In this chapter, we will focus on the following topics:
Using Horizontal Layout
Using Vertical Layout
Using Grid Layout
Using Form Layout
Understanding layouts
As the name suggest, layouts are used for arranging widgets in the desired format. On arranging certain widgets in a layout, certain size and alignment constraints are applied to the widgets automatically. For example, on increasing the size of the window, the widgets in the layout also increase in size to use up the increased space. Similarly, on reducing the size of the window, the widgets in the layout also decrease in size. The following question arises: how does the layout know what the recommended size of the widget is?
Basically, each widget has a property called sizeHint that contains the widget's recommended size. When the window is resized and the layout size also changes, it is through the sizeHint property of the widget that the layout managers know the size requirement of the widget.
In order to apply the size constraints on the widgets, you can make use of the following two properties:
- minimumSize : If the window size is decreased, the widget will still not become smaller than the size specified in the minimumSize property.
- maximumSize : Similarly, if the window is increased, the widget will not become larger than the size specified in the maximumSize property.
When the preceding properties are set, the value specified in the sizeHint property will be overridden.
To arrange widgets in a layout, simply select all the widgets with Ctrl + left-click and click Layout Manager on the toolbar. Another way is to right-click to open the context menu.
From the context menu, you can select the Layout menu option, followed by selecting the desired layout from the submenu that pops up.
On selecting the desired layout, the widgets will be laid out in the selected layout, and the layout will be indicated by a red line around the widgets that is not visible at runtime. To see whether the widgets are properly laid out, you can preview the form by selecting Form , Preview , or Ctrl + R. To break the layout, select Form , Break Layout , enter Ctrl + O , or select the Break Layout icon from the toolbar.
The layouts can be nested.
The following are layout managers provided by Qt Designer:
- Horizontal Layout
- Vertical Layout
- Grid Layout
- Form Layout
Spacers
In order to control spacing between widgets, horizontal and vertical spacers are used.
When a horizontal spacer is kept between the two widgets, the two widgets will be pushed as far left and right as possible. If the window size is increased, the widget sizes will not change and the extra space will be consumed by the spacer. Similarly, when the window size is decreased, the spacer will automatically reduce but the widget sizes will not be changed. Spacers expand to fill empty space and shrink if the space is decreased.
Let's look at the procedure for arranging widgets in a horizontal box layout.
Using Horizontal Layout
A horizontal layout arranges widgets next to each other in a row that is, widgets are horizontally aligned using Horizontal Layout. Let's understand this concept by making an application.
How to do it...
In this application, we will prompt the user to enter an email address and password. The main focus of this recipe is to understand how two pairs of the Label and Line Edit widgets are horizontally aligned. Here is the step-by-step procedure to create this application:
- Let's create an application based on the Dialog without Buttons template and add two QLabel, two QlineEdit, and one QPushButton widget to the form by dragging and dropping two Label , two Line Edit , and a Push Button widget on the form.
- Set the text property of the two Label widgets to Name and Email Address.
- Also, set the text property of the Push Button widget to Submit.
- As the purpose of this application is to understand the layout and nothing else, we won't be setting the objectName property of any of the widgets in the application.
The form will now appear as shown in the following screenshot: - We will be applying Horizontal Layout on each pair of Label and Line Edit widgets. So, click on the Label widget with the text, Name, and, keeping the Ctrl key pressed, click on the Line Edit widget besides it.
You can select more than one widget by using Ctrl + left-click. - After selecting the Label and Line Edit widgets, right-click and select the Layout menu option from the context menu that opens up.
- On selecting the Layout menu option, several submenu options will appear on the screen; select the Layout Horizontally submenu option. Both the Label and Line Edit widgets will be aligned horizontally, as shown in the following screenshot:
- What if you want to break the layout? This is very simple: you can break any layout at any time by just selecting the layout and right-clicking on it. The context menu will pop up; select the Layout menu option from the context menu, followed by the Break Layout submenu option.
- To horizontally align the second pair of Label widgets with the text, Email Address, and the Line Edit widget beside it, repeat the same procedure as mentioned in steps 6 and 7. This pair of Label and Line Edit widgets will also be horizontally aligned, as shown in the following screenshot.
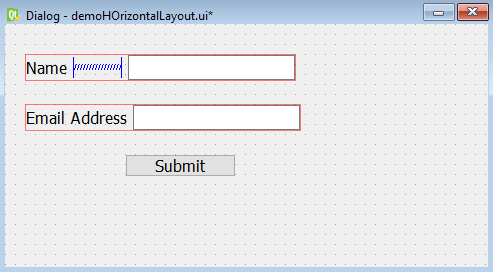
You can see that a red rectangle surrounds the two widgets. This red rectangle is the horizontal layout window: - To create some space between the first pair of Label and Line Edit widgets, drag the Horizontal Spacer widget from the Spacers tab of Widget Box and drop it in between the Label widget with the text, Name, and the Line Edit widget beside it.
The Horizontal Spacer widget initially takes up the default space between the two widgets. The spacers appear as blue springs on the form. - Adjust the size of the horizontal spacer by dragging its nodes to constrain the width of the Line Edit widget, as shown in the following screenshot:
- Select the red rectangle of the Horizontal Layout widget from the first pair of Label and Line Edit widgets, and drag it to the right so that its width becomes equal to the second pair.
- On dragging the Horizontal Layout widget, the horizontal spacer will increase its width to consume the extra blank space between the two widgets, as shown in the following screenshot:
- Save the application as demoHorizontalLayout.ui.
The user interface created with Qt Designer is stored in a .ui file, which is an XML file, and we need to convert it to Python code. To do the conversion, you need to open a Command Prompt window and navigate to the folder where the file is saved, then issue the following command line:
C:\Pythonbook\PyQt5>pyuic5 demoHorizontalLayout.ui -o demoHorizontalLayout.py
# -*- coding: utf-8 -*-

# Form implementation generated from reading ui file 'C:\Users\neo21\Documents\book\qt5\Qt5-Python-GUI-Programming-Cookbook\Qt5-Python-GUI-Programming-Cookbook-master\Qt5-Python-GUI-Programming-Cookbook-master\Chapter06\demoHorizontalLayout.ui'
#
# Created by: PyQt5 UI code generator 5.15.4
#
# WARNING: Any manual changes made to this file will be lost when pyuic5 is
# run again.  Do not edit this file unless you know what you are doing.


from PyQt5 import QtCore, QtGui, QtWidgets


class Ui_Dialog(object):
    def setupUi(self, Dialog):
        Dialog.setObjectName("Dialog")
        Dialog.resize(488, 296)
        self.pushButton = QtWidgets.QPushButton(Dialog)
        self.pushButton.setGeometry(QtCore.QRect(230, 110, 112, 34))
        self.pushButton.setObjectName("pushButton")
        self.widget = QtWidgets.QWidget(Dialog)
        self.widget.setGeometry(QtCore.QRect(64, 36, 341, 27))
        self.widget.setObjectName("widget")
        self.horizontalLayout = QtWidgets.QHBoxLayout(self.widget)
        self.horizontalLayout.setContentsMargins(0, 0, 0, 0)
        self.horizontalLayout.setObjectName("horizontalLayout")
        self.lb2 = QtWidgets.QLabel(self.widget)
        self.lb2.setObjectName("lb2")
        self.horizontalLayout.addWidget(self.lb2)
        spacerItem = QtWidgets.QSpacerItem(148, 20, QtWidgets.QSizePolicy.Expanding, QtWidgets.QSizePolicy.Minimum)
        self.horizontalLayout.addItem(spacerItem)
        self.le1 = QtWidgets.QLineEdit(self.widget)
        self.le1.setObjectName("le1")
        self.horizontalLayout.addWidget(self.le1)
        self.widget1 = QtWidgets.QWidget(Dialog)
        self.widget1.setGeometry(QtCore.QRect(65, 71, 341, 27))
        self.widget1.setObjectName("widget1")
        self.horizontalLayout_2 = QtWidgets.QHBoxLayout(self.widget1)
        self.horizontalLayout_2.setContentsMargins(0, 0, 0, 0)
        self.horizontalLayout_2.setObjectName("horizontalLayout_2")
        self.lb1 = QtWidgets.QLabel(self.widget1)
        self.lb1.setObjectName("lb1")
        self.horizontalLayout_2.addWidget(self.lb1)
        spacerItem1 = QtWidgets.QSpacerItem(70, 0, QtWidgets.QSizePolicy.Expanding, QtWidgets.QSizePolicy.Minimum)
        self.horizontalLayout_2.addItem(spacerItem1)
        self.le2 = QtWidgets.QLineEdit(self.widget1)
        self.le2.setObjectName("le2")
        self.horizontalLayout_2.addWidget(self.le2)

        self.retranslateUi(Dialog)
        QtCore.QMetaObject.connectSlotsByName(Dialog)

    def retranslateUi(self, Dialog):
        _translate = QtCore.QCoreApplication.translate
        Dialog.setWindowTitle(_translate("Dialog", "Dialog"))
        self.pushButton.setText(_translate("Dialog", "Submit"))
        self.lb2.setText(_translate("Dialog", "Name"))
        self.lb1.setText(_translate("Dialog", "Email Address"))


if __name__ == "__main__":
    import sys
    app = QtWidgets.QApplication(sys.argv)
    Dialog = QtWidgets.QDialog()
    ui = Ui_Dialog()
    ui.setupUi(Dialog)
    Dialog.show()
    sys.exit(app.exec_())
How it works...
You can see in the code that a Line Edit widget with the default objectName property, lineEdit, and a Label widget with the default objectName property as label are placed on the form. Both the Line Edit and Label widgets are horizontally aligned using the Horizontal Layout widget. The Horizontal Layout widget has the default objectName property, horizontalLayout. On aligning the Label and Line Edit widgets, the horizontal space between the two widgets is reduced. So, a spacer is kept between the Label and Line Edit widgets. The second pair, Label with the default objectName property label_2 and the Line Edit widget with the default objectName property lineEdit_2, are horizontally aligned by Horizontal Layout with the default objectName property, horizontalLayout_2.
On running the application, you will find that the two pairs of Label and Line Edit widgets are horizontally aligned, as shown in the following screenshot:
Using Vertical Layout
Vertical Layout arranges the selected widgets vertically, in a column one below the other.
In the following application, you will learn the process of laying widgets in a vertical layout.

How to do it...
In this application, we will prompt the user to enter a name and email address. The labels and textboxes for entering names and email addresses, along with the submit button, will be arranged vertically one below the other via Vertical Layout. Here are the steps to create the application:
- Launch Qt Designer and create an application based on the Dialog without Buttons template, then add two QLabel, two QlineEdit, and one QPushButton widget to the form by dragging and dropping two Label , two Line Edit , and one Push Button widget onto the form.
- Set the text property of the two Label widgets to Name and Email Address.
- Set the text property of the Push Button widget to Submit. Because the purpose of this application is to understand the layout and nothing else, we won't be setting the objectName property of any of the widgets in the application. The form will now appear as shown in the following screenshot:
- Before the application of Vertical Layout on the widgets, we need to align the widgets horizontally. So, we will apply the Horizontal Layout widget on each pair of Label and Line Edit widgets. So, click the Label widget with the text Name and, keeping the Ctrl key pressed, click on the Line Edit widget besides it.
- After selecting the Label and Line Edit widgets, right-click the mouse button and select the Layout menu option from the context menu that opens up.
- On selecting the Layout menu option, several submenu options will appear on the screen. Select the Layout Horizontally submenu option. Both the Label and Line Edit widgets will be aligned horizontally.
- To horizontally align the second pair of Label with the text, Email Address, and the Line Edit widget beside it, repeat the same procedure as mentioned in the previous steps, 5 and 6. You can see that a red rectangle surrounds the two widgets. This red rectangle is the horizontal layout window.
- To create some space between the first pair of Label and Line Edit widgets, drag the Horizontal Spacer widget from the Spacers tab of Widget Box and drop it in between the Label widget with the text, Name, and the Line Edit widget besides it. The horizontal spacer will initially take up the default space between the two widgets.
- Select the red rectangle of the Horizontal Layout widget from the first pair of Label and Line Edit widgets, and drag it to the right so that its width becomes equal to the second pair.
- On dragging the Horizontal Layout widget, the horizontal spacer will increase its width to consume the extra blank space between the two widgets, as shown in the following screenshot:
- Now, select three things: the first Horizontal Layout window, the second Horizontal Layout window, and the Submit button. Keep the Ctrl key pressed during these multiple selections.
- Once these three things are selected, right-click to open the context menu.
- From the context menu, select the Layout menu option, followed by the Layout Vertically submenu option. The three items will be aligned vertically, and the width of the Submit button will be increased to match the width of the widest layout, as shown in the following screenshot:
- You can also select the Layout Vertically icon from the toolbar to arrange the widgets in a vertical layout.
- If you want to control the width of the Submit button, you can use the minimumSize and maximumSize properties of this widget. You will notice that the vertical space between the two horizontal layouts is greatly reduced.
- To create some space between the two horizontal layouts, drag the Vertical Spacer widget from the Spacers tab of Widget Box and drop it in between the two horizontal layouts.
The vertical spacer will initially take up the default space between the two horizontal layouts - To create vertical space between the second horizontal layout and the Submit button, drag the vertical spacer and drop it between the second horizontal layout and the Submit button.
- Select the red rectangle of Vertical Layout and drag it down to increase its height.
- On dragging the Vertical Layout widget, the vertical spacer will increase its height to consume the extra blank space between the two horizontal layouts and the Submit button, as shown in the following screenshot:
- Save the application as demoverticalLayout.ui.
As we know that the user interface created with Qt Designer is stored in a .ui file, which is an XML file, it needs to be converted into Python code. To do the conversion, you need to open a Command Prompt window and navigate to the folder where the file is saved, then
issue the following command:
C:PyQt5>pyuic5 demoverticalLayout.ui -o demoverticalLayout.py
The Python script file, demoverticalLayout.py, may have the following code:
# -*- coding: utf-8 -*-

# Form implementation generated from reading ui file 'C:\Users\neo21\Documents\book\qt5\Qt5-Python-GUI-Programming-Cookbook\Qt5-Python-GUI-Programming-Cookbook-master\Qt5-Python-GUI-Programming-Cookbook-master\Chapter06\demoVerticalLayout.ui'
#
# Created by: PyQt5 UI code generator 5.15.4
#
# WARNING: Any manual changes made to this file will be lost when pyuic5 is
# run again.  Do not edit this file unless you know what you are doing.


from PyQt5 import QtCore, QtGui, QtWidgets


class Ui_Dialog(object):
    def setupUi(self, Dialog):
        Dialog.setObjectName("Dialog")
        Dialog.resize(437, 214)
        self.widget = QtWidgets.QWidget(Dialog)
        self.widget.setGeometry(QtCore.QRect(64, 36, 311, 141))
        self.widget.setObjectName("widget")
        self.verticalLayout = QtWidgets.QVBoxLayout(self.widget)
        self.verticalLayout.setContentsMargins(0, 0, 0, 0)
        self.verticalLayout.setObjectName("verticalLayout")
        self.horizontalLayout = QtWidgets.QHBoxLayout()
        self.horizontalLayout.setObjectName("horizontalLayout")
        self.lb2 = QtWidgets.QLabel(self.widget)
        self.lb2.setObjectName("lb2")
        self.horizontalLayout.addWidget(self.lb2)
        spacerItem = QtWidgets.QSpacerItem(148, 20, QtWidgets.QSizePolicy.Expanding, QtWidgets.QSizePolicy.Minimum)
        self.horizontalLayout.addItem(spacerItem)
        self.le1 = QtWidgets.QLineEdit(self.widget)
        self.le1.setObjectName("le1")
        self.horizontalLayout.addWidget(self.le1)
        self.verticalLayout.addLayout(self.horizontalLayout)
        spacerItem1 = QtWidgets.QSpacerItem(20, 40, QtWidgets.QSizePolicy.Minimum, QtWidgets.QSizePolicy.Expanding)
        self.verticalLayout.addItem(spacerItem1)
        self.horizontalLayout_2 = QtWidgets.QHBoxLayout()
        self.horizontalLayout_2.setObjectName("horizontalLayout_2")
        self.lb1 = QtWidgets.QLabel(self.widget)
        self.lb1.setObjectName("lb1")
        self.horizontalLayout_2.addWidget(self.lb1)
        spacerItem2 = QtWidgets.QSpacerItem(70, 0, QtWidgets.QSizePolicy.Expanding, QtWidgets.QSizePolicy.Minimum)
        self.horizontalLayout_2.addItem(spacerItem2)
        self.le2 = QtWidgets.QLineEdit(self.widget)
        self.le2.setObjectName("le2")
        self.horizontalLayout_2.addWidget(self.le2)
        self.verticalLayout.addLayout(self.horizontalLayout_2)
        spacerItem3 = QtWidgets.QSpacerItem(20, 40, QtWidgets.QSizePolicy.Minimum, QtWidgets.QSizePolicy.Expanding)
        self.verticalLayout.addItem(spacerItem3)
        self.pushButton = QtWidgets.QPushButton(self.widget)
        self.pushButton.setObjectName("pushButton")
        self.verticalLayout.addWidget(self.pushButton)

        self.retranslateUi(Dialog)
        QtCore.QMetaObject.connectSlotsByName(Dialog)

    def retranslateUi(self, Dialog):
        _translate = QtCore.QCoreApplication.translate
        Dialog.setWindowTitle(_translate("Dialog", "Dialog"))
        self.lb2.setText(_translate("Dialog", "Name"))
        self.lb1.setText(_translate("Dialog", "Email Address"))
        self.pushButton.setText(_translate("Dialog", "Submit"))


if __name__ == "__main__":
    import sys
    app = QtWidgets.QApplication(sys.argv)
    Dialog = QtWidgets.QDialog()
    ui = Ui_Dialog()
    ui.setupUi(Dialog)
    Dialog.show()
    sys.exit(app.exec_())
How it works...
You can see in the code that a Line Edit widget with the default objectName lineEdit property and the Label widget with the default objectName label property are placed on the form and are horizontally aligned using the horizontal layout with the default objectName property, horizontalLayout. On aligning the Label and Line Edit widgets, the horizontal space between the two widgets is reduced. So, a spacer is kept between the Label and Line Edit widgets. The second pair, the Label widget with the default objectName label_2 property and the Line Edit widget with the default objectName lineEdit_2 property, are horizontally aligned using the horizontal layout
with the default objectName horizontalLayout_2 property. Then, the first two horizontal layouts and the Submit button with the default objectName pushButton property are vertically aligned using the Vertical Layout widget with the default objectName property, verticalLayout. The horizontal space between the first pair of Label and Line Edit widgets is increased by placing a horizontal spacer between them. Similarly, the vertical space between the two horizontal layouts is increased by placing a vertical spacer called spacerItem1 between them. Also, a vertical spacer called spacerItem2 is placed between the second horizontal layout and the Submit button to increase the vertical space between them.
Using Grid Layout
Grid Layout arranges widgets in a stretchable grid. To understand how the Gird Layout widget arranges the widgets, let's create an application.

How to do it...
In this application, we will make a simple sign-in form, prompting the user to enter an email address and password, followed by clicking the Submit button. Below the Submit button, there will be two buttons, Cancel and Forgot Password. The application will help you understand how these widgets are arranged in a grid pattern. Following are the steps to create this application:
- Launch Qt Designer and create an application based on the Dialog without Buttons template, then add two QLabel, two QlineEdit, and three
QPushButton widgets to the form by dragging and dropping two Label , two Line Edit , and three Push Button widgets on the form. - Set the text property of the two Label widgets to Name and Email Address.
- Set the text property of the three Push Button widgets to Submit, Cancel, and Forgot Password.
- Because the purpose of this application is to understand the layout and nothing else, we won't be setting the objectName property of any of the widgets in the application.
- To increase the vertical space between the two Line Edit widgets, drag the Vertical Spacer widget from the Spacers tab of Widget Box and drop it in between the two Line Edit widgets. The vertical spacer will initially take up the blank space between the two Line Edit widgets.
- To create vertical space between the second Line Edit widget and the Submit button, drag the Vertical Spacer widget and drop it between them.
The application will appear as shown in the following screenshot: - Select all the widgets on the form by pressing the Ctrl key and clicking all the widgets on the form.
- After selecting all the widgets, right-click the mouse button to open the context menu.
- From the context menu, select the Layout menu option, followed by selecting the Layout in a Grid submenu option.
The widgets will be aligned in the grid as shown in the following screenshot: - To increase the vertical space between the Submit and Cancel push buttons, drag the Vertical Spacer widget from the Spacers tab of Widget Box and drop it in between them.
- To increase the horizontal space between the Cancel and Forgot Password push buttons, drag the Horizontal Spacer widget from the Spacers tab and drop it in between them.
The form will now appear as shown in the following screenshot: - Save the application by name as demoGridLayout.ui.
The user interface created with Qt Designer is stored in a .ui file, which is an XML file, and needs to be converted into Python code. To do the conversion, you need to open a Command Prompt window and navigate to the folder where the file is saved, then issue the
following command:
C:PyQt5>pyuic5 demoGridLayout.ui -o demoGridLayout.py
The Python script file demoGridLayout.py may have the following code:
# -*- coding: utf-8 -*-

# Form implementation generated from reading ui file 'C:\Users\neo21\Documents\book\qt5\Qt5-Python-GUI-Programming-Cookbook\Qt5-Python-GUI-Programming-Cookbook-master\Qt5-Python-GUI-Programming-Cookbook-master\Chapter06\demoGridLayout.ui'
#
# Created by: PyQt5 UI code generator 5.15.4
#
# WARNING: Any manual changes made to this file will be lost when pyuic5 is
# run again.  Do not edit this file unless you know what you are doing.


from PyQt5 import QtCore, QtGui, QtWidgets


class Ui_Dialog(object):
    def setupUi(self, Dialog):
        Dialog.setObjectName("Dialog")
        Dialog.resize(544, 293)
        self.widget = QtWidgets.QWidget(Dialog)
        self.widget.setGeometry(QtCore.QRect(61, 36, 429, 221))
        self.widget.setObjectName("widget")
        self.gridLayout = QtWidgets.QGridLayout(self.widget)
        self.gridLayout.setContentsMargins(0, 0, 0, 0)
        self.gridLayout.setObjectName("gridLayout")
        self.verticalLayout = QtWidgets.QVBoxLayout()
        self.verticalLayout.setObjectName("verticalLayout")
        self.horizontalLayout = QtWidgets.QHBoxLayout()
        self.horizontalLayout.setObjectName("horizontalLayout")
        self.lb2 = QtWidgets.QLabel(self.widget)
        self.lb2.setObjectName("lb2")
        self.horizontalLayout.addWidget(self.lb2)
        spacerItem = QtWidgets.QSpacerItem(148, 20, QtWidgets.QSizePolicy.Expanding, QtWidgets.QSizePolicy.Minimum)
        self.horizontalLayout.addItem(spacerItem)
        self.le1 = QtWidgets.QLineEdit(self.widget)
        self.le1.setObjectName("le1")
        self.horizontalLayout.addWidget(self.le1)
        self.verticalLayout.addLayout(self.horizontalLayout)
        spacerItem1 = QtWidgets.QSpacerItem(20, 40, QtWidgets.QSizePolicy.Minimum, QtWidgets.QSizePolicy.Expanding)
        self.verticalLayout.addItem(spacerItem1)
        self.horizontalLayout_2 = QtWidgets.QHBoxLayout()
        self.horizontalLayout_2.setObjectName("horizontalLayout_2")
        self.lb1 = QtWidgets.QLabel(self.widget)
        self.lb1.setObjectName("lb1")
        self.horizontalLayout_2.addWidget(self.lb1)
        spacerItem2 = QtWidgets.QSpacerItem(70, 0, QtWidgets.QSizePolicy.Expanding, QtWidgets.QSizePolicy.Minimum)
        self.horizontalLayout_2.addItem(spacerItem2)
        self.le2 = QtWidgets.QLineEdit(self.widget)
        self.le2.setObjectName("le2")
        self.horizontalLayout_2.addWidget(self.le2)
        self.verticalLayout.addLayout(self.horizontalLayout_2)
        spacerItem3 = QtWidgets.QSpacerItem(20, 40, QtWidgets.QSizePolicy.Minimum, QtWidgets.QSizePolicy.Expanding)
        self.verticalLayout.addItem(spacerItem3)
        self.pushButton = QtWidgets.QPushButton(self.widget)
        self.pushButton.setObjectName("pushButton")
        self.verticalLayout.addWidget(self.pushButton)
        self.gridLayout.addLayout(self.verticalLayout, 0, 0, 1, 2)
        self.pushButton_3 = QtWidgets.QPushButton(self.widget)
        self.pushButton_3.setObjectName("pushButton_3")
        self.gridLayout.addWidget(self.pushButton_3, 2, 1, 1, 1)
        self.pushButton_2 = QtWidgets.QPushButton(self.widget)
        self.pushButton_2.setObjectName("pushButton_2")
        self.gridLayout.addWidget(self.pushButton_2, 2, 0, 1, 1)
        spacerItem4 = QtWidgets.QSpacerItem(20, 87, QtWidgets.QSizePolicy.Minimum, QtWidgets.QSizePolicy.Expanding)
        self.gridLayout.addItem(spacerItem4, 1, 0, 1, 1)

        self.retranslateUi(Dialog)
        QtCore.QMetaObject.connectSlotsByName(Dialog)

    def retranslateUi(self, Dialog):
        _translate = QtCore.QCoreApplication.translate
        Dialog.setWindowTitle(_translate("Dialog", "Dialog"))
        self.lb2.setText(_translate("Dialog", "Name"))
        self.lb1.setText(_translate("Dialog", "Email Address"))
        self.pushButton.setText(_translate("Dialog", "Submit"))
        self.pushButton_3.setText(_translate("Dialog", "Forgot Password"))
        self.pushButton_2.setText(_translate("Dialog", "Cancel"))


if __name__ == "__main__":
    import sys
    app = QtWidgets.QApplication(sys.argv)
    Dialog = QtWidgets.QDialog()
    ui = Ui_Dialog()
    ui.setupUi(Dialog)
    Dialog.show()
    sys.exit(app.exec_())
How it works...
You can see in the code that a Line Edit widget with the default objectName lineEdit property and a Label widget with the default objectName label property are placed on the form. Similarly, a second pair, a Label widget with the default objectName label_2 property and a Line Edit widget with the default objectName lineEdit_2 property are placed on the form. The vertical space between the two pairs of Label and Line Edit widgets is increased by placing a vertical spacer called spacerItem1 between them. A Push Button widget with the text, Submit, and objectName , pushButton, is also placed on the form. Again, the vertical space between the second Label with objectName label_2 and the Push Button widget with objectName pushButton is increased by placing a vertical spacer called spacerItem2 between them. Two more push buttons with the default objectName properties, pushButton_2 and pushButton_3, are placed on the form. All the widgets are arranged in a stretchable grid layout with the default object name, gridLayout. The vertical space between the two push buttons with the object names, pushButton and pushButton_2, is increased by placing a vertical spacer called spacerItem3 between them.
Using Form Layout
Form Layout is considered to be the most demanding layout in almost all applications. This two-column layout is required when displaying products, services, and so on, as well as in accepting feedback or other information from users or customers.
Getting ready
The form layout arranges the widgets in a two-column format. Like a sign-up form of any site or any order form, where the form is divided into two columns, the column on the left shows labels or text and the column on the right shows empty textboxes. Similarly, the form layout arranges the widgets in the left and right columns. Let's understand the concept of Form Layout using an application.

How to do it...
In this application, we will make two columns, one for displaying messages and the other column for accepting input from the user. Besides two pairs of Label and Line Edit widgets for taking input from the user, the application will have two buttons that will also be arranged in the form layout. Here are the steps to create an application that arranges widgets using Form Layout :
- Launch Qt Designer and create an application based on the Dialog without Buttons template, then add two QLabel, two QLineEdit, and two
QPushButton widgets to the form by dragging and dropping two Label , two Line Edit , and two PushButton widgets on the form. - Set the text property of the two Label widgets to Name and Email Address.
- Set the text property of the two Push Button widgets to Cancel and Submit.
- Because the purpose of this application is to understand the layout and nothing else, we won't be setting the objectName property of any of the widgets in the application.
The application will appear as shown in the following screenshot: - Select all the widgets on the form by pressing the Ctrl key and clicking all the widgets on the form.
- After selecting all the widgets, right-click the mouse button to open the context menu.
- From the context menu, select the Layout menu option, followed by selecting the Layout in a Form Layout submenu option.
The widgets will be aligned in the Form Layout widget, as shown in the following screenshot: - To increase the vertical space between the two Line Edit widgets, drag the Vertical Spacer widget from the Spacers tab of Widget Box and drop it in between them.
- To increase the vertical space between the second Line Edit widget and the Submit button, drag the Vertical Spacer widget from the Spacers tab and drop it in between them.
- Select the red rectangle of the Form Layout widget and drag it vertically to increase its height. The two vertical spacers will automatically increase in height to use the empty space in between the widgets.
The form will now appear as shown in the following screenshot: - Save the application as demoFormLayout.ui.
The user interface created with Qt Designer is stored in a .ui file, which is an XML file, and needs to be converted into Python code. To do the conversion, you need to open a Command Prompt window and navigate to the folder where the file is saved, then issue the
following command:
C:PyQt5>pyuic5 demoFormLayout.ui -o demoFormLayout.py
The Python script file, demoFormLayout.py, may have the following code:
# -*- coding: utf-8 -*-

# Form implementation generated from reading ui file 'C:\Users\neo21\Documents\book\qt5\Qt5-Python-GUI-Programming-Cookbook\Qt5-Python-GUI-Programming-Cookbook-master\Qt5-Python-GUI-Programming-Cookbook-master\Chapter06\demoFormLayout.ui'
#
# Created by: PyQt5 UI code generator 5.15.4
#
# WARNING: Any manual changes made to this file will be lost when pyuic5 is
# run again.  Do not edit this file unless you know what you are doing.


from PyQt5 import QtCore, QtGui, QtWidgets


class Ui_Dialog(object):
    def setupUi(self, Dialog):
        Dialog.setObjectName("Dialog")
        Dialog.resize(471, 240)
        self.widget = QtWidgets.QWidget(Dialog)
        self.widget.setGeometry(QtCore.QRect(66, 44, 337, 151))
        self.widget.setObjectName("widget")
        self.formLayout = QtWidgets.QFormLayout(self.widget)
        self.formLayout.setContentsMargins(0, 0, 0, 0)
        self.formLayout.setObjectName("formLayout")
        self.lb2 = QtWidgets.QLabel(self.widget)
        self.lb2.setObjectName("lb2")
        self.formLayout.setWidget(0, QtWidgets.QFormLayout.LabelRole, self.lb2)
        self.le1 = QtWidgets.QLineEdit(self.widget)
        self.le1.setObjectName("le1")
        self.formLayout.setWidget(0, QtWidgets.QFormLayout.FieldRole, self.le1)
        self.lb1 = QtWidgets.QLabel(self.widget)
        self.lb1.setObjectName("lb1")
        self.formLayout.setWidget(1, QtWidgets.QFormLayout.LabelRole, self.lb1)
        self.le2 = QtWidgets.QLineEdit(self.widget)
        self.le2.setObjectName("le2")
        self.formLayout.setWidget(1, QtWidgets.QFormLayout.FieldRole, self.le2)
        self.pushButton = QtWidgets.QPushButton(self.widget)
        self.pushButton.setObjectName("pushButton")
        self.formLayout.setWidget(2, QtWidgets.QFormLayout.LabelRole, self.pushButton)
        self.pushButton_2 = QtWidgets.QPushButton(self.widget)
        self.pushButton_2.setObjectName("pushButton_2")
        self.formLayout.setWidget(3, QtWidgets.QFormLayout.LabelRole, self.pushButton_2)
        self.pushButton_3 = QtWidgets.QPushButton(self.widget)
        self.pushButton_3.setObjectName("pushButton_3")
        self.formLayout.setWidget(3, QtWidgets.QFormLayout.FieldRole, self.pushButton_3)

        self.retranslateUi(Dialog)
        QtCore.QMetaObject.connectSlotsByName(Dialog)

    def retranslateUi(self, Dialog):
        _translate = QtCore.QCoreApplication.translate
        Dialog.setWindowTitle(_translate("Dialog", "Dialog"))
        self.lb2.setText(_translate("Dialog", "Name"))
        self.lb1.setText(_translate("Dialog", "Email Address"))
        self.pushButton.setText(_translate("Dialog", "Submit"))
        self.pushButton_2.setText(_translate("Dialog", "Cancel"))
        self.pushButton_3.setText(_translate("Dialog", "Forgot Password"))


if __name__ == "__main__":
    import sys
    app = QtWidgets.QApplication(sys.argv)
    Dialog = QtWidgets.QDialog()
    ui = Ui_Dialog()
    ui.setupUi(Dialog)
    Dialog.show()
    sys.exit(app.exec_())
How it works...
You can see in the code that a Line Edit widget with the default objectName lineEdit property and a Label widget with the default objectName labels property is placed on the form. Similarly, a second pair, a Label widget with the default objectName label_2 property and a Line Edit widget with the default objectName lineEdit_2 property are placed on the form. The two push buttons with the object names, pushButton and pushButton_2, are placed on the form. All six widgets are selected and aligned in a two-column format using the Form Layout widget with the default objectName formLayout property.
On running the application, you will find that the two pairs of Label and Line Edit widgets, and the Cancel and Submit buttons, are arranged in a Form Layout widget as shown in the following screenshot:
'Qt5 Python GUI Programming Cookbook' 카테고리의 다른 글
| Running Python Scripts on Android and iOS (0) | 2023.02.28 |
|---|---|
| Using Google Maps (0) | 2023.02.28 |
| Implementing Animation (0) | 2023.02.28 |
| Using Graphics (0) | 2023.02.28 |
| Database Handling (0) | 2023.02.28 |


댓글