In this chapter, you will learn to run Python scripts on Android devices as well as on iOS. You will learn about the following topics:
- Copying scripts from PC to Android devices
- Prompting for a username and displaying a welcome message
- Understanding different buttons in a Dialog box
- Performing single selection from a list
- Performing multiple selections from a list
- Displaying a Date Picker dialog
- Capturing images using a camera
- Making an Android device speak a text input
- Creating a cross-platform Python script using Kivy
- Packaging a Python script into the Android APK using Buildozer
- Packaging Python script for iOS
In order to run Python scripts on Android devices, we will be making use of QPython3.
Introduction
What is QPython3? QPython3 is a script engine that enables you to run Python scripts on Android devices. Basically, it provides you with Python on Android as it contains the Python interpreter, console, editor, and the SL4A library, making it possible for you to type, edit, debug, and run Python scripts on Android devices. Not only can you run Python scripts on Android devices, but you can access device sensors too. You can even access Android APIs, such as SMS, GPS, NFC, and Bluetooth.
So, let's download QPython3 from the Google Play store and install it. When QPython3 is launched on your Android device, it will appear as shown in the following screenshot:
The first screen shows following several tools:
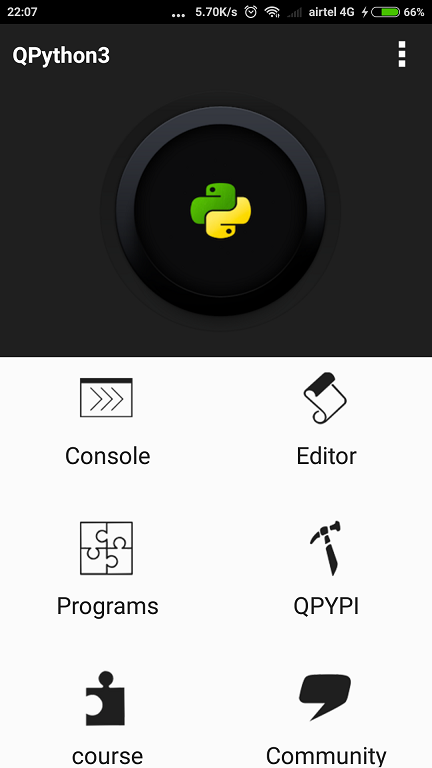
- Console: This opens the Python interpreter, allowing us to type Python commands and execute them directly
- Editor: This opens up a text editor where you can write, save, debug, and run code
- Programs: This is used to find your scripts and projects on your device
- QPYPI: This opens the QPYPI page in the browser, allowing you to install the packages listed there
- course: This opens the page showing links for courses and tutorials on Kivy, Kivy on QPython, QSL4A Android Script Library, and much more
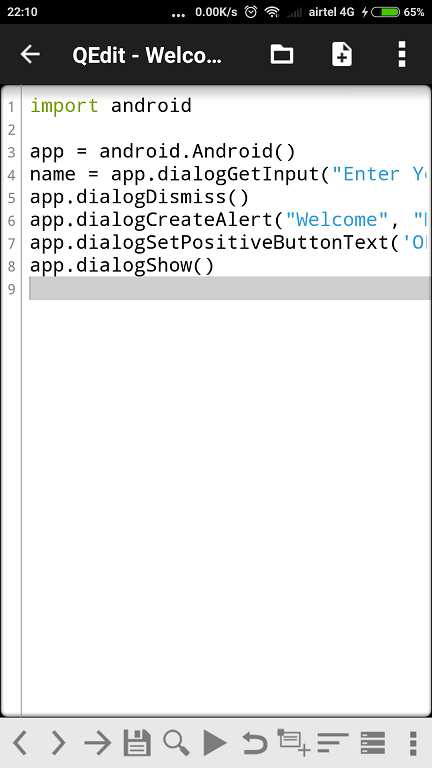
- Community: This opens the Community page, where you can ask QPython questions and find answers Editor is the place where you will be spending most of your time. On clicking the Editor icon, the Editor window will open, as shown in the following screenshot. The Editor window has several icons at the top as well as at the bottom. At the top are the following two icons:
- QEdit - Open File: This opens the existing folder on the device, enabling you to open any existing Python script.
- New ...: When you click this icon, you will be asked what kind of file you want to open, that is, whether it is Blank file, Script, WebApp (Project), ConsoleApp (Project), or KivyApp (Project). Select the desired option and create the file. After creating the file, you will be sent back to the Editor screen to type the content for the newly created file.
The icons at the bottom of the Editor screen are used for saving the file, searching in the file, running the file, undoing any action, running the Save as ... command to save the current file by another name, and so on:
Copying scripts from PC to Android devices
To run QPython scripts on an Android device, either you can type them directly into QPython's editor on the device, or you can type on your PC and then copy them to the Android device for execution. We’ll walk through the process of copying from PC to Android.
How to do it
Here is the step-by-step procedure to connect an Android device with a PC and copy the QPython script to it:
- Connect your Android phone with your PC using a USB cable.
- When you connect your Android phone to the PC, several USB options will appear; select the Turn ON the USB debugging option.
- By turning USB debugging on, you can execute different commands on the Android device and run different tools as well.
- To confirm that the Android device is connected properly and is recognized by your PC, use the adb devices command, as shown here:
C:\Users\Bintu>adb devices
The following output confirms that my Android device is recognized by my PC:
List of devices attached d56ab82e device
Android Debug Bridge (ADB) is a command-line utility that is bundled with the Android SDK. Using ADB, you can interact with your device through your PC. You can install and run apps, run shell commands, copy and delete files, and much more.
- In order to see all the existing files in your Android device, run the adb shell command. The adb shell command will open the interactive Linux command- line shell on your Android device and you will get the $ prompt as follows:
C:\Users\Bintu>adb shell shell@kenzo:/ $
The preceding $ prompt shows that you are no more on your PC but there are on your Android device. On installing QPython on your device, a directory will be created named qpython on the SD card of your device. You can change directory to SD card and list the files in it, as shown here:
shell@kenzo:/ $ cd sdcardshell@kenzo:/sdcard $ cd qpython shell@kenzo:/sdcard/qpython $ ls -l
drwxrwx--x root sdcard_rw 2018-06-04 12:08 cache drwxrwx--x root sdcard_rw 2018-06-04 12:09 lib drwxrwx--x root sdcard_rw 2018-06-04 12:11 projects3 drwxrwx--x root sdcard_rw 2018-06-07 20:43 scripts3 drwxrwx--x root sdcard_rw 2018-06-04 12:08 snippets3
- To keep our Python scripts in a separate folder, we will create a new directory named bintuscripts in the qpython folder, as shown here:
shell@kenzo:/sdcard/qpython $ mkdir bintuscripts
- To exit from the interactive Linux command-line shell on your Android device, write the exit command followed by hitting the Enter key:
shell@kenzo:/sdcard/qpython $ exit
With the preceding command line, you will be back to the Command Prompt of your PC.
- We're assuming that you have a folder on your PC called QPythonScripts that contains certain Python scripts and you want to copy or push a Python script from your PC into your Android device.
- The following is the command line to be used in order to copy a Python script called WelcomeMessage.py from the current folder of your PC into the folder called bintuscripts in the SD card of your Android device:
C:\Users\Bintu\QPythonScripts>adb push WelcomeMessage.py /sdcard/qpython/bintuscripts
If the preceding command line is executed successfully, you get the following message:
WelcomeMessage.py: 1 file pushed. 0.0 MB/s (333 bytes in 0.016s)
- Once copied to the Android device, you can launch QPython3 on your Android device; open the Editor page, followed by opening the script that you copied to the device.
- You can run the script to see the output.
- In order to take a screenshot of the script run on your Android device and copy the screenshot to your PC, execute the following command line:
C:\Users\Bintu\QPythonScripts>adb shell screencap -p /sdcard/screencap.png && adb pull /sdcard/screencap.png
The preceding command will save the screenshot of the Android screen to the SD card with the name screencap.png (you can give it any name), and this pulls that PNG file from the SD card to your current folder of your PC and saves it with the same name.
If this command is executed successfully, you get the following message confirming that the screenshot was successfully copied onto your PC:
/sdcard/screencap.png: 1 file pulled. 0.8 MB/s (12491 bytes in 0.016s)
Prompting for a username and displaying a welcome message
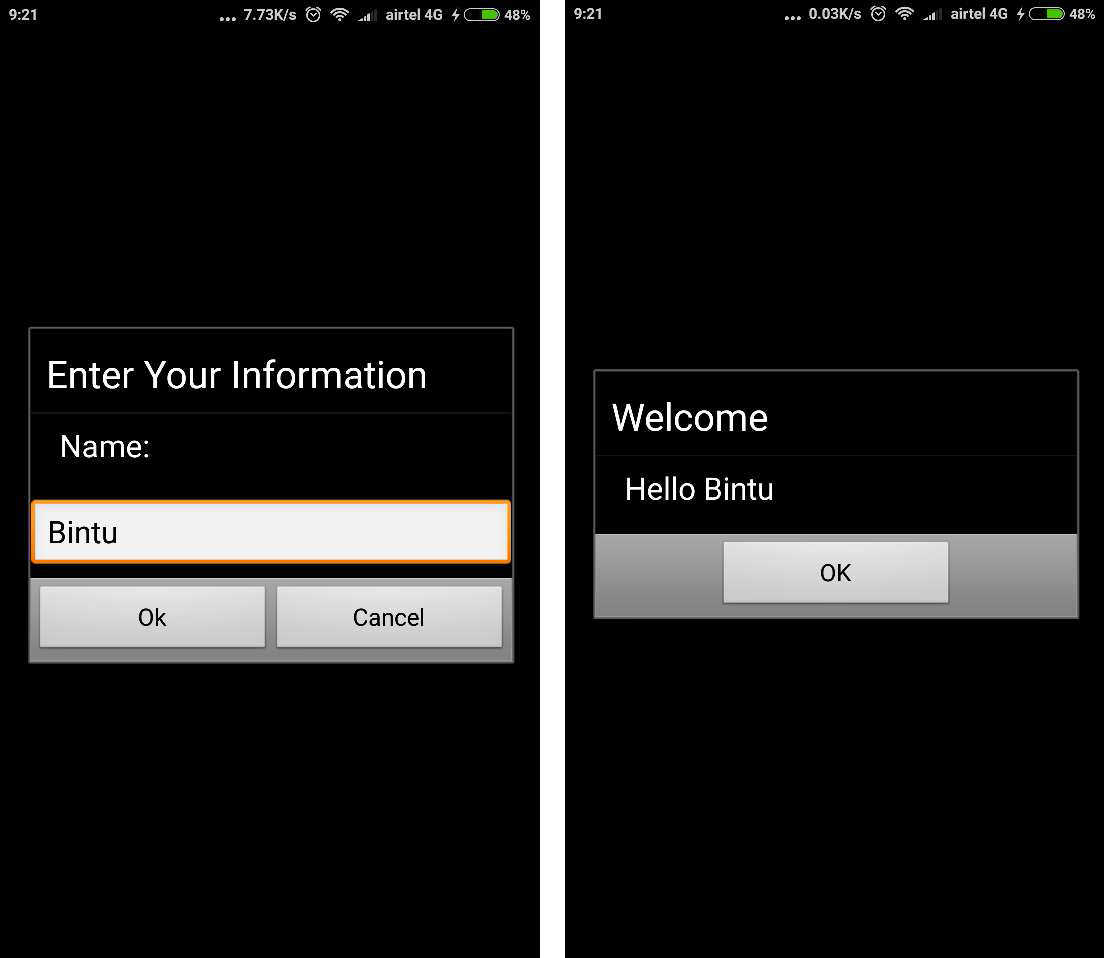
This recipe will prompt the user to enter a name, and when the user clicks the OK button after entering a name, they are greeted with an alert box with the text Hello, followed by the name entered by the user.
How to do it...
In this recipe, we will be making use of the following methods:
- dialogGetInput(): This method is used to take input from the user
- app.dialogCreateAlert(): This method is used to greet the user
- app.dialogSetPositiveButtonText(): This method is used to display positive button text and to keep the dialog box visible until the user presses the OK button
Let's take a look at the following steps:
- Type the following code in the Python script WelcomeMessage.py in the current folder:
- Copy or push this Python script into the Android device by using the following command line:
C:\Users\Bintu\QPythonScripts>adb push WelcomeMessage.py /sdcard/qpython/bintuscripts
How it works...
You invoke the Android() method of the android module to create an object called app. It is through this app object that you will communicate with Android. You show a dialog box prompting the user to enter his/her name. The name entered by the user is assigned to the name variable. You invoke the dialogDismiss() method to dismiss the dialog or make it invisible once the user presses the Enter key after entering a name, or presses the OK button.
Thereafter, you welcome the user by displaying an alert box that shows Hello, followed by the name of the user. To keep the alert box visible until the user sees it, a dialog box is displayed with the OK button in it. The welcome message will be visible until the user presses the OK button to close the dialog box.
On running the application, you will find a dialog box asking you to enter your name, as shown in the following left screenshot. After entering a name, when you click
the OK button, you will be greeted with the Hello message, followed by the name entered by you (in the right screenshot). The dialog box displaying the greeting message will remain there until you close the dialog by clicking the OK button, as shown in the following screenshot:
You can even display a welcome message through the Toast() method, as shown in the following statement:
app.makeToast("Welcome", "Hello %s" % name)
The only drawback is that the Toast output vanishes automatically after a specified duration. It doesn't wait for the user to press any key.
Understanding different buttons in a dialog box
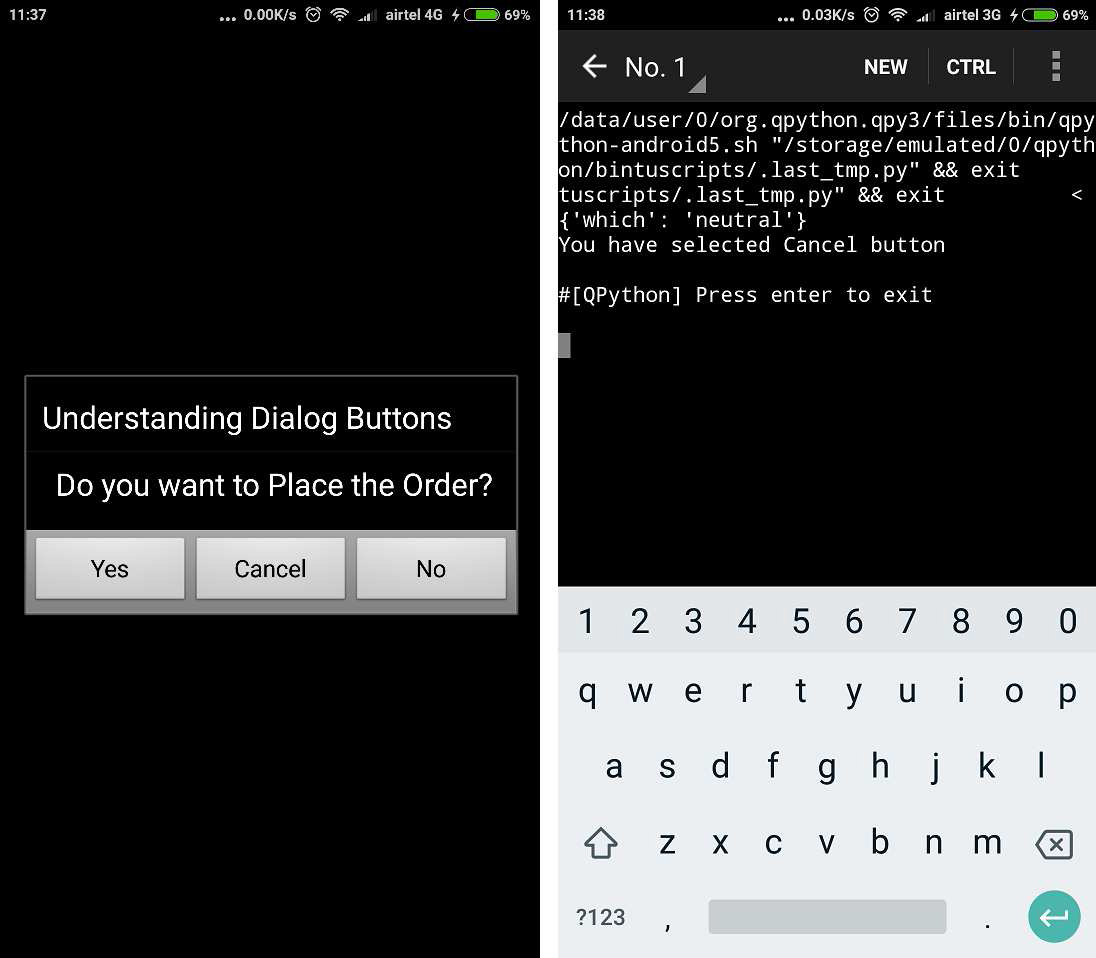
This recipe will display a dialog box with three buttons: Yes, Cancel, and No. When the user clicks a button, the respective message will be displayed, informing you of which button was pressed by the user. The idea is to understand the response generated when any button is pressed and take action accordingly.
How to do it...
In this recipe, we will be making use of the following methods:
- dialogCreateAlert(): This method is used to display a message via a dialog box
- dialogSetPositiveButtonText(): This method is used to display the Yes button in a dialog box
- dialogSetNegativeButtonText(): This method is used to display the No button in a dialog box
- dialogSetNeutralButtonText(): This method is used to display the Cancel button in a dialog box
- dialogGetResponse(): This method is used to take the response from the user via a dialog box
Take a look at the following steps:
- Type the following code in the Python script demoDialog.py in the current folder of your computer:
- Copy or push this Python script into the Android device by using the following command line:
C:\Users\Bintu\QPythonScripts>adb push demoDialog.py /sdcard/qpython/bintuscripts
How it works...
An instance or object called app is created by executing the Android() method of the android module. A dialog box is displayed with the title Understanding Dialog Buttons. The dialog box will display a message, Do you want to Place the Order? Below the message will be three buttons: Yes, No, and Cancel. The Yes button will be displayed by invoking the dialogSetPositiveButtonText() method. Similarly, the No and Cancel buttons will be created by invoking the dialogSetNegativeButtonText() and dialogSetNeutralButtonText() methods, respectively. By invoking the dialogGetResponse() method, you determine the response of the dialog box, that is, you know which button is pressed by the user. The information on the button pressed by the user is assigned to the response array. That is, the which element of the response array stores the information of the button pressed by the user. The which element of the response array will have a positive value if the Yes button is pressed, it will have a negative value if the No button is pressed, and it will have a Neutral value if the Cancel button is pressed. By observing the value assigned to the which element of the response array, the respective message is displayed on the screen.
On running the application, you will get a dialog asking whether you want to place an order. Depending on your choice, you can press the Yes, Cancel, or No button (see the following screenshot, on the left). Assuming you press the Cancel button, the which element of the response array will be assigned a neutral value. The which element is set to pass through the if elif ladder to display a message on the basis of the value assigned to it. The message, You have selected Cancel button, will be displayed (see the following screenshot, on the right):
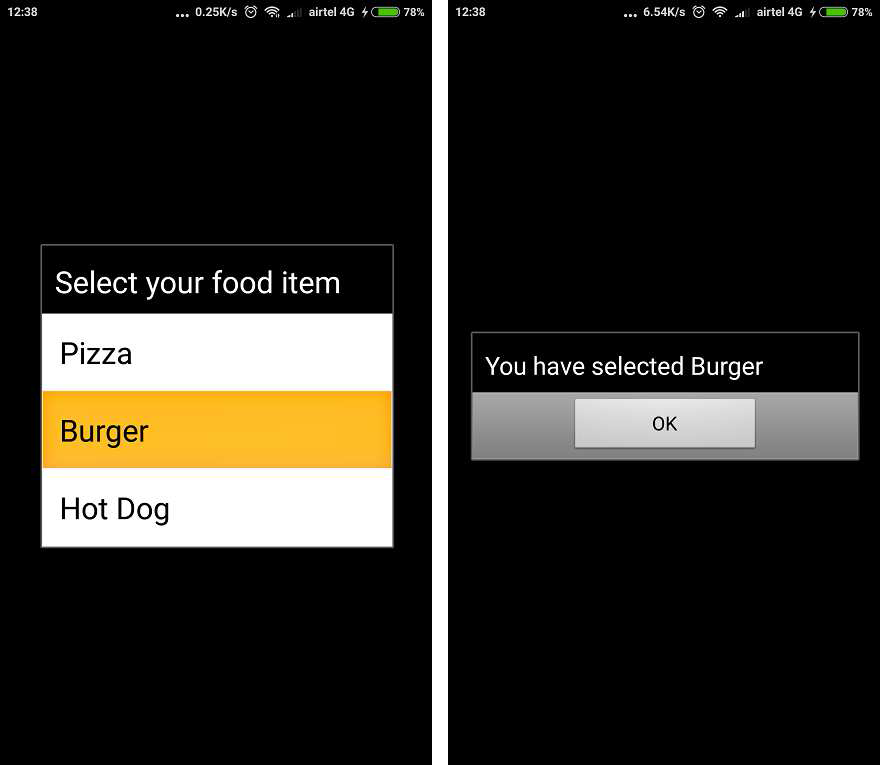
Performing single selection from a list
This recipe will display a dialog box, showing a list of items, allowing the user to select one of them. The name of the selected item will be displayed via another dialog box.
How to do it...
In this recipe, we will be making use of the following methods:
- dialogCreateAlert(): This method is used to display a message via the dialog box
- dialogSetItems(): This method is used to define the array of items to be displayed in the list
- dialogGetResponse(): This method is used to get a response from the user
Take a look at the following steps:
- First type the following code in the Python script demoSingleSelection.py, in the current folder of your computer:
- Copy or push this Python script into the Android device by using the following command:
C:\Users\Bintu\QPythonScripts>adb push demoSingleSelection.py /sdcard/qpython/bintuscripts
How it works...
An object of the Android class is created by the name app. Using the dialogSetItems() method, three food items, Pizza, Burger, and Hot Dog, are displayed in the form of a list in the dialog box. The dialogGetResponse() method is invoked to find the item selected by the user. The user's selection is assigned to the response array and the index value of the food item selected by the user will be assigned to the item element of the response array. The index value in the item element of the response array is accessed and assigned to the selectedResult variable. The value in the selectedResult variable will be 0 if the first food item in the list is selected, 1 if the second food item in the list is selected, and so on. Using the if elif ladder, the value in the selectedResult variable is branched to display the food item selected by the user. The selected food item is displayed via another dialog box. To keep the dialog box visible until the user presses the OK button, the dialog box is accompanied by an OK button. After looking at the selected food item, when the user clicks the OK button, the dialog box goes away.
On running the application, you get a dialog box showing three food items, Pizza, Burger, and Hot Dog, as shown in the following screenshot on the left. On selecting any food item, the selected food item will be displayed via another dialog box, as shown in the following screenshot on the right:
Performing multiple selections from a list
This recipe will show a list of items on an Android device, allowing you to select more than one item from the list, hence enabling multiple selections from the list.
How to do it...
In this recipe, we will be making use of the following methods:
- dialogCreateAlert(): To display a message via the dialog box
- dialogSetMultiChoiceItems(): To define the array of items to be displayed in list format in the dialog for multiple selections
- dialogSetPositiveButtonText(): To display a button in the dialog box to indicate that all selections are complete
- dialogGetSelectedItems(): To get the array of selected items
Take a look at the following steps:
- Type the following code in the Python script demoMultipleSelection.py in the current folder of your computer:
- Copy or push this Python script into the Android device by using the following command:
C:\Users\Bintu\QPythonScripts>adb push demoMultipleSelection.py /sdcard/qpython/bintuscripts
How it works...
An object Android class is created by the name app. A dialog box is created with a message stating select your food items. The dialogSetMultiChoiceItems() method is invoked to display a list of food items, allowing the user to select more than one item. To indicate that the user is done selecting food items, the dialogSetPositiveButtonText() method is invoked to display the Done button that the user can click to state that he/she is done with selecting food items. The user can select any number of food items. The dialogGetSelectedItems() method is invoked to get the list of selected food items and the chosen list is assigned to the response array. The response array is a multidimensional array and at its index location, 1, is a single dimensional array which contains the list of chosen food items. So, the array at the index 1 location from response is accessed and assigned to selectedResult single dimensional array. The length of the selectedResult array determines the number of food items selected by the user. If the user selects two items, their index locations will be stored in the selectedResult array.
For example, if the user selects the first and third food items, then the selectedResult array will contain the values 0 and 2 because the array is zero-based. A for loop is used and every element of the selectedResult array is accessed; depending on its value, the name of the food item is displayed.
On running the application, you get a dialog box showing a list of food items, allowing the user to select more than one food item. Let's assume that the user selects the first and third food item followed by clicking the Done button ( see the below figure on left). The list of selected food items will be displayed, as shown in the following screenshot on the right:

Displaying a Date Picker dialog
In this recipe, you will learn to display a date picker dialog, allowing the user to scroll through days, months, and years to select the desired date.
How to do it...
In this recipe, we will be making use of the following methods:
- dialogCreateDatePicker(): This method is used to display the date with the specified initial date
- dialogGetResponse(): This method is used to get the response, that is, the selection made by the user
- dialogDismiss(): This method is used to make the dialog box invisible after a selection been made by the user
- get("day"): This method is used to access the day in the Date type object
- get("month"): This method is used to access the month in the Date type object
- get("year"): This method is used to access the year in the Date type object
Let's take a look at the following steps:
- Type the following code in the Python script demoDateSelection.py in the current folder of your computer:
- Copy or push this Python script into the Android device by using the following command line:
C:\Users\Bintu\QPythonScripts>adb push demoDateSelection.py /sdcard/qpython/bintuscripts
How it works...
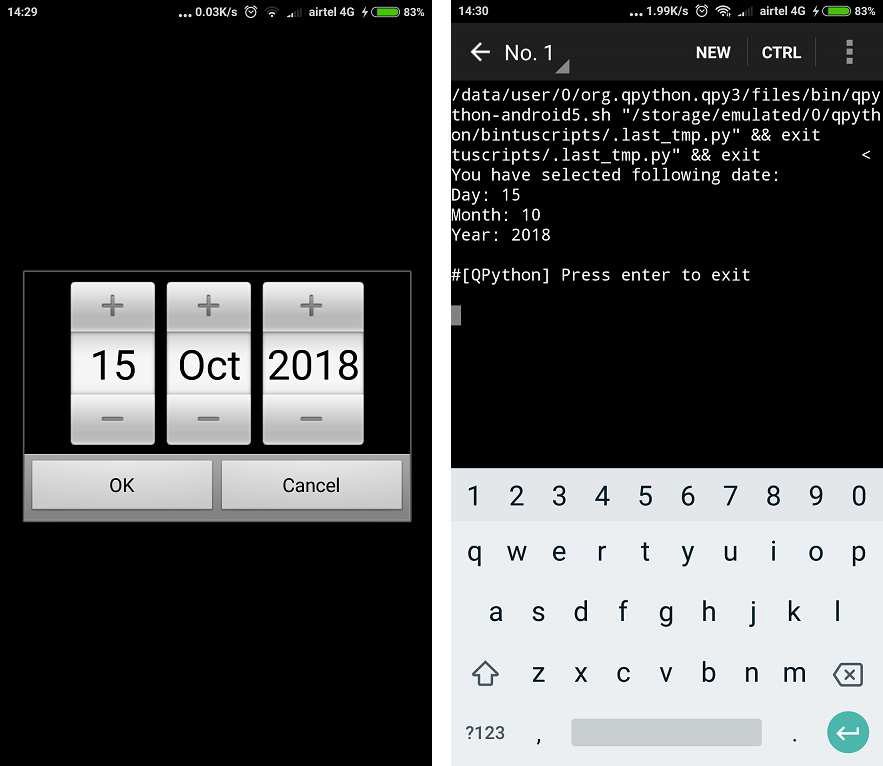
An instance of the Android class is created by name app. By invoking the dialogCreateDatePicker() method, the date picker is displayed; the initial date being displayed is 10 July 2018. You can scroll to any day, month, and year by selecting the + (plus) or - (negative) symbols. The Date Picker dialog is dismissed or made invisible when the user clicks the OK button. Using the dialogGetResponse() method, the date selected by the user is accessed and assigned to the response object. The day in the response object is accessed by invoking the get() method on it and passing the day parameter to it.
Similarly, the month and year selected in the response object are accessed by invoking the get() method on them and passing the month and year parameters to them. That is, the day, month, and year are accessed from the response object and displayed on the screen after being converted into string type.
On running the application, you get a date picker with initial date being displayed as 10 July 2018. You can scroll to any day, month, and year using the + and - symbols associated with each of them. Let's select 15 Oct 2018 and click the OK button (see the following screenshot on the left). You get the output showing the day, month, and year selected by the user, as shown in the following screenshot on the right:
Capturing images using a camera
In this recipe, you will learn to capture a picture on your device camera. You will learn to access the Camera app on your Android device and click the pictures.
How to do it...
In this recipe, we will be making use of the following method cameraInteractiveCapturePicture(), which activates the picture capturing app on an Android device and the clicked picture is saved to the SD card with the specified name.
Let's take a look at the following steps:
- Type the following code in the Python script demoCamera.py in the current folder of your computer:
import android
app = android.Android()app.cameraInteractiveCapturePicture("/sdcard/camer aPic.jpg")
- Copy or push this Python script into the Android device by using the following command line:
C:\Users\Bintu\QPythonScripts>adb push demoCamera.py /sdcard/qpython/bintuscripts
How it works...
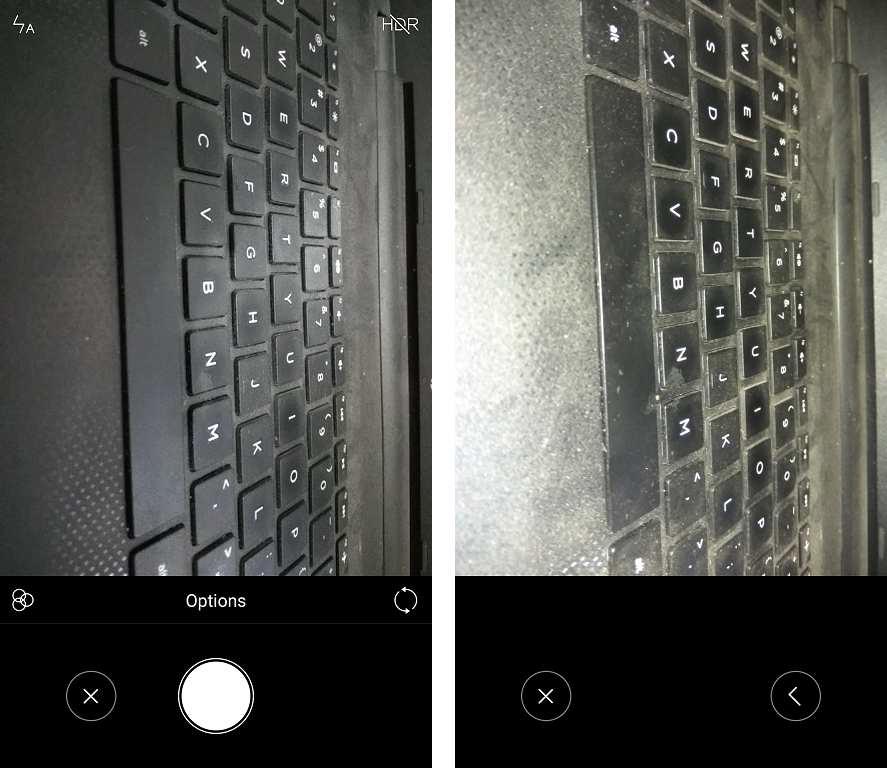
This recipe starts the picture capturing app on your Android device. That is, the Camera app on your device will be invoked enabling you to click the pictures if required.
An object called app is defined by invoking Android() method of the android module. The cameraInteractiveCapturePicture() method is invoked to start the camera and take a picture. The clicked picture will be stored in the specified path in the sdcard folder of your Android device with the cameraPic.jpg filename.
On running the application, the picture capturing app will automatically start, ready to take a picture. The screenshot on the left shows the picture that is visible through the Camera app. You focus the camera of your device on the object to be photographed and click the Take picture button. The Take picture button appears as a big filled circle. On clicking the Take picture button, the picture will be taken and you will be shown two options to select: right or wrong.
The right option if selected will save the taken picture and wrong option if selected will discard the picture as shown in the following screenshot:
Making an Android device speak a text input
In this recipe, we will see how an Android device generates sound from the supplied text. That is, the device will speak the specified text.
How to do it...
In this recipe, we will be making use of the ttsSpeak() method, which activates the speech synthesis application on an Android device and the device will generate sound for the supplied text.
Let's take a look at the following steps:
- Type the following code in the Python script demoTextToSpeach.py in the current folder of your computer:
import androidapp = android.Android() message = "Let us count from 1 to 10" app.ttsSpeak(message)
for i in range(1,11): app.ttsSpeak(str(i))
- Copy or push this Python script into the Android device by using the following command line:
C:\Users\Bintu\QPython\Scripts>adb push demoTextToSpeach.py /sdcard/qpython/bintuscripts
How it works...
An object called app is created by invoking the Android() method of the android module. A message, Let us count from 1 to 10 is passed to the ttsSpeak() method. The ttsSpeak() method will invoke the speech synthesis application in the phone, which generates the spoken version of the supplied text. So, you get to hear "let us count from 1 to 10". After that, a loop is run from integer value 1 to 10 and each value in the loop is sent to the ttsSpeak() method. Consequently, your mobile will speak the numbers from 1 to 10.
Creating a cross-platform Python script using Kivy
Kivy is a Python library that supports multitouch devices, including smartphones. You can create cross-platform Python applications using Kivy as Kivy runs on Android, iOS, Linux, and Windows. With Kivy, you can also access mobile APIs, like the Android API to use the camera of your phone, compass sensor, and so on.
Kivy is an open source, cross-platform that is written in Python and Cython. Because Kivy has several modules that are written in C, it requires Cython for its working. Cython is a compiler that gives you the power of Python as well as C programming. You can write C functions and use C libraries in Cython for writing efficient code.
Getting started
Let's create a very simple application that consists of a single button with the caption Python On Android Device. The Kivy application needs to be made in a separate folder and its main program has to be named main.py.
So, let's create a folder named helloworld. Write the following code and save it with the name main.py in the helloworld folder:
from kivy.app import Appfrom kivy.uix.button import Button class demoAndroidApp(App):
def build(self):
return Button(text='Python On Android Device')
if __name__ in ('__main__', '__android__'): demoAndroidApp().run()
The App class is imported from the kivy library because this class includes the properties required to make a fully featured application. A class is made, named demoAndroidApp, which inherits the App class, so the demoAndroidApp class gets the right to access the methods and members of the App class. Thereafter, you check whether this Python script is an independent script to be run individually, or is supposed to be imported into another script. Being an independent script, the run() method is invoked to execute the application.
To run this Kivy application, you need to install Kivy and it requires several steps. Let's learn how to do it. But before that, let us understand one keyword pip that we will frequently come across.
The pip command is a tool for installing and managing Python packages. PIP already comes installed in the Linux platforms. Also, pip comes installed on Python version 3.4 and later. You give the following command line on your Command Prompt to know whether pip is installed on your PC:
C:>pip --version
If pip is installed on your PC, you get the folder location where it is installed and will show its version number too. If you do not have P installed, you can download and install it from the https:/ / pypi.org/project/pip/ URL.
Now, let us move ahead and learn the steps to install Kivy.
How to do it...
- Before you install Kivy, you need to install Cython first as Kivy needs Cython. The following statement installs Cython:
C:\helloworld>python -m pip install Cython
You may get the following output while installing Cython on your machine:

- Once Cython is installed, you can go ahead and install Kivy by executing the following command line:
C:\helloworld>python -m pip install kivy
While installing Kivy, you may get the following output on the screen:

- You need to install Kivy dependencies, the modules that Kivy is dependent on. The following statement installs the Kivy dependencies:
C:\helloworld>pip install docutils pygments pypiwin32 kivy.deps.sdl2 kivy.deps.glew
On executing the preceding command, you may get the following output on the screen:
Requirement already satisfied: docutils in c:usersBintuappdatalocalprogramspythonpython35-32libsite-packages (0.14)
Requirement already satisfied: pygments in c:usersBintuappdatalocalprogramspythonpython35-32libsite-packages (2.2.0)
Collecting pypiwin32
Downloading https://files.pythonhosted.org/packages/d0/1b/2f292bbd742e369a100c9 1faa0483172cd91a1a422a6692055ac920946c5/pypiwin32-223-py3-none- any.whl
Collecting kivy.deps.sdl2
Downloading https://files.pythonhosted.org/packages/d5/5a/1f8ca6e6e5343ffc4d145 fab0644e051cf52ee97bca9313307af0c8b5129/kivy.deps.sdl2-0.1.17-cp35- cp35m-win32.whl (2.1MB)
100% |################################| 2.1MB 369kB/s
Collecting kivy.deps.glew
Downloading https://files.pythonhosted.org/packages/32/0f/16419ffd63c60b0c19761 4c430eab35360a94154ac1b846b3ee69f8c8061/pywin32-223-cp35-cp35m- win32.whl (8.3MB)
100% |################################| 8.3MB 310kB/s
Installing collected packages: pywin32, pypiwin32, kivy.deps.sdl2, kivy.deps.glew
Successfully installed kivy.deps.glew-0.1.9 kivy.deps.sdl2-0.1.17 pypiwin32-223 pywin32-223
- The Kivy platform needs OpenGL. So, you need to run the following command to support a graphics card and other graphics hardware:
C:\helloworld>pip install kivy.deps.angle && set KIVY_GL_BACKEND=angle_sdl2
Now, Kivy is completely installed, along with its dependencies, and you are ready to run your Kivy application.
- Run your application by running the following command line:
C: helloworld>python main.py
The application will execute, showing you a big button with the caption Python On Android Device, as shown in the following screenshot:

Packaging a Python Script into the Android APK using Buildozer
In this recipe, we will be learning to package a Python script into the Android APK file using Buildozer. Buildozer is a tool that packages mobile applications quite easily. Basically, it auto-creates a buildozer.spec file, which stores configuration and other
settings of the application including its name, package, domain name, icon, and so on. It also automatically downloads the prerequisites, such as python-for-android, the Android SDK, NDK, and so on, and presents the Android APK file ready to distribute and install. Not only for Android; Buildozer makes the Python script run on iOS too. The focus of this recipe is to create a package for Android. First of all, we will be creating a Kivy Python script that consists of a button and a label. When the button is clicked, the application simply displays the message Welcome to Python on Smartphones.
Getting ready
This Kivy Python script is made in a folder. So, create a folder named dispmessage() and write the following code in a file named main.py:
The App class is imported from the kivy library because this class includes the properties required to make a fully featured application. Besides the App class, the Button class, the Label class, and the BoxLayout class are also imported into the application.
A MessageApp class is created, that inherits from the App class, so the MessageApp class gets the right to access methods and members of the App class. Thereafter, an object of the Button class is created by name, pushButton, and the button text supplied is Click
Me. Also, a Label widget's instance is created, named labelMessage, with no text. The text for the Label widget will be supplied through the code. An object of BoxLayout is created called layout and its orientation specified as horizontal. The pushButton and labelMessage objects are added to the layout horizontally, beside each other. You also bind the on_press event of the pushButton object with the dispMessage() method, so that whenever the push button is pressed, the dispMessage() will be invoked. In the dispMessage() method, you set the text for the labelMessage object as Welcome to Python on Smartphones. Hence, whenever, the Click Me button is pressed, the labelMessage object will display the text Welcome to Python on Smartphones. The run() method is invoked at the end to execute the application.
To package this Python script into the Android APK, you need to install Buildozer and this requires several steps. Let's learn how to do it step by step.
How to do it...
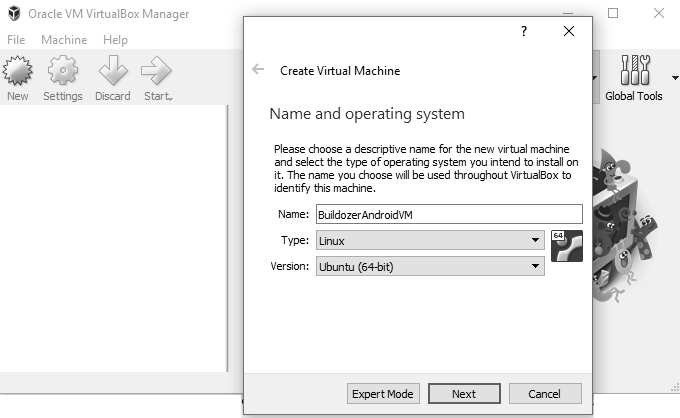
Because the Buildozer tool runs on the Linux operating system and I am using a Windows operating system, we need to take the help of a virtual box to install Buildozer. Here are the steps:
- First, install Oracle VM VirtualBox.
- Once VirtualBox is loaded, click on the New button to create a new Virtual Machine.
- Name the new Virtual Machine as BuildozerAndroidVM.
- Set the type of this Virtual Machine as Linux and version as Ubuntu (64 bit), as shown in the following screenshot:
Kivy provides you a Kivy Buildozer VM that you can download from the https:/ / kivy.org/#download URL.
- Click on the Next button, and you will be prompted to enter information for the virtual hard disk.
- Select the Use an existing virtual hard disk file option, select the downloaded Kivy Virtual VM file, and then click on the Create button as shown in the following screenshot:
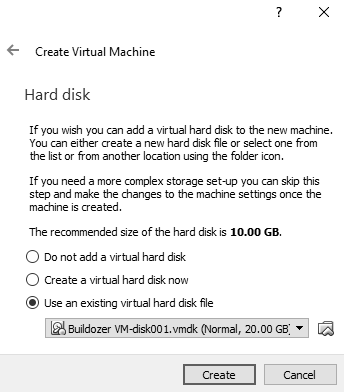
A virtual machine named BuildozerAndroidVM will be created.
- Click on the Start icon at the top to run the virtual machine as shown in the following screenshot:
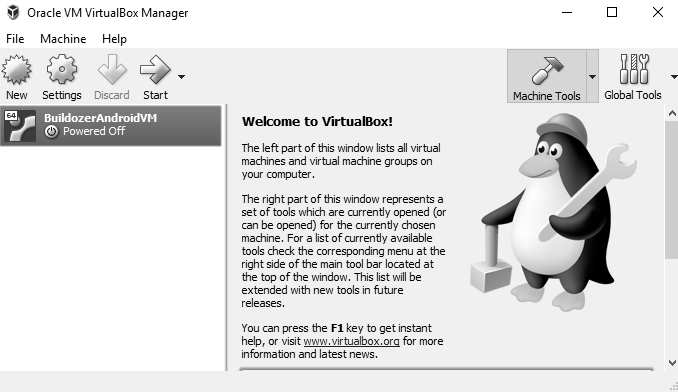
You will be asked to enter the password. The ID is kivy, and the password too is kivy.
- Enter the password and click on the Log In button.
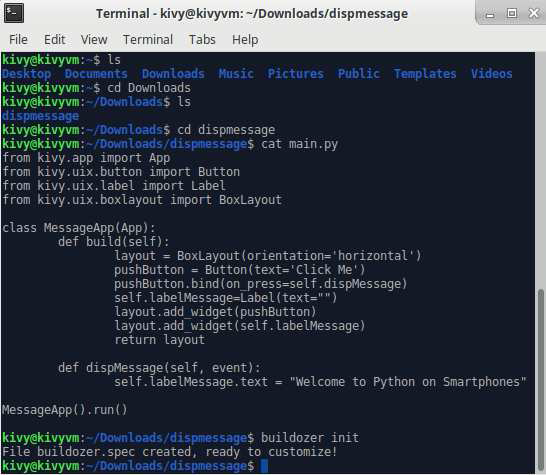
- Once you are logged in, from the Menu at the top, select the Terminal option from the Menu option to open the Terminal window. By default, you will be in the kivy folder. Change directory to the Downloads folder.
- In the Downloads folder, create a folder named dispmessage() and in that folder, create a file, main.py, with the code shown before.
- Before packaging this Python script into the Android APK file, create a buildozer.spec file (see the following screenshot). The buildozer.spec file is automatically created by running the following command line in the dispmessage folder:
buildozer init
- Recall that the buildozer.spec file is a configuration file that stores
information such as the application's name, package name, domain name, icon, and other details. The buildozer.spec file contains certain default information.
You can change the application's name, package, and other information as shown in the following screenshot:
- To create Android's APK file, run the following command line:
buildozer Android debug
The preceding command line will download and install Android ANT, Android SDK, Android NDK, and other essential modules if they are missing, and finally packages the Python script into an APK file, which can be found in the bin folder that is automatically created (see the following screenshot):
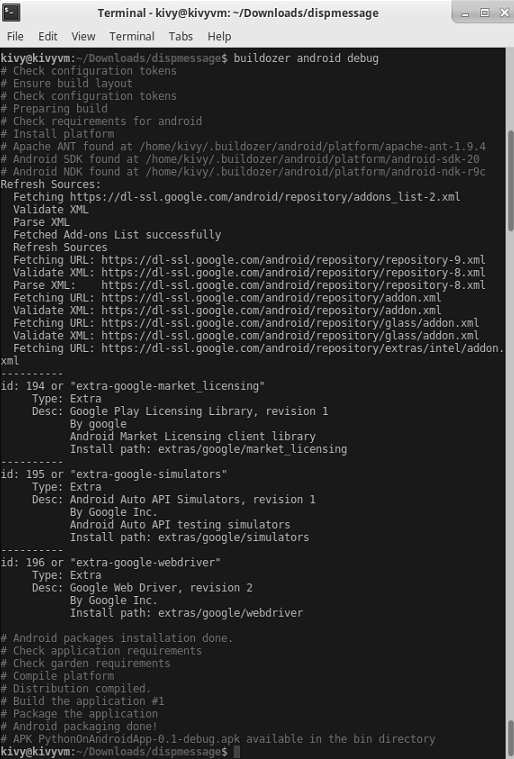
- Copy the APK file into any Android device, install it, and run it.
How it works
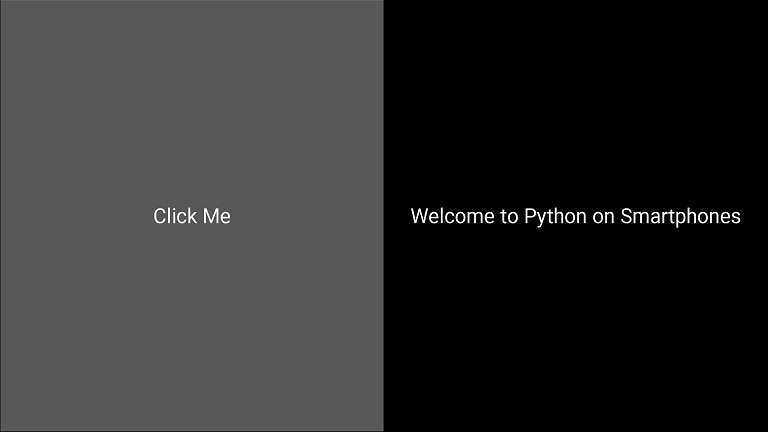
On running the Android application, you will find a push button, Click Me, on the left, as shown in the following screenshot. The label on the right does not show any text at the moment:

On clicking the push button, the label on the right shows the text Welcome to Python on Smartphones, as shown in the following screenshot:
Packaging Python script for iOS
In this recipe, we will be learning to package a Python script for iOS. iOS is a mobile operating system developed by Apple Inc for its devices, including the iPhone, iPad, and iPod Touch. To write, test and run this application, we will be requiring a Macintosh computer.
First of all, we will be creating a Kivy Python script that comprises a button and a label. When a button is clicked, the application simply displays the message Welcome to Python on Smartphones. This Kivy Python script is made in a folder. So, create a folder named helloworld and write the following code in a file named main.py:
How to do it...
- The first step is to install Xcode and related SDK on your computer. Give the following command line if the Xcode is not installed on your machine
xcode-select –install
You might be prompted to install command-line developer tools as shown in the folowing screenshot:
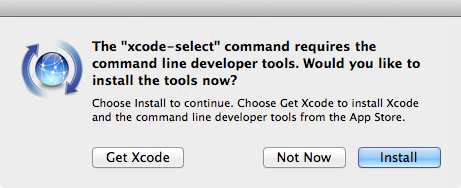
- Click on the Install button to install the tools. Next, you need to install libraries for building. Give the following two command lines to install libraries:
brew install autoconf automake libtool pkg-config
On executing the preceding command line you get the output as shown in the following screenshot:
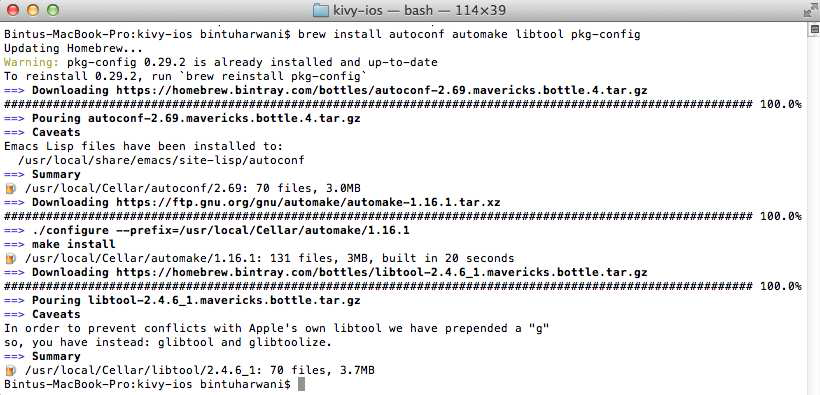
The following command is also required to install libraries:
brew link libtool
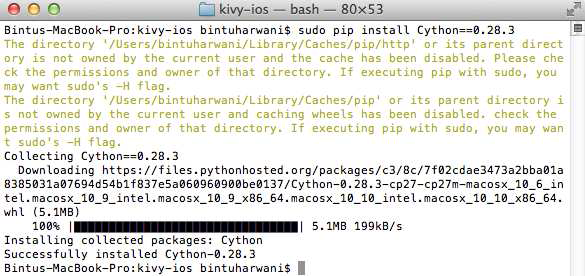
Because Kivy requires Cython, execute the following command line to install Cython:
sudo pip install Cython==0.28.3
While installing Cython, you get the output as shown in the following screenshot:
- Next step is to download kivy-ios and install. To do so, execute the following command line:
$ git clone git://github.com/kivy/kivy-ios
**
A folder called kivy-ios will be created and kivy-ios files are downloaded and copied in it. You get the output as shown in the following screenshot:
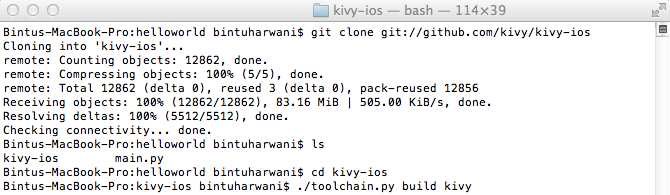
- Next step is to change directory to the kivy-ios folder and execute the toolchain.py file. The toolchain is used in compiling the necessary libraries for iOS to run our application. It is also very helpful in creating the Xcode project.
$ cd kivy-ios$ ./toolchain.py build kivy
- Now, we can create an Xcode project. Execute the following command line specifying the location of our helloworld folder where kivy python script is written:
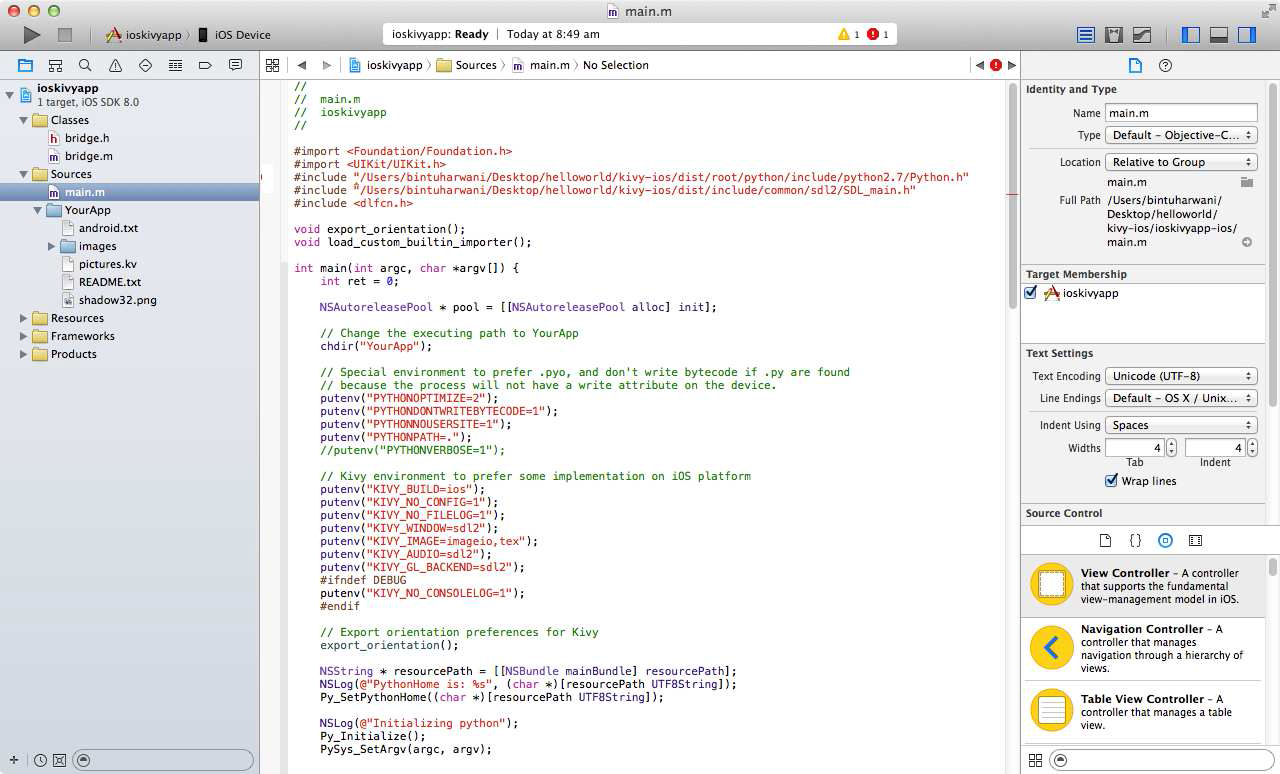
$ ./toolchain.py create ioskivyapp /Users/bintuharwani/Desktop/helloworld
The preceding command line will create a folder ioskivyapp-ios and will create the Xcode project in that folder by name, ioskivyapp.xcodeproj. On executing the preceding command, you will get the output as shown in the following screenshot:

Following is the list of files that are created in the ioskivyapp-ios folder :

- You can execute the Xcode project by running the following command line: open ioskivyapp.xcodeproj
Xcode will open up as shown in the following screenshot:
- You need to register as a developer in Apple developer center for running this Xcode project.
How it works...
For making a fully featured application, you need the App class which is imported from the kivy library. For creating interface elements like button, label, and so on and for arranging them, several more classes like, the Button class, Label class and BoxLayout too are imported in the application.
To access methods and members of the App class, a class is created by name WelcomeApp that inherits the App class. To create a button in the application, an object of the Button class is created by name, pushButton. The text for the button is set as Click Me. Also, a Label class's instance is created by name labelMessage without any default text. The text for the Label widget will be displayed through the code. An object of BoxLayout is created by name layout and its orientation specified as horizontal. The pushButton and labelMessage objects are added to the layout horizontally that is one besides the other. You also bind the on_press event of the pushButton object with the showMessage() method that is whenever the push button will be pressed, the showMessage() method will be invoked. In the showMessage() method, you set the text for the labelMessage object as, Python is compatible to Smartphones. Hence, whenever, the Click Me button is pressed, the labelMessage object will display the text, Python is compatible to Smartphones. The run() method is invoked at the end to execute the application.
'Qt5 Python GUI Programming Cookbook' 카테고리의 다른 글
| Understanding Layouts (0) | 2023.03.01 |
|---|---|
| Using Google Maps (0) | 2023.02.28 |
| Implementing Animation (0) | 2023.02.28 |
| Using Graphics (0) | 2023.02.28 |
| Database Handling (0) | 2023.02.28 |


댓글