Database handling plays a major role in any application as data needs to be stored for future use. You need to store customer information, user information, product information, order information, and so on. In this chapter, you will learn every task that is related to database handling:
- Creating a database
- Creating a database table
- Inserting rows in the specified database table
- Displaying rows in the specified database table
- Navigating through the rows of the specified database table
- Searching a database table for specific information
- Creating a signin form – applying an authentication procedure
- Updating a database table – changing a user's password
- Deleting a row from a database table
We will be using SQLite for database handling. Before we move further into the chapter, let's have a quick introduction to SQLite.
Introduction
SQLite is a very easy-to-use database engine. Basically, it is a lightweight database meant to be used in small applications that can be stored in a single disk file. It is a very popular database used in phones, tablets, small appliances, and instruments. SQLite does not require a separate server process, and does not even require any configuration.
To make this database easy to use in Python scripts, the Python Standard Library includes a module called sqlite3. So, to use SQLite in any Python application, you need to import
the sqlite3 module using the import statement shown here:
import sqlite3The first step to use any database is to create a connect object, by means of which you need to establish a connection with the database. The following example establishes a connection to the ECommerce database:
conn = sqlite3.connect('ECommerce.db')This example will establish a connection to the ECommerce database if it already exists. If the database does not already exist, the database will be created first and then the connection established.
You can also create a temporary database in memory, that is, in RAM by using the :memory: argument in the connect method, as shown here:
conn = sqlite3.connect(':memory:')You can also supply the special name :memory: to create a database in RAM.
Once the job associated with the database is over, you need to close the connection using the following statement:
conn.close()
Creating the cursor object
To work with database tables, you need to get a cursor object and pass the SQL statements to the cursor object to execute them. The following statement creates a cursor object called cur:
cur = conn.cursor()Using the cursor object, cur, you can execute SQL statements. For example, the following set of statements creates a Users table consisting of three columns, id, EmailAddress, and Password:
# Get a cursor object

cur = conn.cursor()

cur.execute('''CREATE TABLE Users(id INTEGER PRIMARY KEY, EmailAddress TEXT, Password TEXT)''')

conn.commit()
Remember, you need to commit the changes to the database by invoking the commit() method on the connection object, otherwise all the changes made to the database will be lost.
The following set of statements will drop the Users table:
#   Get a cursor object

cur = conn.cursor()
cur.execute('''DROP TABLE Users''')
conn.commit()
Creating a database
In this recipe, we will be prompting the user to enter a database name, followed by clicking the push button. Upon clicking the push button, if the specified database does not exist, it is created and, if it already exists, it is connected.
How to do it…
Follow this step-by-step procedure to create a database in SQLite:
- Let's create an application based on the Dialog without Buttons template.
- Add two QLabel widgets, one QLineEdit widget, and one QPushButton widget to the form by dragging and dropping two Label widget, one Line Edit widget, and a Push Button widget on the form.
- Set the text property of the first Label widget to Enter database name.
- Delete the text property of the second Label widget because this is established.
- Set the objectName property of the Line Edit widget to lineEditDBName.
- Set the objectName property of the Push Button widget to pushButtonCreateDB.
- Set the objectName property of the second Label widget to labelResponse.
- Save the application by name as demoDatabase.ui. The form will now appear as shown in the following screenshot:
The user interface created with Qt Designer is stored in a .ui file, which is an XML file, and needs to be converted into Python code. By applying the pyuic5 utility, the XML file is converted into Python code. The Python script generated, demoDatabase.py, can be seen in the source code bundle of the book.
- Treat the demoDatabase.py script as a header file, and import it into the file from which you will invoke its user interface design.
- Create another Python file with the name callDatabase.pyw and import the demoDatabase.py code into it:
import sqlite3, sys
from PyQt5.QtWidgets import QDialog, QApplication
from sqlite3 import Error
from demoDatabase import *
class MyForm(QDialog):
    def __init__(self):
        super().__init__()
        self.ui = Ui_Dialog()
        self.ui.setupUi(self)
        self.ui.pushButtonCreateDB.clicked.connect(self.createDatabase)
        self.show()
    def createDatabase(self):
        try:
            conn = sqlite3.connect(self.ui.lineEditDBName.text()+".db")
            self.ui.labelResponse.setText("Database is created")
        except Error as e:
            self.ui.labelResponse.setText("Some error has occurred")
        finally:
            conn.close()
if __name__=="__main__":
    app = QApplication(sys.argv)
    w = MyForm()
    w.show()
    sys.exit(app.exec_())
How it works…
You can see in the script that the click() event of the push button with the objectName property pushButtonCreateDB is connected to the createDatabase() method. This means that, whenever the push button is clicked, the createDatabase() method is invoked. In the createDatabase() method, the connect() method is invoked on the sqlite3 class and the database name entered by the user in the Line Edit widget is passed to the connect() method. The connect() method will create the database if it does not exist already. If no error occurs in creating the database, the message Database is created is displayed via the Label widget to inform the user; otherwise, a Some error has occurred message is displayed via the Label widget to indicate the occurrence of an error.
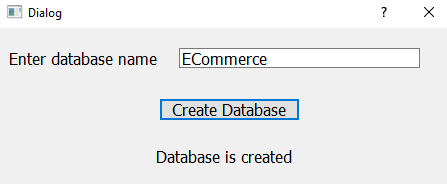
On running the application, you will be prompted to enter the database name. Suppose we enter the database name as Ecommerce. Upon clicking the Create Database button, the database will be created and you get the message Database is created:
Creating a database table
In this recipe, we will be learning to create a database table. The user will be prompted to specify the database name, followed by the table name that is to be created. The recipe enables you to enter column names and their data types. Upon clicking the push button, the table with the defined columns will be created in the specified database.
How to do it…
Here are the steps to create a GUI that enables the user to enter all the information for the database table to be created. Using this GUI, the user can specify the database name, column names, and choose column types too:
- Let's create an application based on the Dialog without Buttons template.
- Add five QLabel, three QLineEdit, one QComboBox, and two QPushButton widgets to the form by dragging and dropping five Label, three Line Edit, one Combo Box, and two Push Button widgets on the form.
- Set the text property of the first four Label widgets to Enter database name, Enter table name, Column Name, and Data Type.
- Delete the text property of the fifth Label widget because this is established through code.
- Set the text property of the two push buttons to Add Column and Create Table.
- Set the objectName property of the three Line Edit widgets to lineEditDBName, lineEditTableName, and lineEditColumnName.
- Set the objectName property of the Combo Box widget to ComboBoxDataType.
- Set the objectName property of the two push buttons to pushButtonAddColumn and pushButtonCreateTable.
- Set the objectName property of the fifth Label widget to labelResponse.
- Save the application by name as demoCreateTable.ui.
The user interface created with Qt Designer is stored in a .ui file, which is an XML file, and needs to be converted into Python code. The pyuic5 command is used to convert the XML file into Python code. The Python script generated, demoCreateTable.py, can be seen in the source code bundle of this book.
- Treat the demoCreateTable.py script as a header file, and import it into the file from which you will invoke its user interface design.
- Create another Python file with the name callCreateTable.pyw and import the demoCreateTable.py code into it:
import sqlite3
import sys
from PyQt5.QtWidgets import QDialog, QApplication
from sqlite3 import Error
from demoCreateTable import *

tabledefinition = ""

class MyForm(QDialog):
    def __init__(self):
        super().__init__()
        self.ui = Ui_Dialog()
        self.ui.setupUi(self)
        self.ui.pushButtonCreateTable.clicked.connect(self.createTable)
        self.ui.pushButtonAddColumn.clicked.connect(self.addColumns)
        self.show()
    def addColumns(self):
        global tabledefinition
        if tabledefinition == "":
            tabledefinition = "CREATE TABLE IF NOT EXISTS "+ self.ui.lineEditTableName.text()+ \
                " ("+ self.ui.lineEditColumnName.text()+" "+ \
                self.ui.comboBoxDataType.itemText(self.ui.comboBoxDataType.currentIndex())
        else:
            tabledefinition += (","+self.ui.lineEditColumnName.text()+" " + \
                self.ui.comboBoxDataType.itemText(self.ui.comboBoxDataType.currentIndex()))
            self.ui.lineEditColumnName.setText("")
            self.ui.lineEditColumnName.setFocus()
    def createTable(self):
        global tabledefinition
        try:
            conn = sqlite3.connect(self.ui.lineEditDBName.text()+".db")
            self.ui.labelResponse.setText("Database is connected")
            c = conn.cursor()
            tabledefinition += ");"
            c.execute(tabledefinition)
            self.ui.labelResponse.setText("Table is successfully created")
        except Error as e:
            self.ui.labelResponse.setText("Error in creating table")
        finally:
            conn.close()

if __name__ == "__main__":
    app = QApplication(sys.argv)
    w = MyForm()
    w.show()
    sys.exit(app.exec_())
    # https://www.daleseo.com/python-sqlite3/
How it works…
You can see in the script that the click() event of the push button with the objectName property pushButtonCreateTable is connected to the createTable() method. This means that, whenever this push button is clicked, the createTable() method will be invoked. Similarly, the click() event of the push button with the objectName property pushButtonAddColumn is connected to the addColumns() method. That is, this button, when clicked, will invoke the addColumns() method.
In the addColumns() method, the CREATE TABLE SQL statement is defined, which consists of the column name entered in the Line Edit widget and the data type selected from the combo box. The user can add any number of columns to the table.
In the createTable() method, first the connection to the database is established, and thereafter the CREATE TABLE SQL statement defined in the addColumns() method is executed. If the table is successfully created, a message is displayed informing you of the successful creation of the table through the last Label widget. Finally, the connection to the database is closed.
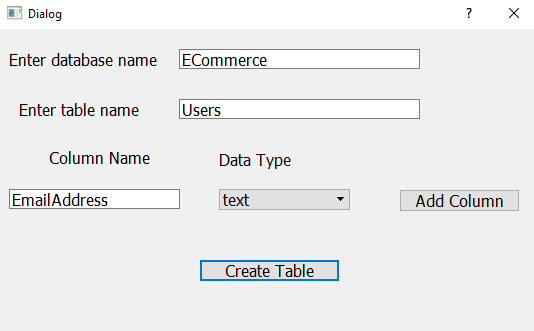
On running the application, you will be prompted to enter the database name and table name that you want to create, followed by the columns required in that table. Let's assume you want to create a Users table in the ECommerce table consisting of two columns, EmailAddress and Password. Both the columns are assumed to be of the text type.
The first column name, Email Address, in the Users table can be defined as shown in the following screenshot:
Let's define one more column, called Password, of the text type in the Users table, followed by clicking the Create Table button. If the table is created with the specified number of columns successfully, a message, Table is successfully created, is displayed via the last Label widget, as shown in the following screenshot:
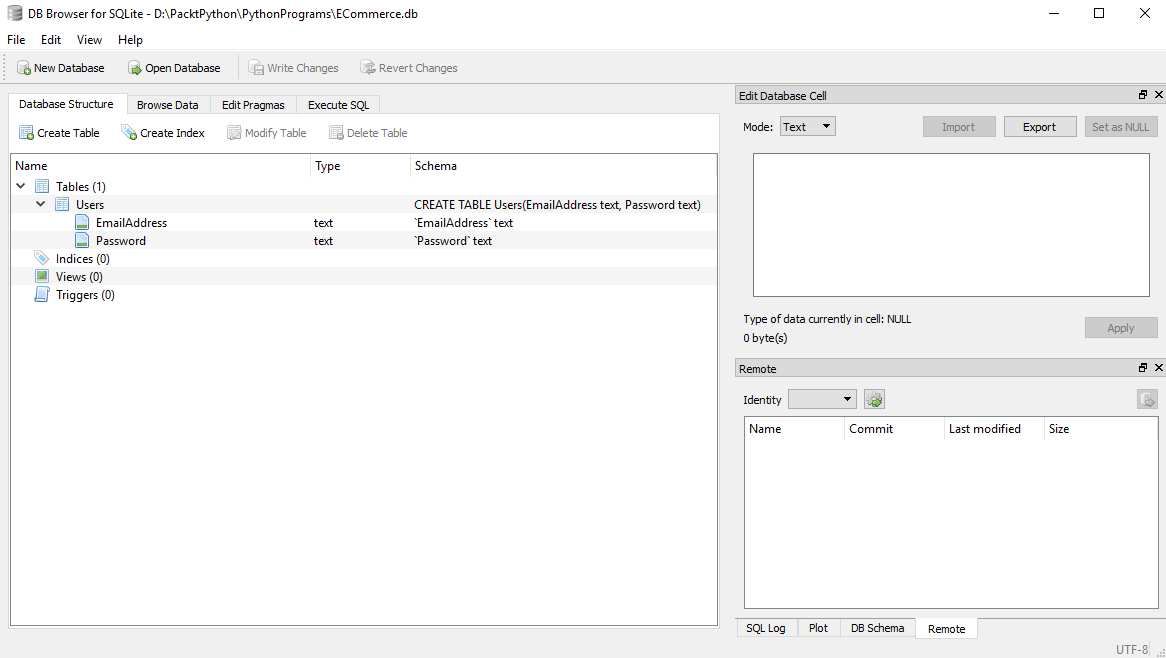
To verify that the table was created, I will be making use of a visual tool that enables you to create, edit, and view the database tables and rows inside them. That visual tool is DB Browser for SQLite, which I downloaded from http:/ / sqlitebrowser.org/. On launching
DB Browser for SQLite, click the Open Database tab below the main menu. Browse and select the ECommerce database from the current folder. The ECommerce database shows the Users table consisting of two columns, EmailAddress and Password, as shown in the following screenshot, confirming that the database table was created successfully:
Inserting rows in the specified database table
In this recipe, we will be learning to insert rows into a table. We assume a table called Users consisting of two columns, EmailAddress and Password, already exists in a database called ECommerce.
After entering the email address and password in the respective Line Edit widgets, when the user clicks the Insert Row button, the row will be inserted into the specified database table.
How to do it…
Here are the steps to insert rows into a database table that exists in SQLite:
- Let's create an application based on the Dialog without Buttons template.
- Add five QLabel widgets, four QLineEdit widgets, and one QPushButton widgets to the form by dragging and dropping five Label widgets, four Line Edit widgtes, and one Push Button widget on the form.
- Set the text property of the first four Label widgets to Enter database name, Enter table name, Email Address, and Password.
- Delete the text property of the fifth Label widget this is established through code.
- Set the text property of the push button to Insert Row.
- Set the objectName property of the four Line Edit widgets to lineEditDBName, lineEditTableName, lineEditEmailAddress, and lineEditPassword.
- Set the objectName property of the Push Button widget to pushButtonInsertRow.
- Set the objectName property of the fifth Label widget to labelResponse. As we don't want the password to be displayed, we want asterisks to appear when the user enters their password.
- To do this, select the Line Edit widget that is meant for entering the password and, from the Property Editor window, select the echoMode property and set it to Password, instead of the default Normal, as shown in the following screenshot:

The echoMode property shows the following four options:
- Normal: It is the default property and it displays characters when typed in the Line Edit widget.
- NoEcho: It does not display anything when typed in the Line Edit widget, that is, you will not even know the length of the text entered.
- Password: It is used mostly for passwords. It displays asterisks when typed in the Line Edit widget.
- PasswordEchoOnEdit: It displays the password while being typed in the Line Edit widget, although the content typed is quickly replaced by asterisks.
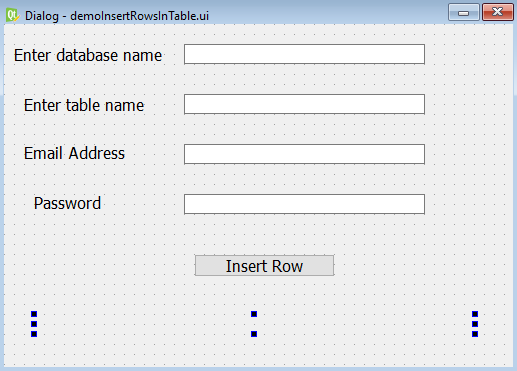
- Save the application by name as demoInsertRowsInTable.ui. The form will now appear as shown in the following screenshot:
The user interface created with Qt Designer is stored in a .ui file, which is an XML file and needs to be converted into Python code. By applying the pyuic5 utility, the XML file will be converted into Python code. The Python script generated, demoInsertRowsInTable.py, can be seen in the source code bundle of the book.
- Create another Python file with the name callInsertRows.pyw and import the demoInsertRowsInTable.py code into it. The code in the Python
import sqlite3
import sys
from PyQt5.QtWidgets import QDialog, QApplication
from sqlite3 import Error
from demoInsertRowsInTable import *
class MyForm(QDialog):
       def __init__(self):
              super().__init__()
              self.ui = Ui_Dialog()
              self.ui.setupUi(self)
              self.ui.pushButtonInsertRow.clicked.connect(self.InsertRows)
              self.show()
       def InsertRows(self):

              sqlStatement = "INSERT INTO " + \
                     self.ui.lineEditTableName.text() + \
                            " VALUES('" + self.ui.lineEditEmailAddress.text() + \
                                   "','" + self.ui.lineEditPassword.text() + "')"

              try:
                     conn = sqlite3.connect(self.ui.lineEditDBName.text() + ".db")
                     with conn:
                            cur = conn.cursor()
                            cur.execute(sqlStatement)
                            self.ui.labelResponse.setText("Row successfully inserted")
              except Error as e:
                     print(e)
                     self.ui.labelResponse.setText("Error in inserting row")
              finally:
                     conn.close()
if __name__ == "__main__":
       app = QApplication(sys.argv)
       w = MyForm()
       w.show()
       sys.exit(app.exec_())
       # https://www.daleseo.com/python-sqlite3/
How it works…
You can see in the script that the click event of the push button with the objectName property pushButtonInsertRow is connected to the InsertRows() method. This means that, whenever this push button is clicked, the InsertRows() method will be invoked. In the InsertRows() method, an INSERT SQL statement is defined that fetches the email address and password entered in the Line Edit widgets. A connection is established with the database whose name is entered in the Line Edit widget. Thereafter, the INSERT SQL statement is executed, which adds a new row to the specified database table. Finally, the connection to the database is closed.
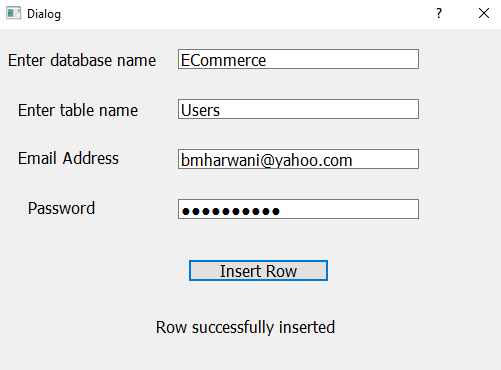
On running the application, you will be prompted to specify the database name, table name, and the data for the two columns, Email Address and Password. After entering the required information, when you click the Insert Row button, a new row will be added to the table and a message, Row successfully inserted, will be displayed, as shown in the following screenshot:
To verify that the row was inserted into the Users table, I will be making use of a visual tool called DB Browser for SQLite. It is a wonderful tool that enables you to create, edit, and view the database tables and rows inside them. You can download DB Browser for SQLite from http:/ / sqlitebrowser.org/. On launching DB Browser for SQLite, you need to first open the database. To do so, click the Open Database tab below the main menu. Browse and select the Ecommerce database from the current folder. The Ecommerce database shows the Users table. Click on the Execute SQL button; you get a small window to type the SQL statement. Write an SQL statement, select * from Users, and click the Run icon above the window.
All the rows entered in the Users table will be displayed in tabular format, as shown in the following screenshot. It confirms that the application made in our recipe is working perfectly well:

Displaying rows in the specified database table
In this recipe, we will be learning to fetch rows from a given database table and display them in tabular format via the Table widget. We assume a table called Users consisting of two columns, EmailAddress and Password, already exists in a database called ECommerce. Also, we assume that the Users table contains some rows in it.
How to do it…
Follow this step-by-step procedure to access rows from the database table in SQLite:
- Let's create an application based on the Dialog without Buttons template.
- Add three QLabel widgets, two QLineEdit widgets, one QPushButton, and one QTableWidget widget to the form by dragging and dropping three Label widgets, two Line Edit widgets, one Push Button widget, and a Table widget on the form.
- Set the text property of the two Label widgets to Enter database name and Enter table name.
- Delete the text property of the third Label widget because its text property will be set through code.
- Set the text property of the push button to Display Rows.
- Set the objectName property of the two Line Edit widgets to lineEditDBName and lineEditTableName.
- Set the objectName property of the Push Button widget to pushButtonDisplayRows.
- Set the objectName property of the third Label widget to labelResponse.
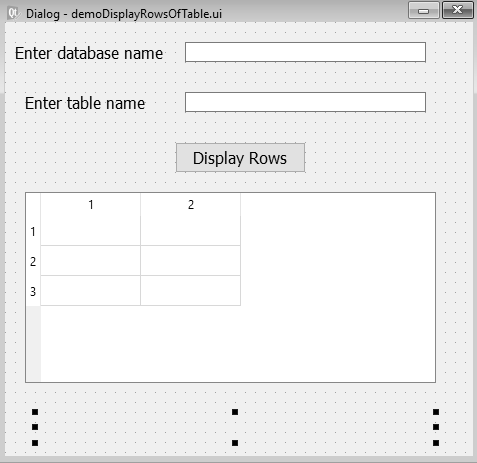
- Save the application by name as demoDisplayRowsOfTable.ui. The form will now appear as shown in the following screenshot:
The Users table whose rows will be displayed through the Table widget consists of two columns.
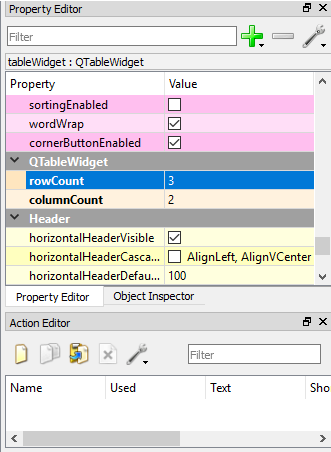
- Select the Table widget and select its columnCount property in the Property Editor window.
- Set the columnCount property to 2 and the rowCount property to 3, as shown in the following screenshot:
The user interface created with Qt Designer is stored in a .ui file, which is an XML file and needs to be converted into Python code. By applying the pyuic5 utility, the XML file will be converted into Python code. The Python script generated, demoInsertRowsInTable.py, can be seen in the source code bundle of this book.
- Treat the demoInsertRowsInTable.py script as a header file, and import it into the file from which you will invoke its user interface design.
- Create another Python file with the name callDisplayRows.pyw and import the demoDisplayRowsOfTable.py code into it:
import sqlite3, sys
from PyQt5.QtWidgets import QDialog, QApplication,QTableWidgetItem
from sqlite3 import Error
from demoDisplayRowsOfTable import *
class MyForm(QDialog):
    def __init__(self):
        super().__init__()
        self.ui = Ui_Dialog()
        self.ui.setupUi(self)
        self.ui.pushButtonDisplayRows.clicked.connect(self.DisplayRows)
        self.show()
    def DisplayRows(self):
        sqlStatement="SELECT * FROM " + self.ui.lineEditTableName.text()
        try:
            conn = sqlite3.connect(self.ui.lineEditDBName.text()+ ".db")
            cur = conn.cursor()
            cur.execute(sqlStatement)
            rows = cur.fetchall()
            rowNo=0
            for tuple in rows:
                self.ui.labelResponse.setText("")
                colNo=0
                for columns in tuple:
                    oneColumn=QTableWidgetItem(columns)
                    self.ui.tableWidget.setItem(rowNo, colNo, oneColumn)
                    colNo+=1
                rowNo+=1
        except Error as e:
            self.ui.tableWidget.clear()
            self.ui.labelResponse.setText("Error in accessing table")
        finally:
            conn.close()
if __name__=="__main__":
    app = QApplication(sys.argv)
    w = MyForm()
    w.show()
    sys.exit(app.exec_())
How it works…
You can see in the script that the click() event of the push button with the objectName property pushButtonDisplayRows is connected to the DisplayRows() method. This means that, whenever this push button is clicked, the DisplayRows() method will be invoked. In the DisplayRows() method, an SQL SELECT statement is defined that fetches the rows from the table whose name is specified in the Line Edit widget. Also, a connection is established with the database whose name is entered in the Line Edit widget. Thereafter, the SQL SELECT statement is executed. The fetchall() method is executed on the cursor to keep all the rows that are accessed from the database table.
A for loop is executed to access one tuple at a time from the received rows, and again a for loop is executed on the tuple to get data in each column of that row. The data accessed in each column of the row is assigned to the Table widget for display. After displaying the data in the first row, the second row is picked up from the rows and the procedure is repeated to display the data in the second row in the Table widget. The two nested for loops are executed until all the rows are displayed through the Table widget.
Upon running the application, you will be prompted to specify the database name and table name. After entering the required information, when you click the Display Rows button, the content of the specified database table is displayed through the Table widget, as shown in the following screenshot:

Navigating through the rows of the specified database table
In this recipe, we will be learning to fetch rows from a given database table one at a time. That is, on running the application, the first row of the database table will be displayed. You will be provided with four push buttons in the application, called Next, Previous, First, and Last. As the name suggests, upon clicking the Next button, the next row in the sequence will be displayed. Similarly, upon clicking the Previous button, the previous row in the sequence will be displayed. Upon clicking the Last button, the last row of the database table will be displayed and, upon clicking the First button, the first row of the database table will be displayed.
How to do it…
Here are the steps to understand how rows from a database table are accessed and displayed one by one:
- Let's create an application based on the Dialog without Buttons template.
- Add three QLabel widgets, two QLineEdit widgets, and four QPushButton widgets to the form by dragging and dropping three Label widgets, two Line Edit widgets, and four Push Button widgets on the form.
- Set the text property of the two Label widgets to Email Address and Password.
- Delete the text property of the third Label widget because its text property will be set through code.
- Set the text property of the four push buttons to First Row, Previous, Next, and Last Row.
- Set the objectName property of the two Line Edit widgets to lineEditEmailAddress and lineEditPassword.
- Set the objectName property of the four push buttons to pushButtonFirst, pushButtonPrevious, pushButtonNext, and pushButtonLast.
- Set the objectName property of the third Label widget to labelResponse. Because we don't want the password to be displayed, we want the asterisks to appear when the user enters their password.
- Select the Line Edit widget that is meant for entering the password (lineEditPassword) and, from the Property Editor window, select the echoMode property and set it to Password instead of the default Normal.
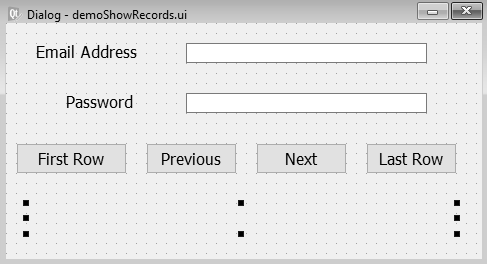
- Save the application by name as demoShowRecords. The form will now appear as shown in the following screenshot:
The user interface created with Qt Designer is stored in a .ui file, which is an XML file, and on applying the pyuic5 command, the XML file can be converted into Python code. The Python script generated, demoShowRecords.py, can be seen in the source code bundle of the book. - Treat the demoShowRecords.py script as a header file, and import it into the file from which you will invoke its user interface design.
- Create another Python file with the name callShowRecords.pyw and import the demoShowRecords.py code into it.
import sqlite3, sys
from PyQt5.QtWidgets import QDialog, QApplication,QTableWidgetItem
from sqlite3 import Error
from demoShowRecords import *

rowNo=1
sqlStatement="SELECT EmailAddress, Password FROM Users"
conn = sqlite3.connect("ECommerce.db")
cur = conn.cursor()

class MyForm(QDialog):
    def __init__(self):
        super().__init__()
        self.ui = Ui_Dialog()
        self.ui.setupUi(self)
        cur.execute(sqlStatement)
        self.ui.pushButtonFirst.clicked.connect(self.ShowFirstRow)
        self.ui.pushButtonPrevious.clicked.connect(self.ShowPreviousRow)
        self.ui.pushButtonNext.clicked.connect(self.ShowNextRow)
        self.ui.pushButtonLast.clicked.connect(self.ShowLastRow)
        self.show()
    def ShowFirstRow(self):
        try:
            cur.execute(sqlStatement)
            row=cur.fetchone()
            if row:
                self.ui.lineEditEmailAddress.setText(row[0])
                self.ui.lineEditPassword.setText(row[1])
        except Error as e:
            self.ui.labelResponse.setText("Error in accessing table")
    def ShowPreviousRow(self):
        global rowNo
        rowNo -= 1
        sqlStatement="SELECT EmailAddress, Password FROM Users where rowid=" + str(rowNo)
        cur.execute(sqlStatement)
        row=cur.fetchone()
        if row:
            self.ui.labelResponse.setText("")
            self.ui.lineEditEmailAddress.setText(row[0])
            self.ui.lineEditPassword.setText(row[1])
        else:
            rowNo += 1
            self.ui.labelResponse.setText("This is the first row")
    def ShowNextRow(self):
        global rowNo
        rowNo += 1
        sqlStatement="SELECT EmailAddress, Password FROM Users where rowid="+str(rowNo)
        cur.execute(sqlStatement)
        row=cur.fetchone()
        if row:
            self.ui.labelResponse.setText("")
            self.ui.lineEditEmailAddress.setText(row[0])
            self.ui.lineEditPassword.setText(row[1])
        else:
            rowNo -= 1
            self.ui.labelResponse.setText("This is the last row")
    def ShowLastRow(self):
        cur.execute(sqlStatement)
        for row in cur.fetchall():
            self.ui.lineEditEmailAddress.setText(row[0])
            self.ui.lineEditPassword.setText(row[1])

if __name__=="__main__":
    app = QApplication(sys.argv)
    w = MyForm()
    w.show()
    sys.exit(app.exec_())
How it works…
You can see in the script that the click() event of the push button with the objectName property pushButtonFirst is connected to the ShowFirstRow() method, the push button with the objectName property pushButtonPrevious is connected to the ShowPreviousRow() method, the push button with the objectName property pushButtonNext is connected to the ShowNextRow() method, and the push button with the objectName property pushButtonLast is connected to the ShowLastRow() method.
Whenever a push button is clicked, the associated method will be invoked.
In the ShowFirstRow() method, an SQL SELECT statement is executed that fetches the email address and password columns of the Users table. The fetchone() method is executed on the cursor to access the first row from the rows that are received on execution of the SQL SELECT statement. The data in the EmailAddress and Password columns is displayed through two Line Edit widgets on the screen. If an error occurs when accessing the rows, an error message, Error in accessing table, will be displayed through the Label widget.
To fetch the previous row, we make use of a global variable, rowNo, which is initialized to 1. In the ShowPreviousRow() method, the value of the global variable, rowNo, is decremented by 1. Thereafter, an SQL SELECT statement is executed that fetches the EmailAddress and Password columns of the Users table whose rowid=rowNo. Because the rowNo variable is decremented by 1, the SQL SELECT statement will fetch the previous row in the sequence. The fetchone() method is executed on the cursor to access the received row, and the data in the EmailAddress and Password columns is displayed through two Line Edit widgets on the screen.
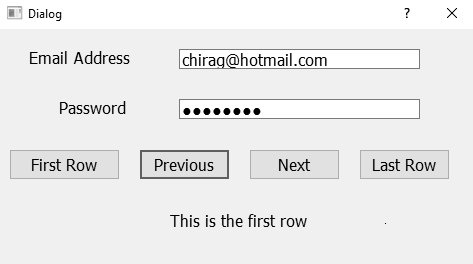
If the first row is already being displayed, then, upon clicking the Previous button, it will simply display a message, This is the first row, through the Label widget.
We make use of the global variable rowNo while accessing the next row in the sequence too. In the ShowNextRow() method, the value of the global variable rowNo is incremented by 1. Thereafter, an SQL SELECT statement is executed that fetches the EmailAddress and Password columns of the Users table whose rowid=rowNo; hence, the next row, that is, the one whose rowid is one higher than the current row, is accessed. The fetchone() method is executed on the cursor to access the received row and the data in the EmailAddress and Password columns is displayed through two Line Edit widgets on the screen.
If you are looking at the last row in the database table, then, upon clicking the Next button, it will simply display a message, This is the last row, through the Label widget.
In the ShowLastRow() method, an SQL SELECT statement is executed that fetches the EmailAddress and Password columns of the Users table. The fetchall() method is executed on the cursor to access the remainder of the rows in the database table. Using the for loop, a row variable is moved to the last row from the rows that are received upon execution of the SQL SELECT statement. The data in the EmailAddress and Password columns of the last row is displayed through two Line Edit widgets on the screen.
Upon running the application, you will get the first row of the database table displayed on the screen, as shown in the following screenshot. If you click the Previous button now, you get the message, This is the first row:
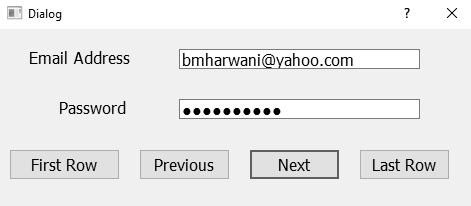
Upon clicking the Next button, the next row in the sequence will be displayed on the screen, as shown in the following screenshot:
Upon clicking the Last Row button, the last row in the database table will be displayed, as shown in the following screenshot:

Searching a database table for specific information
In this recipe, we will be learning how searching is performed in a database table to fetch the desired information. We assume that a user has forgotten their password. So, you will be prompted to enter the database name, table name, and email address of the user whose password is required. If any user with the email address supplied exists in the database table, then the password of that user will be searched for, accessed, and displayed on the screen.
How to do it…
Follow these steps to find out how data can be searched for in a database table in SQLite:
- Let's create an application based on the Dialog without Buttons template.
- Add five QLabel widgets, four QLineEdit widgets, and one QPushButton widget to the form by dragging and dropping five Label widgets, four Line Edit widgets, and one Push Button widget on the form.
- Set the text property of the first three Label widgets to Enter database name, Enter table name, and Email Address.
- Delete the text property of the fourth Label widget this is established through code.
- Set the text property of the fifth Label widget to Password.
- Set the text property of the push button to Search.
- Set the objectName property of the four Line Edit widgets to lineEditDBName, lineEditTableName, lineEditEmailAddress, and lineEditPassword.
- Set the objectName property of the Push Button widget to pushButtonSearch.
- Set the objectName property of the fourth Label widget to labelResponse.
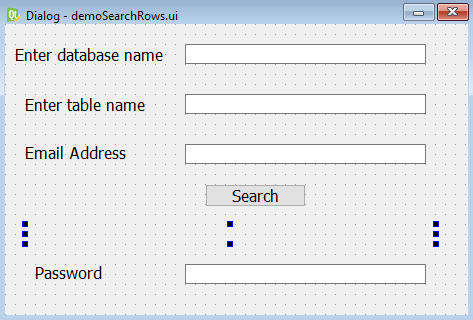
- Save the application by name as demoSearchRows.ui. The form will now appear as shown in the following screenshot:
The user interface created with Qt Designer is stored in a .ui file, an XML file that needs to be converted into Python code through application of the pyuic5 command. The generated Python script, demoSearchRows.py, can be seen in the source code bundle of the book.
- Treat the demoSearchRows.py script as a header file, and import it into the file from which you will invoke its user interface design.
- Create another Python file with the name callSearchRows.pyw and import the demoSearchRows.py code into it:
import sqlite3, sys
from PyQt5.QtWidgets import QDialog, QApplication
from sqlite3 import Error
from demoSearchRows import *
class MyForm(QDialog):
    def __init__(self):
        super().__init__()
        self.ui = Ui_Dialog()
        self.ui.setupUi(self)
        self.ui.pushButtonSearch.clicked.connect(self.SearchRows)
        self.show()
    def SearchRows(self):
        sqlStatement="SELECT Password FROM "+self.ui.lineEditTableName.text() + " where EmailAddress like'" + self.ui.lineEditEmailAddress.text()+"'"
        try:
            conn = sqlite3.connect(self.ui.lineEditDBName.text() + ".db")
            cur = conn.cursor()
            cur.execute(sqlStatement)
            row = cur.fetchone()
            if row==None:
                self.ui.labelResponse.setText("Sorry, No User found with this email address")
                self.ui.lineEditPassword.setText("")
            else:
                self.ui.labelResponse.setText("Email Address Found, Password of this User is :")
                self.ui.lineEditPassword.setText(row[0])
        except Error as e:
            self.ui.labelResponse.setText("Error in accessing row")
        finally:
            conn.close()

if __name__=="__main__":
    app = QApplication(sys.argv)
    w = MyForm()
    w.show()
    sys.exit(app.exec_())
How it works…
You can see in the script that the click() event of the push button with the objectName property pushButtonSearch is connected to the SearchRows() method. This means that, whenever the push button is clicked, the SearchRows() method is invoked. In the SearchRows() method, the connect() method is invoked on the sqlite3 class and the database name entered by the user in the Line Edit widget is passed to the connect() method. The connection to the database is established. An SQL search statement is defined that fetches the Password column from the table supplied whose email address matches the email address supplied. The search SQL statement is executed on the given database table. The fetchone() method is executed on the cursor to fetch one row from the executed SQL statement. If the fetched row is not None, that is, there is a row in the database table that matches the given email address, the password in the row is accessed and assigned to the Line Edit widget with the object name lineEditPassword for display. Finally, the connection to the database is closed.
If an error occurs in the execution of the SQL statement, that is, if the database is not found, the table name is incorrectly entered, or the email address column does not exist in the given table, an error message, Error in accessing row, is displayed via the Label widget with the objectName property, labelResponse.
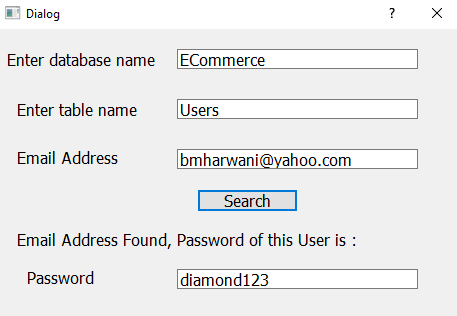
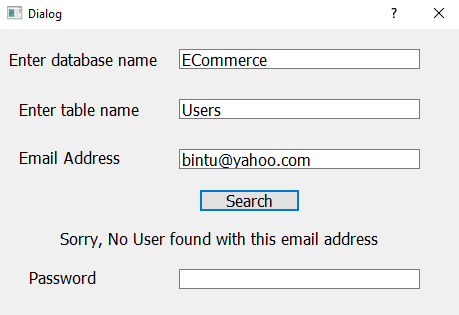
Upon running the application, we get a dialog that prompts us for the database name, table name, and column name from the table. Suppose we want to find out the password of the user whose email address is bmharwani@yahoo.com in the Users table of the ECommerce database. After entering the required information in the boxes, when you click on the Search button, the password of the user will be accessed from the table and displayed through the Line Edit widget, as shown in the following screenshot:
If the email address supplied is not found in the Users table, you get the message "Sorry, No User found with this email address," which is displayed through the Label widget as shown here:
Creating a signin form – applying an authentication procedure
In this recipe, we will be learning how rows can be accessed from a specific table and compared with the information supplied.
We assume that a database called ECommerce already exists and a table called Users also exists in the ECommerce database. The Users table consists of two columns, EmailAddress and Password. Also, we assume that the Users table contains a few rows in it. The user
will be prompted to enter their email address and password in the signin form. The Users table is searched for the specified email address. If the email address is found in the Users table, then the password in that row is compared with the password entered. If the two passwords match, a welcome message is displayed; otherwise, an error message indicating that the email address or password don't match is displayed.
How to do it…
Here are the steps to understand how data in a database table can be compared with data entered by the user and authenticate a user:
- Let's create an application based on the Dialog without Buttons template.
- Add three QLabel widgets, two QLineEdit widgets, and one QPushButton widget to the form by dragging and dropping three Label widgets, two Line Edit widgets, and one Push Button widget on the form.
- Set the text property of the first two Label widgets to Email Address and Password.
- Delete the text property of the third Label widget this is established through code.
- Set the text property of the push button to Sign In.
- Set the objectName property of the two Line Edit widgets to lineEditEmailAddress and lineEditPassword.
- Set the objectName property of the Push Button widget to pushButtonSearch.
- Set the objectName property of the third Label widget to labelResponse.
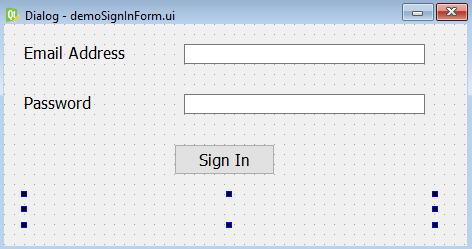
- Save the application by name as demoSignInForm.ui. The form will now appear as shown in the following screenshot:
The user interface created with Qt Designer is stored in a .ui file, which is an XML file, and needs to be converted into Python code. By applying the pyuic5 command, the XML file can be converted into Python code. The Python script generated, demoSignInForm.py, can be seen in the source code bundle of the book.
- Treat the demoSignInForm.py file as a header file, and import it into the file from which you will invoke its user interface design.
- Create another Python file with the name callSignInForm.pyw and import the demoSignInForm.py code into it:
import sqlite3, sys
from PyQt5.QtWidgets import QDialog, QApplication
from sqlite3 import Error
from demoSignInForm import *

class MyForm(QDialog):
    def __init__(self):
        super().__init__()
        self.ui = Ui_Dialog()
        self.ui.setupUi(self)
        self.ui.pushButtonSearch.clicked.connect(self.SearchRows)
        self.show()
    def SearchRows(self):
        sqlStatement="SELECT EmailAddress, Password FROM Users where EmailAddress like'" + \
            self.ui.lineEditEmailAddress.text() + \
                "'and Password like '" + self.ui.lineEditPassword.text() + "'"
        try:
            conn = sqlite3.connect("ECommerce.db")
            cur = conn.cursor()
            cur.execute(sqlStatement)
            row = cur.fetchone()
            if row==None:
                self.ui.labelResponse.setText("Sorry, Incorrect email address or password ")
            else:
                self.ui.labelResponse.setText("You are welcome ")
        except Error as e:
            self.ui.labelResponse.setText("Error in accessing row")
        finally:
            conn.close()

if __name__=="__main__":
    app = QApplication(sys.argv)
    w = MyForm()
    w.show()
    sys.exit(app.exec_())
How it works…
You can see in the script that the click event of the push button with the objectName property pushButtonSearch is connected to the SearchRows() method. This means that, whenever the push button is clicked, the SearchRows() method is invoked. In the SearchRows() method, the connect() method is invoked on the sqlite3 class to establish a connection with the ECommerce database. An SQL search statement is defined that fetches the EmailAddress and Password columns from the Users table whose email address matches the email address supplied. The search SQL statement is executed on the Users table. The fetchone() method is executed on the cursor to fetch one row from the executed SQL statement. If the fetched row is not None, that is, there is a row in the database table that matches the given email address and password, a welcome message is displayed with the Label widget with the objectName property, labelResponse. Finally, the connection to the database is closed.
If an error occurs in the execution of the SQL statement, if the database is not found, or if the table name is incorrectly entered, or the email address or password columns do not exist in the Users table, an error message, Error in accessing row, is displayed via the Label widget with the objectName property, labelResponse.
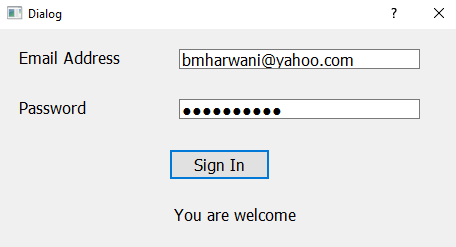
Upon running the application, you will be prompted to enter an email address and password. Upon entering the correct email address and password, when you click the Sign In button, you receive the message, You are welcome, as shown in the following screenshot:
But if either email address or password is entered incorrectly, you get the message, Sorry, Incorrect email address or password, as shown in the following screenshot:

Updating a database table – changing a user's password
In this recipe, you will learn how to update any information in the database. Changing passwords is a very common requirement in almost all applications. In this recipe, we assume that a database called ECommerce already exists and a table called Users also exists in the ECommerce database. The Users table consists of two columns, EmailAddress and Password. Also, we assume that the Users table contains a few rows in it. The user will be prompted to enter their email address and password in the form. The Users table is searched for the specified email address and password. If a row is found with the specified email address and password, the user will be prompted to enter a new password. The new password will be asked for twice, that is, the user will be asked to enter their new password in both the New Password box and the Re-enter New Password box. If the passwords entered in the two boxes match, the password will be changed, that is, the old password will be replaced by the new password.
How to do it…
The procedure for deleting data from the database table is very critical, and any mistake in executing such an application can lead to disaster. Here come the steps to delete any row from the given database table:
- Let's create an application based on the Dialog without Buttons template.
- Add five QLabel widgets, four QLineEdit widgets, and one QPushButton widget to the form by dragging and dropping five Label widgets, four Line Edit widgets, and one Push Button widget on the form.
- Set the text property of the first four Label widgets to Email Address, Old Password, New Password, and Re-enter New Password.
- Delete the text property of the fifth Label widget this is established through code. Set the text property of the push button to Change Password.
- Set the objectName property of the four Line Edit widgets to lineEditEmailAddress, lineEditOldPassword, lineEditNewPassword, and lineEditRePassword. Since we don't want the password to be displayed in any of the Line Edit widgets that are associated with the password, we want the asterisks to appear when the user enters the password.
- Select the three Line Edit widgets one at a time and from the Property Editor window.
- Select the echoMode property and set it to Password instead of the default Normal.
- Set the objectName property of the Push Button widget to pushButtonChangePassword.
- Set the objectName property of the fifth Label widget to labelResponse.
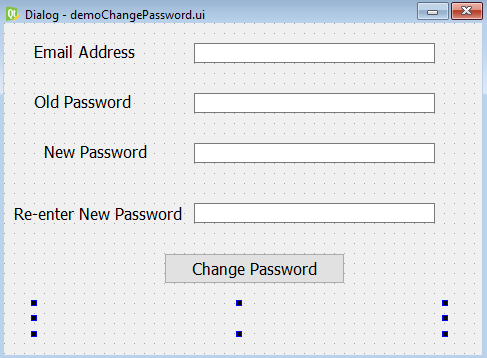
- Save the application by name as demoChangePassword.ui. The form will now appear as shown in the following screenshot:
The user interface created with Qt Designer is stored in a .ui file, which is an XML file, and needs to be converted into Python code. The pyuic5 command is used to convert the XML file into Python code. The Python script generated, demoChangePassword.py, can be seen in the source code bundle of this book.
- Treat the demoChangePassword.py script as a header file, and import it into the file from which you will invoke its user interface design.
- Create another Python file with the name callChangePassword.pyw and import the demoChangePassword.py code into it:
import sqlite3, sys
from PyQt5.QtWidgets import QDialog, QApplication
from sqlite3 import Error
from demoChangePassword import *

class MyForm(QDialog):
    def __init__(self):
        super().__init__()
        self.ui = Ui_Dialog()
        self.ui.setupUi(self)
        self.ui.pushButtonChangePassword.clicked.connect(self.ChangePassword)
        self.show()
    def ChangePassword(self):
        selectStatement = "SELECT EmailAddress, Password FROM Users where EmailAddress like '" + \
            self.ui.lineEditEmailAddress.text() + "'and Password like '" + \
                self.ui.lineEditOldPassword.text() + "'"
        try:
            conn = sqlite3.connect("ECommerce.db")
            cur = conn.cursor()
            cur.execute(selectStatement)
            row = cur.fetchone()
            if row==None:
                self.ui.labelResponse.setText("Sorry, Incorrect email address or password")
            else:
                if self.ui.lineEditNewPassword.text() == self.ui.lineEditRePassword.text():
                    updateStatement = "UPDATE Users set Password = '" + \
                        self.ui.lineEditNewPassword.text() + "' WHERE EmailAddress like'" + \
                            self.ui.lineEditEmailAddress.text() + "'"
                    with conn:
                        cur.execute(updateStatement)
                        self.ui.labelResponse.setText("Password successfully changed")
                else:
                    self.ui.labelResponse.setText("The two passwords don't match")
        except Error as e:
            self.ui.labelResponse.setText("Error in accessing row")
        finally:
            conn.close()

if __name__=="__main__":
    app = QApplication(sys.argv)
    w = MyForm()
    w.show()
    sys.exit(app.exec_())
How it works…
You can see in the script that the click() event of the push button with the objectName property pushButtonChangePassword is connected to the ChangePassword() method. This means that, whenever the push button is clicked, the ChangePassword() method will be invoked. In the ChangePassword() method, the connect() method is invoked on the sqlite3 class to establish a connection with the ECommerce database. An SQL SELECT statement is defined that fetches the EmailAddress and Password columns from the Users table whose email address and password matches the email address and password entered in the Line Edit widgets. The SQL SELECT statement is executed on the Users table. The fetchone() method is executed on the cursor to fetch one row from the executed SQL statement. If the fetched row is not None, that is, there is a row in the database table, then it is confirmed whether the new passwords entered in the two Line Edit widgets, lineEditNewPassword and lineEditRePassword, are exactly the same. If the two passwords are the same, then an UPDATE SQL statement is executed to update the Users table, changing the password to the new one.
If the two passwords do not match, then no updating is applied to the database table and a message, The two passwords don't match, is displayed through the Label widget.
If an error occurs in the execution of the SQL SELECT or UPDATE statement, then an error message, Error in accessing row, is displayed via a Label widget with the objectName property labelResponse.
Upon running the application, you will be prompted to enter the email address and password, along with the new password, too. If the email address or password does not match, an error message, Sorry, Incorrect email address or password, is displayed via the Label widget, as shown in the following screenshot:

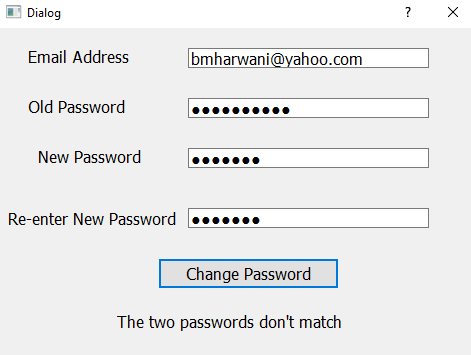
If the email address and password entered are correct, but the new passwords entered in the New Password and Re-enter New Password boxes do not match, then the message The two passwords don't match is displayed on the screen, as shown in the following screenshot:
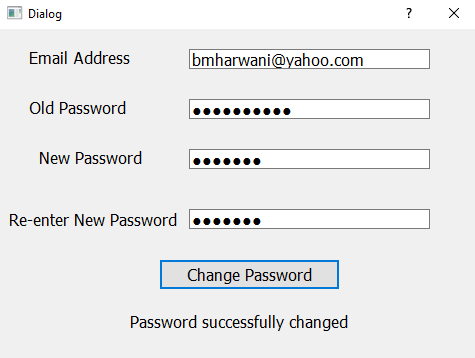
If the email address and passwords are all entered correctly, that is, if the user row is found in the database table and the new passwords entered in the New Password and Re-enter New Password boxes match, then the Users table is updated and, upon successfully updating the table, a message, Password successfully changed, is displayed on the screen, as shown in the following screenshot:
Deleting a row from a database table
In this recipe, we will be learning how to remove a row from a database table. We assume that a database called ECommerce already exists and a table called Users also exists in the ECommerce database. The Users table consists of two columns, EmailAddress and Password. Also, we assume that the User table contains a few rows in it. The user will be prompted to enter their email address and password in the form. The Users table is searched for the specified email address and password. If any row is found with the specified email address and password in the Users table, you will be prompted to confirm whether you are sure that you want to delete the row. If you click on the Yes button, the row will be deleted.
How to do it…
The procedure for deleting data from the database table is very critical, and any mistake in executing such an application can lead to disaster. The following are the steps for deleting any row from the given database table:
- Let's create an application based on the Dialog without Buttons template.
- Add four QLabel widgets, two QLineEdit widgets, and three
QPushButton widgets to the form by dragging and dropping four Label widgets, two LineEdit widgets, and three Push Button widgets on the form.
- Set the text property of the first three Label widgets to Email Address, Password, and Are you Sure?
- Delete the text property of the fourth Label widget this is established through code.
- Set the text property of the three push buttons to Delete User, Yes, and No.
- Set the objectName property of the two Line Edit widgets to lineEditEmailAddress and lineEditPassword.
- Set the objectName property of the three Push Button widgets to pushButtonDelete, pushButtonYes, and pushButtonNo.
- Set the objectName property of the fourth Label widget to labelResponse.
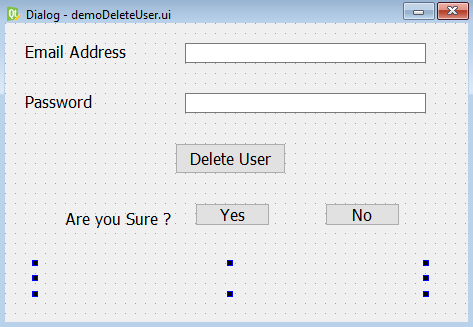
- Save the application by name as demoDeleteUser.ui. The form will now appear as shown in the following screenshot:
The user interface created with Qt Designer is stored in a .ui file, which is an XML file and needs to be converted into Python code. The pyuic5 command is used for converting the XML file into Python code. The Python script generated, demoDeleteUser.py, can be seen in the source code bundle of this book.
- Treat the demoDeleteUser.py script as a header file, and import it into the file from which you will invoke its user interface design.
- Create another Python file with the name callDeleteUser.pyw and import the demoDeleteUser.py code into it:
import sqlite3, sys
from PyQt5.QtWidgets import QDialog, QApplication
from sqlite3 import Error
from demoDeleteUser import *

class MyForm(QDialog):
    def __init__(self):
        super().__init__()
        self.ui = Ui_Dialog()
        self.ui.setupUi(self)
        self.ui.pushButtonDelete.clicked.connect(self.DeleteUser)
        self.ui.pushButtonYes.clicked.connect(self.ConfirmDelete)
        self.ui.labelSure.hide()
        self.ui.pushButtonYes.hide()
        self.ui.pushButtonNo.hide()
        self.show()
    def DeleteUser(self):
        selectStatement="SELECT * FROM Users where EmailAddress like'" + \
            self.ui.lineEditEmailAddress.text() + "' and Password like '" + \
                self.ui.lineEditPassword.text() + "'"
        try:
            conn = sqlite3.connect("ECommerce.db")
            cur = conn.cursor()
            cur.execute(selectStatement)
            row = cur.fetchone()
            if row==None:
                self.ui.labelSure.hide()
                self.ui.pushButtonYes.hide()
                self.ui.pushButtonNo.hide()
                self.ui.labelResponse.setText("Sorry, Incorrect email address or password ")
            else:
                self.ui.labelSure.show()
                self.ui.pushButtonYes.show()
                self.ui.pushButtonNo.show()
                self.ui.labelResponse.setText("")
        except Error as e:
            self.ui.labelResponse.setText("Error in accessing user account")
        finally:
            conn.close()
    def ConfirmDelete(self):
        deleteStatement="DELETE FROM Users where EmailAddress like '"+ \
            self.ui.lineEditEmailAddress.text() + "' and Password like '" + \
                self.ui.lineEditPassword.text() + "'"
        try:
            conn = sqlite3.connect("ECommerce.db")
            cur = conn.cursor()
            with conn:
                cur.execute(deleteStatement)
                self.ui.labelResponse.setText("User successfully deleted")
        except Error as e:
            self.ui.labelResponse.setText("Error in deleting user account")
        finally:
            conn.close()
if __name__=="__main__":
    app = QApplication(sys.argv)
    w = MyForm()
    w.show()
    sys.exit(app.exec_())
How it works…
In this application, the Label widget with the text Are you Sure? and the two push buttons, Yes and No, are initially hidden. These three widgets will be displayed only when the email address and password entered by the user are found in the database table. These three widgets enable the user to confirm that they really want to delete the row. So, the hide() method is invoked on these three widgets to make them initially invisible. Also, the click() event of the push button with the objectName property pushButtonDelete is connected to the DeleteUser() method. This means that whenever the Delete button is clicked, the DeleteUser() method is invoked. Similarly, the click() event of the push button with the objectName property pushButtonYes is connected to the ConfirmDelete() method. This means that when the user confirms deletion of the row by clicking the Yes button, the ConfirmDelete() method will be invoked.
In the DeleteUser() method, you first search to see whether any row exists in the Users table that matches the email address and password entered. The connect() method is invoked on the sqlite3 class to establish a connection with the ECommerce database. An SQL SELECT statement is defined that fetches the EmailAddress and Password columns from the Users table whose email address and password matches the email address and passwords supplied. The SQL SELECT statement is executed on the Users table. The fetchone() method is executed on the cursor to fetch one row from the executed SQL statement. If the fetched row is not None, that is, there is a row in the database table that matches the given email address and password, the three widgets, the Label, and two push buttons, will be made visible. The user will be shown the message Are you Sure? followed by two push buttons with the text Yes and No.
If the user clicks the Yes button, then the ConfirmDelete() method is executed. In the ConfirmDelete() method, an SQL DELETE method is defined that deletes the row that matches the entered email address and password from the Users table. After establishing a connection with the ECommerce database, the SQL DELETE method is executed. If the row is successfully deleted from the Users table, a message, User successfully deleted, will be displayed through the Label widget; otherwise, an error message, Error in deleting user account, will be displayed.
Before running the application, we will launch a visual tool called DB Browser for SQLite. The visual tool enables us to create, edit, and view the database tables and rows inside them. Using DB Browser for SQLite, we will first see the existing rows in the Users table. After that, the application will run and a row will be deleted. Again, from DB Browser for SQLite, we will confirm the row was really deleted from the Users table.
So, launch DB Browser for SQLite and click the Open Database tab below the main menu. Browse and select the Ecommerce database from the current folder. The Ecommerce database shows the Users table consisting of two columns, EmailAddress and Password.
Click on the Execute SQL button to write an SQL statement. In the window, write the SQL statement select * from Users, followed by clicking the Run icon. All existing rows in the Users table will be displayed on the screen. You can see in the following screenshot that the Users table has two rows:

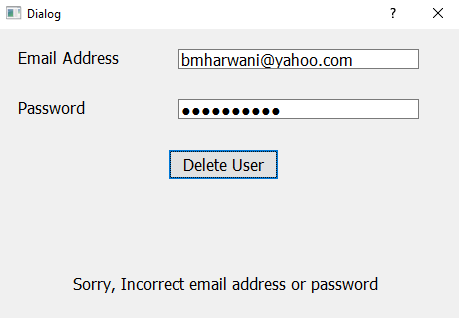
Upon running the application, you will be prompted to enter your email address and password. If you enter the wrong email address and password, you get the message Sorry, Incorrect email address or password, as shown in the following screenshot:
Upon entering the correct email address and password, when you click the Delete User button, the three widgets—the Label widget and two push buttons, will be made visible, and you get the message Are you Sure?, along with the two push buttons, Yes and No, as shown in the following screenshot:

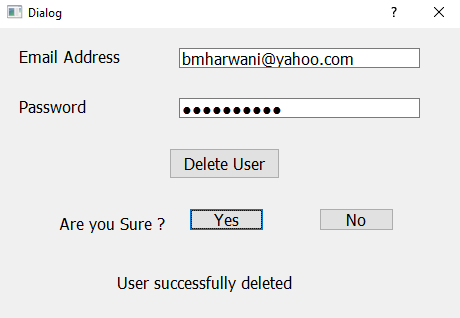
Upon clicking the Yes push button, the row in the Users table whose email address and password matches the email address and password supplied will be deleted and a confirmation message, User successfully deleted, will be displayed through the Label widget, as shown in the following screenshot:
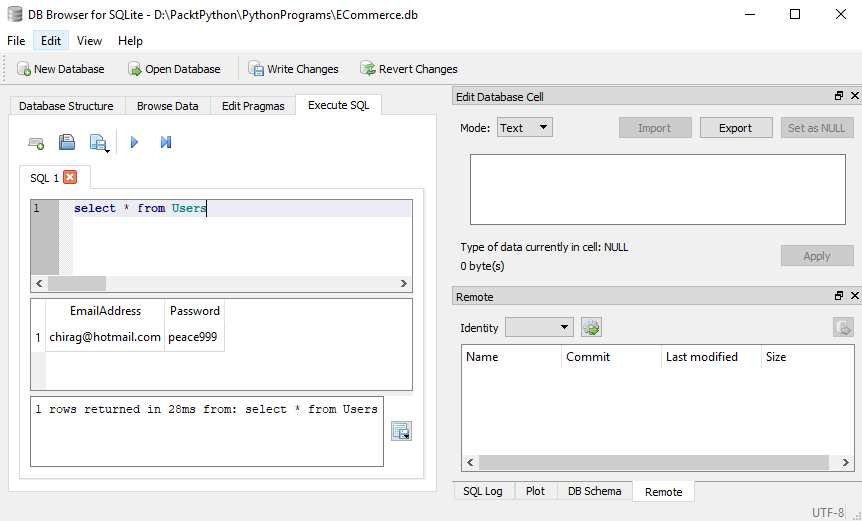
Let's check through the visual tool as to whether the row was actually deleted from the Users table. Therefore, launch the DB Browser for SQLite and click the Open Database tab below the main menu. Browse and select the Ecommerce database from the current folder. The Ecommerce database will show the Users table. Click on the Execute SQL button to write an SQL statement. In the window, write the SQL statement select * from Users, followed by clicking the Run icon. All existing rows in the Users table will be displayed on the screen. Before running the application, we saw that there were two rows in the Users table. This time, you see only one row in the Users table (see the following screenshot), confirming that a row was deleted from the Users table:
'Qt5 Python GUI Programming Cookbook' 카테고리의 다른 글
| Implementing Animation (0) | 2023.02.28 |
|---|---|
| Using Graphics (0) | 2023.02.28 |
| Doing Asynchronous Programming in Python (1) | 2023.02.28 |
| Networking and Managing Large Documents (1) | 2023.02.28 |
| Understanding Dialogs (0) | 2023.02.28 |


댓글