In this chapter, we will learn how to use the following types of dialog:
- The input dialog box
- Using the input dialog
- Using the color dialog
- Using the font dialog
- Using the file dialog
Introduction
Dialogs are required in all applications to get input from the user, and also to guide the user to enter the correct data. Interactive dialogs make the application quite user-friendly too. There are basically the following two types of dialog:
- Modal dialog: A modal dialog is a dialog that wants the user to enter mandatory information. This type of dialog doesn't allow the user to use other parts of the application until the modal dialog is closed. That is, the user needs to enter the required information in the modal dialog, and after closing the dialog, the user can access the rest of the application.
- Non-modal or modeless dialogs: These are dialogs that enable the user to interact with the rest of the application and dialog box too. That is, the user can continue interacting with the rest of the application while keeping the modeless dialog open. That is why modeless dialogs are usually used for getting non- essential or non-critical information from the user.
The input dialog box
An input dialog box is created with the help of the QInputDialog class. The QInputDialog class provides a dialog to get a single value from the user. The provided input dialog consists of a text field and two buttons, OK and Cancel. The text field enables us to get a single value from the user, where that single value can be a string, a number, or an item from a list. The following are the methods provided by the QInputDialog class to accept different types of input from the user:
- getInt(): This method shows a spin box for accepting an integer number. To get an integer from the user, you need to use the following syntax:
Take a look at the following example:getInt(self, window title, label before LineEdit widget, default value, minimum, maximum and step size)
The preceding code prompts the user to enter quantity. If the user does not enter any value, the default value 2 will be assigned to the quantity variable. The user can enter any value between 1 and 100.quantity, ok = QInputDialog.getInt(self, "Order Quantity", "Enter quantity:", 2, 1, 100, 1)
- getDouble(): This method shows a spin box with a floating point number to accept fractional values. To get a fractional value from the user, you need to use the following syntax:
Take a look at the following example:getDouble(self, window title, label before LineEdit widget, default value, minimum, maximum and number of decimal places desired)
The preceding code prompts the user to enter the price of the product. If the user does not enters any value, the default value 1.50 will be assigned to the price variable. The user can enter any value between 0 and 100.price, ok = QInputDialog.getDouble(self, "Price of the product", "Enter price:", 1.50,0, 100, 2)
getText(): This method shows a Line Edit widget to accept text from the user. To get text from the user, you need to use the following syntax:
getText(self, window title, label before LineEdit widget)Take a look at the following example:
name, ok = QtGui.QInputDialog.getText(self, 'Get Customer Name', 'Enter your name:')The preceding code will display an input dialog box with the title, Get Customer Name. The dialog box will also display a Line Edit widget allowing user to enter some text. A Label widget will also be displayed before the Line Edit widget showing the text, Enter your name:. The customer's name, entered in the dialog box will be assigned to the name variable.
getItem(): This method shows a combo box displaying several items to choose from. To get an item from a drop-down box, you need to use the following syntax:
getItem(self, window title, label before combo box, array , current item, Boolean Editable)Here, array is the list of items that need to be displayed in the combo box. The current item is the item that is treated as the current item in the combo box. Editable is the Boolean value, which, if set to True, means the user can edit the combo box and enter their own text. When Editable is set to False, it means the user can only select an item from the combo box but cannot edit items. Take a look at the following example:
countryName, ok = QInputDialog.getItem(self, "Input Dialog", "List of countries", countries, 0, False)The preceding code will display an input dialog with the title Input Dialog. The dialog box shows a combo box showing a list of countries that are displayed via the elements from the countries array. The Label widget before the combo box shows the text, List of countries. The selected country name from the combo box will be assigned to the countryName variable. Users can only choose the country from the combo box but cannot edit any country name from the combo box.
Using the input dialog
The input dialog can accept data of any type, including integer, double, and text. In this recipe, we will learn to get text from the user. We will make use of an input dialog to know the name of the country in which the user lives.
The input dialog box will display a combo box showing different country names. On choosing a country by name, the chosen country name will appear in the textbox.
How to do it...
Let's create a new application based on the Dialog without Buttons template by performing the following steps:
- Since the application will prompt the user to choose the country that he/she lives, via input dialog, so drag and drop one Label widget, one Line Edit widget, and one Push Button widget onto the form.
- Set the text property of the Label widget to Your Country.
- Set the text property of the Push Button widget to Choose Country.
- Set the objectName property of the Line Edit widget to lineEditCountry.
- Set the objectName property of the Push Button widget to pushButtonCountry.
- Save the application with the name demoInputDialog.ui.

The form will now look as follows:
The user interface created with Qt Designer is stored in a .ui file, which is an XML file and needs converting to Python code.
- To do the conversion, you need to open a Command Prompt window, navigate to the folder where the file is saved, and issue the following command line:
C:\Pythonbook\PyQt5>pyuic5 demoInputDialog.ui -o demoInputDialog.py
You can find the generated Python script, demoInputDialog.py, in the source code bundle of this book.
- Treat the demoInputDialog.py script as a header file, and import it to the file from which you will invoke its user interface design.
- Create another Python file with the name callInputDialog.pyw and import the demoInputDialog.py code into it:
import sys

from PyQt5.QtWidgets import QDialog, QApplication, QInputDialog

from demoInputDialog import *

class MyForm(QDialog):
    def __init__(self):
        super().__init__()
        self.ui = Ui_Dialog()
        self.ui.setupUi(self)
        self.ui.pushButtonCountry.clicked.connect(self.dispmessage)
        self.show()

    def dispmessage(self):
      countries = ("Albania", "Algeria", "Andorra", "Angola", "Antigua and Barbuda", "Argentina", "Armenia", "Aruba", "Australia", "Austria", "Azerbaijan")
      countryName, ok = QInputDialog.getItem(self, "Input Dialog", "List of countries", countries, 0, False)
      if ok and countryName:
          self.ui.lineEditCountry.setText(countryName)

if __name__=="__main__":
    app = QApplication(sys.argv)
    w = MyForm()
    w.show()
    sys.exit(app.exec_())
How it works...
In the demoInputDialog.py file, a class with the name of the top-level object is created with Ui_ prepended. That is, for the top-level object, Dialog, the Ui_Dialog class is created and stores the interface elements of our widget. That class has two methods, setupUi() and retranslateUi().
The setupUi() method creates the widgets that are used in defining the user interface in Qt Designer. Also, the properties of the widgets are set in this method. The setupUi() method takes a single argument, which is the top-level widget of the application, an instance of QDialog. The retranslateUi() method translates the interface.
In the callInputDialog.pyw file, you can see that the click event of the Push Button widget is connected to the dispmessage() method that is used to select the country; when the user clicks the push button, the dispmessage() method will be invoked. The dispmessage() method defines a string array called countries that contains several country names in the form of array elements. After that, the getItem method of the QInputDialog class is invoked and opens up an input dialog box displaying a combo box. When the user clicks the combo box, it will expand, showing the country names that are assigned to the countries string array. When the user selects a country, followed by clicking the OK button in the dialog box, the selected country name will be assigned to the countryName variable. The selected country name will then be displayed through the Line Edit widget.
On running the application, you get an empty Line Edit widget and a push button, Choose Country, as shown in the following screenshot:

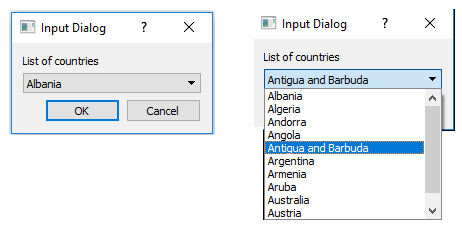
On clicking the Choose Country button, the input dialog box will open, as shown in the following screenshot. The input dialog shows a combo box along with two buttons, OK and Cancel. On clicking the combo box, it will expand to show all the country names, as shown in the following screenshot:
After choosing a country name from the combo box, followed by clicking the OK button, the chosen country name will be displayed in the Line Edit box, as shown in the following screenshot:

Using the color dialog
In this recipe, we will learn to use color dialog to display a color palette, allowing users to select predefined colors from the palette or create a new custom color.
The application includes a frame, and when the user selects any color from the color dialog, the chosen color will be applied to the frame. Besides this, the hex code of the selected color will also be displayed via a Label widget.
In this recipe, we will be making use of the QColorDialog class, which provides a dialog widget for selecting color values.
How to do it...
Let's create a new application based on the Dialog without Buttons template by performing the following steps:
- Drag and drop a Push Button, a Frame, and a Label widget onto the form.
- Set the text property of the Push Button widget to Choose color.
- Set the objectName property of the Push Button widget to pushButtonColor.
- Set the objectName property of the Frame widget to frameColor.
- Set the Label widget to labelColor.
- Save the application with the name demoColorDialog.ui.
The form will now look as follows:
The user interface created with Qt Designer is stored in a .ui file, which is an XML file. You can use pyuic5 utility to convert the XML file into Python code. The generated Python script, demoColorDialog.py, can be seen in the source code bundle of this book. The demoColorDialog.py script will be used as a header file, and will be imported in another Python script file, which will invoke this user interface design.
- Create another Python file with the name callColorDialog.pyw and import the demoColorDialog.py code into it:
import sys

from PyQt5.QtWidgets import QDialog, QApplication, QColorDialog
from PyQt5.QtGui import QColor

from demoColorDialog import *

class MyForm(QDialog):
    def __init__(self):
        super().__init__()
        col = QColor(0, 0, 0)
        self.ui = Ui_Dialog()
        self.ui.setupUi(self)
        self.ui.frameColor.setStyleSheet("QWidget { background-color: %s }" % col.name())
        self.ui.pushButtonColor.clicked.connect(self.dispcolor)
        self.show()

    def dispcolor(self):
        col = QColorDialog.getColor()
        if col.isValid():
            self.ui.frameColor.setStyleSheet("QWidget { background-color: %s }" % col.name())
            self.ui.labelColor.setText("You have selected the color with code: " + str(col.name()))

if __name__=="__main__":
    app = QApplication(sys.argv)
    w = MyForm()
    w.show()
    sys.exit(app.exec_())
How it works...
In the callColorDialog.pyw file, you can see that the click() event of the push button is connected to the dispcolor() method; that is, when the user clicks the Choose color button, the dispcolor() method will be invoked. The dispmessage() method invokes the getColor() method of the QColorDialog class, which opens up a dialog showing different colors. Not only can the user choose any predefined basic color from the dialog box, but they can create a new custom color too. After choosing the desired color, when the user clicks the OK button from the color dialog, the chosen color will be assigned to the frame by invoking the setStyleSheet() method on the Frame widget class. Also, the hex code of the chosen color is displayed via the Label widget.
On running the application, initially you see a push button, Choose color, and a frame that is filled with black by default, as shown in the following screenshot:
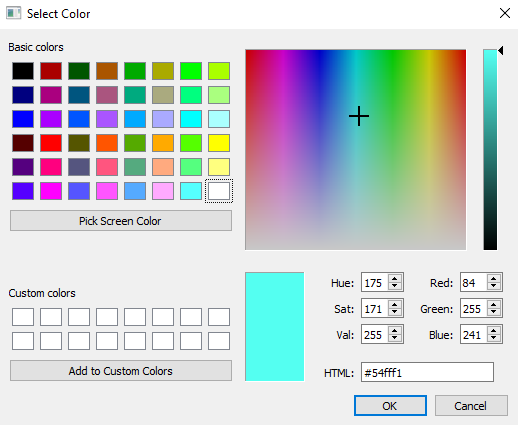
On clicking the Choose color button, the color dialog opens up, showing the basic colors shown in the following screenshot. The color dialog also enables you to create your own custom color too:
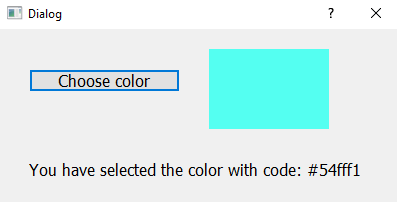
After selecting a color, when you select the OK button, the chosen color will be applied to the frame and the hex code of the chosen color will be displayed via the Label widget, as shown in the following screenshot:
Using the font dialog
In this recipe, we will learn to use a font dialog to apply different fonts and styles to the selected text.
We will make use of a Text Edit widget and a Push Button widget in this application. The push button, when clicked, will open the font dialog. The font and style selected from the font dialog will be applied to the text written in the Text Edit widget.
In this recipe, we will be making use of the QFontDialog class, which displays a Dialog widget meant for selecting a font.
How to do it...
Let's create a new application based on the Dialog without Buttons template by performing the following steps:
- Drag and drop a Push Button and a Text Edit widget onto the form.
- Set the text property of the Push Button widget to Choose Font.
- Set the objectName property of the Push Button widget to pushButtonFont.
- Save the application with the name demoFontDialog.ui.
- After performing the preceding steps, the application will appear as shown in the following screenshot:
The user interface created with Qt Designer is stored in a .ui file, which is an XML file. Using the pyuic5 command, you can convert the XML file into Python code. The generated Python script, demoFontDialog.py, can be seen in the source code bundle of this book. The demoFontDialog.py script will be used as a header file, and will be imported in another Python script file, which will invoke this user interface design.
- Create another Python file with the name callFontDialog.pyw and import the demoFontDialog.py code into it:
import sys

from PyQt5.QtWidgets import QDialog, QApplication, QFontDialog


from demoFontDialog import *

class MyForm(QDialog):
    def __init__(self):
        super().__init__()
        self.ui = Ui_Dialog()
        self.ui.setupUi(self)
        self.ui.pushButtonFont.clicked.connect(self.changefont)
        self.show()

    def changefont(self):
        font, ok = QFontDialog.getFont()
        if ok:
            self.ui.textEdit.setFont(font)

if __name__=="__main__":
    app = QApplication(sys.argv)
    w = MyForm()
    w.show()
    sys.exit(app.exec_())
How it works...
In the callFontDialog.pyw file, you can see that the click() event of the push button is connected to the changefont() method; that is, when the user clicks the Choose Font button, the change() method will be invoked. The changefont() method invokes the getFont() method of the QFontDialog class, which opens up a dialog showing different fonts, font styles, sizes, and effects. On choosing a font, font style, size, or effect, the effect of the choice on the text will be displayed in the Sample box. On choosing the desired font, font style, size, and effect, when user clicks the OK button, the selected choices will be assigned to the font variable. Subsequently, the setFont() method is invoked on the TextEdit class to apply the chosen font and styles to the text displayed through the Text Edit widget.
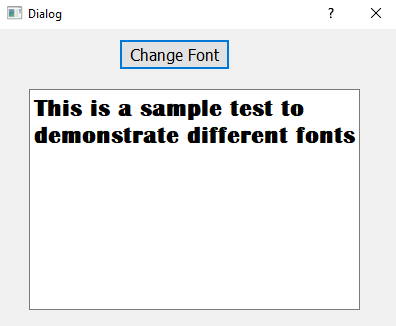
On running the application, you see a push button, the Change Font widget, and the Text Edit widget, as shown in the following screenshot:
To see the impact of a chosen font from the font dialog, you need to type some text in the Text Edit widget, as shown in the following screenshot:
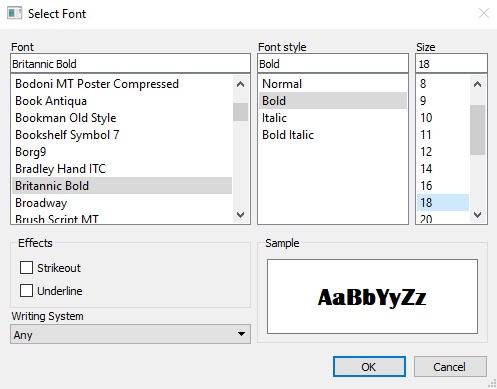
On selecting the Change Font button, the font dialog will open up, as shown in the following screenshot. You can see that a different font name will be displayed on the leftmost tab. The middle tab shows different font styles that enable you to make the text appear in bold, italic, bold italic, and regular. The rightmost tab shows different sizes. At the bottom, you can see different checkboxes that enable you to make text appear in underline, strikeout, and so on. Choose the options from any tab and the impact of the chosen font and style can be seen on the sample text shown in the Sample box. After selecting the desired font and style, click the OK button to close the font dialog:
The effect of the chosen font and style will appear on the text written in the Text Edit widget, as shown in the following screenshot:
Using the file dialog
In this recipe, we will learn to use a file dialog to understand how different file operations, such as opening a file and saving a file, are done.
We will learn to create a file menu with two menu items, Open and Save. On clicking the Open menu item, the file open dialog box will open, which will help in browsing and choosing the file to open. The file contents of the opened file is displayed in the Text Edit box. The user can even update the file contents if desired. After making the desired modifications in the file, when the user clicks the Save option from the File menu, the file contents will be updated.

Getting ready
In this recipe, we will be making use of the QFileDialog class, which displays a dialog
that allows users to select files or directories. The files can be selected for both opening and saving.
In this recipe, I will be using the following two methods of the QFileDialog class:
- getOpenFileName(): This method opens the file dialog, enabling the user to browse the directories and open the desired file. The syntax of the getOpenFileName() method is as follows:In the preceding code, filter represents the file extensions; it determines the types of file displayed to open, for example as follows:In the preceding example, file dialog is opened that shows all the files of home directory to browse from.In the preceding example, you can see that files from the home directory are displayed. The files with the extensions .png, .jpg, .txt, and .xml will be displayed in the dialog box.
file\_name = QFileDialog.getOpenFileName(self, 'Open file', '/home', "Images (\*.png \*.jpg);;Text files (.txt);;XML files (\*.xml)")file\_name = QFileDialog.getOpenFileName(self, 'Open file', '/home')file\_name = QFileDialog.getOpenFileName(self, dialog\_title, path, filter)- getSaveFileName(): This method opens the file save dialog, enabling the user to save the file with the desired name and in the desired folder. The syntax of the getSaveFileName() method is as follows:options represents various options for how to run the dialog, for example, take a look at the following code:In the preceding example, the File Save dialog box will be opened allowing you to save the files with the desired extension. If you don't specify the file extension, then it will be saved with the default extension, .txt.
file\_name, \_ = QFileDialog.getSaveFileName(self,"QFileDialog.getSaveFileName()","" ,"All Files (\*);;Text Files (\*.txt)", options=options)file\_name = QFileDialog.getSaveFileName(self, dialog\_title, path, filter, options)
How to do it...
Let's create a new application based on the Main Window template. The Main Window template includes a menu at the top by default:
- We can even use two push buttons to initiate the file open dialog box and file save dialog box, but using the menu items to initiate file operations will give the feel of a real-time application.
- The default menu bar in the Main Window template shows Type Here in place of the menu name.
- The Type Here option indicates that the user can type the desired menu name, replacing the Type Here text. Let's type File, creating a menu in the menu bar.
- On pressing the Enter key, the term Type Here will appear as a menu item under the File menu.
- Let's type Open as the first menu item in the File menu.
- On pressing the Enter key after creating the first menu item, Open, the term Type Here will appear below Open.
- Replace Type Here with the menu item, Save.
- After creating the File menu along with two menu items, Open and Save
- The application will appear as shown in the following screenshot:
In the Action Editor window that is below the Property Editor window, you can see that the default object names of the Open and Save menu items are actionOpen and actionSave, respectively. The Shortcut tab in the Action
Editor window is currently blank, as no shortcut has yet been assigned to either menu item:
- To assign a shortcut to the Open menu item, double-click on the blank space in the Shortcut tab of the actionOpen menu item. You get the dialog box, as shown in the following screenshot:
The Text, Object name, and ToolTip boxes are automatically filled with default text.
- Click on the Shortcut box to place the cursor in that box, and press the Ctrl and O keys to assign Ctrl + O as a shortcut to the Open menu item.
- Double-click on the blank space in the Shortcut tab of the actionSave menu item and press Ctrl + S in the Shortcut box of the dialog box that opens up.
- After assigning the shortcut keys to both the menu items, Open and Save. The Action Editor window will appear as shown in the following screenshot:
The user interface created with Qt Designer is stored in a .ui file, which is an XML file. On application of the pyuic5 command, the XML file will be converted into Python code. The generated Python script, demoFileDialog.py, can be seen
in the source code bundle of the book. The demoFileDialog.py script will be used as a header file, and will be imported in another Python script file, which will invoke this user interface design, the File menu and its respective menu items.
- Create another Python file with the name callFileDialog.pyw and import the demoFileDialog.py code into it:
import sys

from PyQt5.QtWidgets import QMainWindow, QApplication, QAction, QFileDialog

from demoFileDialog import *

class MyForm(QMainWindow):
    def __init__(self):
        super().__init__()
        self.ui = Ui_MainWindow()
        self.ui.setupUi(self)
        self.ui.actionOpen.triggered.connect(self.openFileDialog)
        self.ui.actionSave.triggered.connect(self.saveFileDialog)
        self.show()

    def openFileDialog(self):

        fname = QFileDialog.getOpenFileName(self, 'Open file', '/home')

        if fname[0]:
            f = open(fname[0], 'r')

            with f:
                data = f.read()
                self.ui.textEdit.setText(data)

    def saveFileDialog(self):
        options = QFileDialog.Options()
        options |= QFileDialog.DontUseNativeDialog
        fileName, _ = QFileDialog.getSaveFileName(self,"QFileDialog.getSaveFileName()","","All Files (*);;Text Files (*.txt)", options=options)
        f = open(fileName,'w')
        text = self.ui.textEdit.toPlainText()
        f.write(text)
        f.close()

if __name__=="__main__":
    app = QApplication(sys.argv)
    w = MyForm()
    w.show()
    sys.exit(app.exec_())
How it works...
In the callFileDialog.pyw file, you can see that the click() event of the Open menu item with objectName, actionOpen, is connected to the openFileDialog method; when the user clicks the Open menu item, the openFileDialog method will be invoked. Similarly, the click() event of the Save menu item with objectName, actionSave, is connected to the saveFileDialog method; when the user clicks the Save menu item, the saveFileDialog method will be invoked.
In the openFileDialog method, the open file dialog is opened by invoking the getOpenFileName method of the QFileDialog class. The open file dialog enables the user to browse the directories and choose the desired file to open. After selecting the file, when the user clicks the OK button, the selected filename is assigned to the fname variable. The file is opened in read-only mode and the file contents are read and assigned to the Text Edit widget; that is, the file content is displayed in the Text Edit widget.
After making the changes in the file contents being displayed in the Text Edit widget, when the user clicks the Save menu item from the File dialog, the saveFileDialog() method will be invoked.
In the saveFileDialog() method, the getSaveFileName() method is invoked on the QFileDialog class, which will open the file save dialog box. You can save the file with the same name at the same location, or with some other name. If the same filename is provided at the same location, then, on clicking the OK button, you get a dialog box asking whether you want to overwrite the original file with the updated content. On supplying the filename, that file is opened in write mode and the content in the Text Edit widget will be read and written into the file. That is, the updated file contents that are available in the Text Edit widget are written into the supplied filename.
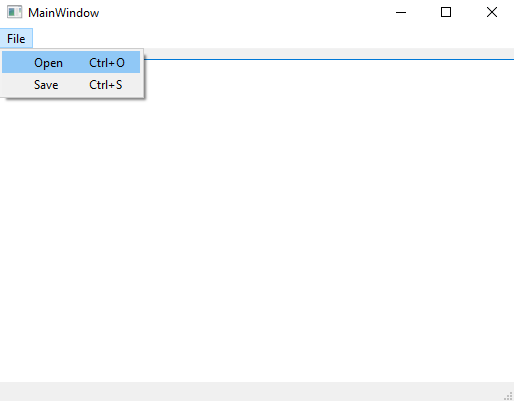
On running the application, you find a File menu with two menu items, Open and Save, as shown in the following screenshot. You can see the shortcuts of the Open and Save menu items too:
On clicking the Open menu item from the File menu, or on pressing the shortcut keys Ctrl + O, you get the Open file dialog, as shown in the following screenshot. You can browse the desired directory and select the file to open. After selecting the file, you need to click the Open button from the dialog:
The content of the selected file will be displayed in the Text Edit box, as shown in the following screenshot:
After making modifications in the file contents shown in the Text Edit box, when the user clicks on the Save menu item from the File menu, the getSaveFileName method will be invoked to display the save file dialog box. Let's save the file with the original name, followed by clicking the Save button, as shown in the following screenshot:
Because the file is being saved with the same name, you will get a dialog box asking for confirmation to replace the original file with the new content, as shown in the following screenshot. Click on Yes to update the file with the new content:
'Qt5 Python GUI Programming Cookbook' 카테고리의 다른 글
| Doing Asynchronous Programming in Python (1) | 2023.02.28 |
|---|---|
| Networking and Managing Large Documents (1) | 2023.02.28 |
| Understanding OOP Concepts (0) | 2023.02.28 |
| Working with Date and Time (0) | 2023.02.28 |
| Event Handling - Signals andSlots (0) | 2023.02.27 |


댓글