import sys
from PyQt5 import QtWidgets as qtw
from PyQt5 import QtGui as qtg
from PyQt5 import QtCore as qtc


class SettingsDialog(qtw.QDialog):
    """Dialog for setting the settings"""

    def __init__(self, settings, parent=None):
        super().__init__(parent, modal=True)
        self.setLayout(qtw.QFormLayout())
        self.settings = settings
        self.layout().addRow(
            qtw.QLabel('<h1>Application Settings</h1>'),
        )
        self.show_warnings_cb = qtw.QCheckBox(
            #checked=settings.get('show_warnings')
            checked=settings.value('show_warnings', type=bool)
        )
        self.layout().addRow("Show Warnings", self.show_warnings_cb)

        self.accept_btn = qtw.QPushButton('Ok', clicked=self.accept)
        self.cancel_btn = qtw.QPushButton('Cancel', clicked=self.reject)
        self.layout().addRow(self.accept_btn, self.cancel_btn)

    def accept(self):
        #self.settings['show_warnings'] = self.show_warnings_cb.isChecked()
        self.settings.setValue(
            'show_warnings',
            self.show_warnings_cb.isChecked()
        )
        print(self.settings.value('show_warnings'))
        super().accept()


class MainWindow(qtw.QMainWindow): # change to mainwindow

    #settings = {'show_warnings': True}
    settings = qtc.QSettings('Alan D Moore', 'text editor')

    def __init__(self):
        """MainWindow constructor.

        This widget will be our main window.
        We'll define all the UI components in here.
        """
        super().__init__()
        # Main UI code goes here

        ######################
        # The central widget #
        ######################
        self.textedit = qtw.QTextEdit()
        self.setCentralWidget(self.textedit)

        #################
        # The Statusbar #
        #################

        # The long way 'round
        #status_bar = qtw.QStatusBar()
        #self.setStatusBar(status_bar)
        #status_bar.showMessage('Welcome to text_editor.py')

        # The short way 'round
        self.statusBar().showMessage('Welcome to text_editor.py')

        # add widgets to statusbar
        charcount_label = qtw.QLabel("chars: 0")
        self.textedit.textChanged.connect(
            lambda: charcount_label.setText(
                "chars: " +
                str(len(self.textedit.toPlainText()))
                )
            )
        self.statusBar().addPermanentWidget(charcount_label)

        ###############j
        # The menubar #
        ###############
        menubar = self.menuBar()

        # add submenus to a menu
        file_menu = menubar.addMenu('File')
        edit_menu = menubar.addMenu('Edit')
        help_menu = menubar.addMenu('Help')

        # add actions
        open_action = file_menu.addAction('Open')
        save_action = file_menu.addAction('Save')

        # add separator
        file_menu.addSeparator()

        # add an action with a callback
        # Errata:  The book contains this line:
        #quit_action = file_menu.addAction('Quit', self.destroy)
        # It should call self.close instead, like so:
        quit_action = file_menu.addAction('Quit', self.close)

        # connect to a Qt Slot
        edit_menu.addAction('Undo', self.textedit.undo)

        # create a QAction manually

        redo_action = qtw.QAction('Redo', self)
        redo_action.triggered.connect(self.textedit.redo)
        edit_menu.addAction(redo_action)

        ############################
        # The Toolbar and QActions #
        ############################

        toolbar = self.addToolBar('File')
        #toolbar.addAction(open_action)
        #toolbar.addAction("Save")

        toolbar.setMovable(False)
        toolbar.setFloatable(False)
        toolbar.setAllowedAreas(
            qtc.Qt.TopToolBarArea |
            qtc.Qt.BottomToolBarArea
        )

        # Add with icons
        open_icon = self.style().standardIcon(qtw.QStyle.SP_DirOpenIcon)
        save_icon = self.style().standardIcon(qtw.QStyle.SP_DriveHDIcon)

        open_action.setIcon(open_icon)
        toolbar.addAction(open_action)
        toolbar.addAction(
            save_icon,
            'Save',
            lambda: self.statusBar().showMessage('File Saved!')
        )

        # create a custom QAction

        help_action = qtw.QAction(
            self.style().standardIcon(qtw.QStyle.SP_DialogHelpButton),
            'Help',
            self,  # important to pass the parent!
            triggered=lambda: self.statusBar().showMessage(
                'Sorry, no help yet!'
            )
        )
        toolbar.addAction(help_action)

        # create a toolbar in another part of the screen:
        toolbar2 = qtw.QToolBar('Edit')
        self.addToolBar(qtc.Qt.RightToolBarArea, toolbar2)
        toolbar2.addAction('Copy', self.textedit.copy)
        toolbar2.addAction('Cut', self.textedit.cut)
        toolbar2.addAction('Paste', self.textedit.paste)


        ################
        # Dock Widgets #
        ################

        dock = qtw.QDockWidget("Replace")
        self.addDockWidget(qtc.Qt.LeftDockWidgetArea, dock)

        # make it not closable
        dock.setFeatures(
            qtw.QDockWidget.DockWidgetMovable |
            qtw.QDockWidget.DockWidgetFloatable
        )

        replace_widget = qtw.QWidget()
        replace_widget.setLayout(qtw.QVBoxLayout())
        dock.setWidget(replace_widget)

        self.search_text_inp = qtw.QLineEdit(placeholderText='search')
        self.replace_text_inp = qtw.QLineEdit(placeholderText='replace')
        search_and_replace_btn = qtw.QPushButton(
            "Search and Replace",
            clicked=self.search_and_replace
            )
        replace_widget.layout().addWidget(self.search_text_inp)
        replace_widget.layout().addWidget(self.replace_text_inp)
        replace_widget.layout().addWidget(search_and_replace_btn)
        replace_widget.layout().addStretch()

        ############################
        # Messageboxes and Dialogs #
        ############################

        # QMessageBox
        help_menu.addAction('About', self.showAboutDialog)

        if self.settings.value('show_warnings', False, type=bool):
            response = qtw.QMessageBox.question(
                self,
                'My Text Editor',
                'This is beta software, do you want to continue?',
                qtw.QMessageBox.Yes | qtw.QMessageBox.Abort
            )
            if response == qtw.QMessageBox.Abort:
                self.close()
                sys.exit()

            # custom message box

            splash_screen = qtw.QMessageBox()
            splash_screen.setWindowTitle('My Text Editor')
            splash_screen.setText('BETA SOFTWARE WARNING!')
            splash_screen.setInformativeText(
                'This is very, very beta, '
                'are you really sure you want to use it?'
            )
            splash_screen.setDetailedText(
                'This editor was written for pedagogical '
                'purposes, and probably is not fit for real work.'
            )
            splash_screen.setWindowModality(qtc.Qt.WindowModal)
            splash_screen.addButton(qtw.QMessageBox.Yes)
            splash_screen.addButton(qtw.QMessageBox.Abort)
            response = splash_screen.exec_()
            if response == qtw.QMessageBox.Abort:
                self.close()
                sys.exit()

        # QFileDialog
        open_action.triggered.connect(self.openFile)
        save_action.triggered.connect(self.saveFile)

        # QFontDialog

        edit_menu.addAction('Set Font…', self.set_font)

        # Custom dialog
        edit_menu.addAction('Settings…', self.show_settings)

        ###################
        # Saving Settings #
        ###################


        # End main UI code
        self.show()

    def search_and_replace(self):
        s_text = self.search_text_inp.text()
        r_text = self.replace_text_inp.text()

        if s_text:
            self.textedit.setText(
                self.textedit.toPlainText().replace(s_text, r_text)
                )

    def showAboutDialog(self):
        qtw.QMessageBox.about(
            self,
            "About text_editor.py",
            "This is a text editor written in PyQt5."
        )

    def openFile(self):
        filename, _ = qtw.QFileDialog.getOpenFileName(
            self,
            "Select a text file to open…",
            qtc.QDir.homePath(),
            'Text Files (*.txt) ;;Python Files (*.py) ;;All Files (*)',
            'Python Files (*.py)',
            qtw.QFileDialog.DontUseNativeDialog |
            qtw.QFileDialog.DontResolveSymlinks
        )
        if filename:
            try:
                with open(filename, 'r') as fh:
                    self.textedit.setText(fh.read())
            except Exception as e:
                # Errata:  Book contains the following line:
                #qtw.QMessageBox.critical(f"Could not load file: {e}")
                # It should read like this:
                qtw.QMessageBox.critical(self, f"Could not load file: {e}")

    def saveFile(self):
        filename, _ = qtw.QFileDialog.getSaveFileName(
            self,
            "Select the file to save to…",
            qtc.QDir.homePath(),
            'Text Files (*.txt) ;;Python Files (*.py) ;;All Files (*)'
        )
        if filename:
            try:
                with open(filename, 'w') as fh:
                    fh.write(self.textedit.toPlainText())
            except Exception as e:
                # Errata:  Book contains this line:
                #qtw.QMessageBox.critical(f"Could not save file: {e}")
                # It should read like this:
                qtw.QMessageBox.critical(self, f"Could not load file: {e}")

    def set_font(self):
        current = self.textedit.currentFont()
        font, accepted = qtw.QFontDialog.getFont(
            current,
            self,
            options=(
                qtw.QFontDialog.DontUseNativeDialog |
                qtw.QFontDialog.MonospacedFonts
            )
        )
        if accepted:
            self.textedit.setCurrentFont(font)

    def show_settings(self):

        settings_dialog = SettingsDialog(self.settings, self)
        settings_dialog.exec()


if __name__ == '__main__':
    app = qtw.QApplication(sys.argv)
    # it's required to save a reference to MainWindow.
    # if it goes out of scope, it will be destroyed.
    mw = MainWindow()
    sys.exit(app.exec())
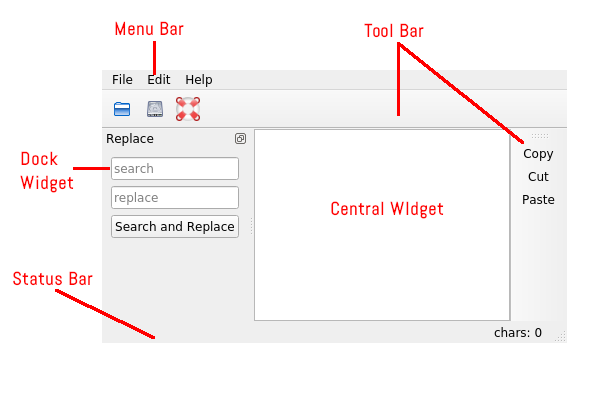
Setting a central widget
self.textedit = qtw.QTextEdit()
self.setCentralWidget(self.textedit)
Adding a status bar
self.statusBar().showMessage('Welcome to text_editor.py')Note that we've added it directly to the status bar, without referencing a layout object; QStatusBar has its own methods for adding or inserting widgets that come in two flavors: regular and permanent. In regular mode, widgets can be covered up if the status bar is sent a long message to display. In permanent mode, they will remain visible. In this case, we used the addPermanentWidget() method to add charcount_label in permanent mode so it won't be covered up by a long text message.
The methods for adding a widget in regular mode are addWidget() and insertWidget(); for permanent mode, use addPermanentWidget() and insertPermanentWidget().
Creating an application menu
The application menu is a crucial feature for most applications, offering access to all the application's functionality in hierarchically organized drop-down menus.
We can create on easily using the QMainWindow.menuBar() method:
menubar = self.menuBar()
The menuBar() method returns a QMenuBar object, and as with statusBar(), this method will give us the window's existing menu if it exists, or simply create a new one if it doesn't.
By default, the menu is blank, but we can add submenus using the menu bar's addMenu() method, like so:
file_menu = menubar.addMenu('File') edit_menu = menubar.addMenu('Edit') help_menu = menubar.addMenu('Help')
addMenu() returns a QMenu object, which represents a drop-down submenu. The string passed into the method will be used to label the menu in the main menu bar.
Certain platforms, such as macOS, will not display empty submenus. See the Menus on macOS section for more information on building menus in macOS.
To populate these menus with items, we need to create some actions. Actions are simply objects of the QAction class that represent things our program can do. To be useful, a QAction object needs at least a name and a callback; they can optionally define a keyboard shortcut and icon for the action.
One way to create actions is to call a QMenu object's addAction() method, like so:
open_action = file_menu.addAction('Open') save_action = file_menu.addAction('Save')
We've created two actions called Open and Save. Neither of them actually does anything, because we haven't assigned callback methods, but if you run your application script, you'll see that the file menu does indeed have two items listed, Open and Save.
To create items that actually do something, we can pass in a second argument containing a Python callable or Qt slot:
quit_action = file_menu.addAction('Quit', self.destroy) edit_menu.addAction('Undo', self.textedit.undo)
For cases where we want more control, it's possible to create a QAction object explicitly and add it to the menu, like so:
redo_action = qtw.QAction('Redo', self) redo_action.triggered.connect(self.textedit.redo) edit_menu.addAction(redo_action)
QAction objects have a triggered signal that must be connected to a callable or slot for
the action to have any effect. This is handled automatically when we use the addAction() method of creating actions, but it must be done manually when creating QAction objects explicitly.
Although not technically required, it's very important to pass in a parent widget when creating a QAction object explicitly. Failing to do so will result in the item not showing up, even when you add it to the menu.
Menus on macOS
QMenuBar wraps the OS's native menu system by default. On macOS, the native menu system has a few peculiarities that you need to be aware of:
- macOS uses a global menu, meaning the menu bar is not part of the application window but is attached to the bar at the top of the desktop. By default, your main window's menu bar will be used as the global menu. If you have an application with multiple main windows and you want them all to use the same menu bar, do not use QMainWindow.menuBar() to create the menu bar. Instead, create a QMenuBar object explicitly and assign it to the main window objects you create using the setMenuBar() method.
- macOS also has a number of default submenus and menu items. To access these items, simply use the same when adding a submenu. When adding a submenu see the Further reading section for more details on macOS menus.
- As mentioned previously, macOS will not display an empty submenu on the global menu.
If you find these issues too problematic for your application, you can always instruct Qt not to use the native menu system, like so:
self.menuBar().setNativeMenuBar(False)
This will place the menu bar in the application window as it is on other platforms and remove the platform-specific issues. However, be aware that this approach breaks the workflow typical to macOS software and users may find it jarring.
More information about Qt menus on macOS can be found at https:// doc.qt.io/qt-5/macos-issues.html#menu-bar.
Adding toolbars
A toolbar is a long row of buttons often used for editing commands or similar actions. Unlike main menus, toolbars are not hierarchical and the buttons are typically only labeled with an icon.
QMainWindow allows us to add multiple toolbars to our application using the addToolBar() method, like so:
toolbar = self.addToolBar('File')
The addToolBar() method creates and returns a QToolBar object. The string passed into the method becomes the toolbar's title.
We can add QAction objects much like we can to a QMenu object:
toolbar.addAction(open_action)
toolbar.addAction("Save")
Just as with a menu, we can add QAction objects or just the information to build an action (title, callback, and other).
Run the application; it should look something like this:

Note that the title of the toolbar is not displayed on it. However, if you right-click the toolbar area, you'll see a pop-up menu containing all the toolbar titles with checkboxes that allow you to show or hide any of the application's toolbars.
By default, toolbars can be torn from the application and left floating or docked to any of the four edges of the application. This can be disabled by setting the movable and
floatable properties to False:
toolbar.setMovable(False) toolbar.setFloatable(False)
You can also restrict the sides of the window to which the bar can be docked by setting its allowedAreas property to a combination of flags from the QtCore.Qt.QToolBarAreas enum.
For example, let's restrict our toolbar to the top and bottom areas only:
toolbar.setAllowedAreas(
qtc.Qt.TopToolBarArea | qtc.Qt.BottomToolBarArea )
Our toolbar currently has text-labeled buttons, but normally a toolbar would have icon- labeled buttons. To show how that works, we'll need some icons.
We can extract some icons from the built-in style, like so:
open_icon = self.style().standardIcon(qtw.QStyle.SP_DirOpenIcon) save_icon = self.style().standardIcon(qtw.QStyle.SP_DriveHDIcon)
Don't worry about how this code works right now; a complete discussion of styles and icons will come along in Chapter 6, Styling Qt Applications. For now, just understand that open_icon and save_icon are QIcon objects, which is how Qt handles icons.
These can be attached to our QAction objects, which can be then attached to the toolbar, like so:
open_action.setIcon(open_icon) toolbar.addAction(open_action)
As you can see, that looks a bit better:

Notice when you run this that the File | Open option in the menu also now has an icon. Because both use the open_action object, any changes we make to that action object will carry to all uses of the object.
Icon objects can be passed into the toolbar's addAction method as the first argument, like so:
toolbar.addAction(
save_icon,
'Save',
lambda: self.statusBar().showMessage('File Saved!') )
This adds a Save action to the toolbar with an icon and a rather useless callback. Notice that this time, the File | Save action in the menu did not get an icon; despite the fact that we used the same label text, calling addAction() with discrete arguments in both places
results in two distinct and unrelated QAction objects.
Finally, just like with the menu, we can create QAction objects explicitly and add them to the toolbar, like so:
help_action = qtw.QAction( self.style().standardIcon(qtw.QStyle.SP_DialogHelpButton), 'Help',
self, # important to pass the parent!
triggered=lambda: self.statusBar().showMessage(
'Sorry, no help yet!'
)
)
toolbar.addAction(help_action)
To synchronize actions across multiple action containers (toolbars, menus, and so on), either explicitly create QAction objects or save the references returned from addAction() to make sure you're adding the same action objects in each case.
We can add as many toolbars as we wish to our application and attach them to whichever side of the application we wish. To specify a side, we have to use an alternative form of addToolBar(), like so:
toolbar2 = qtw.QToolBar('Edit')
toolbar2.addAction('Copy', self.textedit.copy)
toolbar2.addAction('Cut', self.textedit.cut)
toolbar2.addAction('Paste', self.textedit.paste)
self.addToolBar(qtc.Qt.RightToolBarArea, toolbar2)
To use this form of addToolBar(), we have to create the toolbar first then pass it in along with a QtCore.Qt.ToolBarArea constant.
Adding dock widgets
Dock widgets are similar to toolbars, but they sit between the toolbar areas and the central widget and are able to contain any kind of widget.
Adding a dock widget is much like explicitly creating a toolbar:
dock = qtw.QDockWidget("Replace")
self.addDockWidget(qtc.Qt.LeftDockWidgetArea, dock)
Like toolbars, dock widgets by default can be closed, floated, or moved to another side of the application. To change whether a dock widget can be closed, floated, or moved, we have to set its features property to a combination of
QDockWidget.DockWidgetFeatures flag values.
For instance, let's make it so the user cannot close our dock widget, by adding this code:
dock.setFeatures(
qtw.QDockWidget.DockWidgetMovable | qtw.QDockWidget.DockWidgetFloatable )
We've set features to DockWidgetMovable and DockWidgetFloatable. Since DockWidgetClosable is missing here, the user won't be able to close the widget.
The dock widget is designed to hold a single widget that is set using the setWidget() method. As with our main application's centralWidget, we typically will set this to a QWidget containing some kind of form or other GUI.
Let's build a form to place in the dock widget, as follows:
replace_widget = qtw.QWidget() replace_widget.setLayout(qtw.QVBoxLayout()) dock.setWidget(replace_widget)
self.search_text_inp = qtw.QLineEdit(placeholderText='search')
self.replace_text_inp = qtw.QLineEdit(placeholderText='replace') search_and_replace_btn = qtw.QPushButton(
"Search and Replace", clicked=self.search_and_replace
) replace_widget.layout().addWidget(self.search_text_inp) replace_widget.layout().addWidget(self.replace_text_inp) replace_widget.layout().addWidget(search_and_replace_btn) replace_widget.layout().addStretch()
The addStretch() method can be called on a layout to add an expanding QWidget that pushes the other widgets together.
This is a fairly simple form containing two QLineEdit widgets and a button. When the button is clicked, it calls the main window's search_and_replace() method. Let's code that quickly:
def search_and_replace(self):
s_text = self.search_text_inp.text() r_text = self.replace_text_inp.text()
if s_text:
self.textedit.setText(
self.textedit.toPlainText().replace(s_text, r_text) )
This method simply retrieves the contents of the two-line edits; then, if there is content in the first, it replaces all instances of the first text with the second in the text edit's contents.
Run the program at this point and you should see our dock widget on the left side of the application, like so:

Note the icon in the upper right of the dock widget. This allows the user to detach and float the widget outside the application window.
Other QMainWindow features
Although we've covered its main components, the QMainWindow offers many other features and configuration options that you can explore in its documentation at https://doc.qt. io/qt-5/qmainwindow.html. We may touch on some of these in future chapters, as we will make extensive use of QMainWindow from here onward.
Standard dialog boxes
Dialog boxes are commonly required in applications, whether to ask a question, present a form or merely alert the user to some information. Qt provides a wide variety of ready- made dialog boxes for common situations, as well as the capability to define custom dialog boxes of our own. In this section, we'll look at some of the more commonly used dialog box classes and take a stab at designing our own.
QMessageBox
QMessageBox is a simple dialog box used mainly to display short messages or ask yes-or- no questions. The simplest way to use QMessageBox is to take advantage of its convenient static methods, which create and show a dialog box with minimal fuss.
The six static methods are as follows:
| Function | Type | Dialog |
|---|---|---|
| about() | Modeless | Shows an About dialog box for your application with the given text. |
| aboutQt() | Modeless | Shows an About dialog box for Qt. |
| critical() | Modal | Show a critical error message with the provided text. |
| information() | Modal | Show an informational message with the provided text. |
| warning() | Modal | Show a warning message with the provided text. |
| question() | Modal | Asks the user a question. |
| The main difference between most of these boxes are the default icons, the default buttons, and the modality of the dialog. |
Dialog boxes can be either modal or modeless. Modal dialog boxes prevent the user from interacting with any other part of the program and block program execution while displayed, and they can return a value when finished. Modeless dialog boxes do not block execution, but they also do not return a value. In the case of a modal QMessageBox, the return value is an enum constant representing the button pressed.
Let's use the about() method to add an About message to our application. First, we'll create a callback to display the dialog:
def showAboutDialog(self): qtw.QMessageBox.about( self,
"About text_editor.py",
"This is a text editor written in PyQt5." )
The About dialog is modeless, so it's really just a way to display information passively. The arguments are, in order, the dialog's parent widget, the dialog's window title text, and the dialog's main text.
Back in the constructor, let's add a menu action to call this method:
help_menu.addAction('About', self.showAboutDialog)
Modal dialog boxes can be used to retrieve a response from the user. For instance, we could warn the user about the unfinished nature of our editor and see whether they are really intent on using it, like so:
response = qtw.QMessageBox.question( self,
'My Text Editor',
'This is beta software, do you want to continue?' )
if response == qtw.QMessageBox.No: self.close()
sys.exit()
All modal dialog boxes return a Qt constant corresponding to the button the user pushed; by default, question() creates a dialog box with the QMessageBox.Yes and QMessageBox.No button values so we can test the response and react accordingly. The buttons presented can also be overridden by passing in a fourth argument containing multiple buttons combined with the pipe operator.
For example, we can change No to Abort, like so:
response = qtw.QMessageBox.question(
self,
'My Text Editor',
'This is beta software, do you want to continue?', qtw.QMessageBox.Yes | qtw.QMessageBox.Abort )
if response == qtw.QMessageBox.Abort: self.close()
sys.exit()
If the static QMessageBox methods do not provide enough flexibility, you can also explicitly create a QMessageBox object, like so:
splash_screen = qtw.QMessageBox()
splash_screen.setWindowTitle('My Text Editor')
splash_screen.setText('BETA SOFTWARE WARNING!') splash_screen.setInformativeText(
'This is very, very beta, '
'are you really sure you want to use it?' )
splash_screen.setDetailedText(
'This editor was written for pedagogical '
'purposes, and probably is not fit for real work.' ) splash_screen.setWindowModality(qtc.Qt.WindowModal) splash_screen.addButton(qtw.QMessageBox.Yes) splash_screen.addButton(qtw.QMessageBox.Abort)
response = splash_screen.exec()
if response == qtw.QMessageBox.Abort: self.close()
sys.exit()
As you can see, we can set quite a few properties on the message box; these are described here:
| Property | Description |
|---|---|
| windowTitle | The title printed in the taskbar and title bar of the dialog. |
| text | The text displayed in the dialog. |
| informativeText | A longer, explanatory piece of text displayed under the text string often displayed in a smaller or lighter font face. |
| detailedText | Text that will be hidden behind a Show details button and displayed in a scrolling textbox. Useful for debugging or log output. |
| windowModality | Used to set whether the message box is modal or modeless. Requires a QtCore.Qt.WindowModality constant. |
| We can also add any number of buttons to the dialog box using the addButton() method |
and then display the dialog box by calling its exec() method. If we configured the dialog box to be modal, this method will return the constant matching the button that was clicked.
QFileDialog
Applications commonly need to open or save files, and users need an easy way to browse and select those files. Qt provides us with the QFileDialog class to meet this need.
Just as with QMessageBox, the QFileDialog class contains several static methods that display an appropriate modal dialog box and return the value selected by the user.
This table shows the static methods and their intended use:
| Method | Returns | Description |
|---|---|---|
| getExistingDirectory | String | Select an existing directory path. |
| getExistingDirectoryUrl | QUrl | Select an existing directory URL. |
| getOpenFileName | String | Select an existing filename path to open. |
| getOpenFileNames | List | Select multiple existing filename paths to open. |
| getOpenFileUrl | QUrl | Select an existing filename URL. |
| getSaveFileName | String | Select a new or existing filename path to save to. |
| getSaveFileUrl | QUrl | Select a new or existing URL. |
| On platforms that support it, the URL versions of these methods allow for selecting remote files and directories. |
To see how file dialog boxes work, let's create the ability to open a file in our application:
def openFile(self):
filename, _ = qtw.QFileDialog.getOpenFileName()
if filename:
try:
with open(filename, 'r') as fh: self.textedit.setText(fh.read())
except Exception as e:
qtw.QMessageBox.critical(f"Could not load file: {e}")
getOpenFileName() returns a tuple containing the filename selected and the selected file type filter. If the user cancels the dialog, an empty string is returned for the filename, and our method will exit. If we receive a filename, we attempt to open the file and write into it the contents of our textedit widget.
Since we aren't using the second value returned from the method, we're assigning it to the _ (underscore) variable. This is a standard Python convention for naming variables you don't intend to use.
getOpenFileName() has a number of arguments for configuring the dialog, all of which are optional. In order, they are as follows:
- The parent widget
- The caption, used in the window title
- The starting directory, as a path string
- The filters available for the file type filter dropdown
- The default selected filter
- Option flags
For example, let's configure our file dialog:
filename, _ = qtw.QFileDialog.getOpenFileName( self,
"Select a text file to open…", qtc.QDir.homePath(),
'Text Files (*.txt) ;;Python Files (*.py) ;;All Files (*)', 'Python Files (*.py)',
qtw.QFileDialog.DontUseNativeDialog | qtw.QFileDialog.DontResolveSymlinks
)
QDir.homePath() is a static method that returns the user's home directory.
Notice that the filters are specified as a single string; each filter is a description plus a wildcard string in parenthesis, and the filters are separated by double semi-colons. This results in a filter dropdown that looks like this:

Last, of all, we can specify a collection of option flags combined using the pipe operator. In this case, we're telling Qt not to use the native OS file dialog boxes and not to resolve symbolic links (both of which it does by default). See the QFileDialog documentation at https://doc.qt.io/qt-5/qfiledialog.html#Option-enum for a complete list of option
flags.
The save file dialog box works much the same way but provides an interface more appropriate for saving a file. We can implement our saveFile() method as follows:
def saveFile(self):
filename, _ = qtw.QFileDialog.getSaveFileName( self,
"Select the file to save to…", qtc.QDir.homePath(),
'Text Files (*.txt) ;;Python Files (*.py) ;;All Files (*)' )
if filename:
try:
with open(filename, 'w') as fh: fh.write(self.textedit.toPlainText())
except Exception as e:
qtw.QMessageBox.critical(f"Could not save file: {e}")
Other QFileDialog convenience methods work the same way. As with QMessageBox, it's also possible to explicitly create a QFileDialog object, configure its properties manually, and then display it with its exec() method. However, this is rarely necessary as the built- in methods are adequate for most file-selection situations.
Before moving on, don't forget to add actions to call these methods back in the MainWindow constructor:
open_action.triggered.connect(self.openFile) save_action.triggered.connect(self.saveFile)
QFontDialog
Qt provides a number of other convenient selection dialog boxes similar to the QFileDialog; one such dialog box is the QFontDialog, which allows users to select and configure various aspects of a text font.
Like the other dialog box classes, this is most easily used by calling a static method to display the dialog box and return the user's selection, in this case, the getFont() method.
Let's add a callback method to our MainWindow class to set the editor font:
def set_font(self):
current = self.textedit.currentFont()
font, accepted = qtw.QFontDialog.getFont(current, self) if accepted: self.textedit.setCurrentFont(font)
getFont takes the current font as an argument, which allows it to set the selected font to whatever is current (if you neglect to do this, the dialog box will default to the first font listed).
It returns a tuple containing the selected font and a Boolean indicating whether the user clicked OK. The font is returned as a QFont object, which encapsulates not only the font family but also the style, size, effects, and writing system of the font. Our method can pass this object back to the QTextEdit object's setCurrentFont() slot to set its font.
As with QFileDialog, Qt tries to use the operating system's native font dialog box if it has one; otherwise, it will use its own widget. You can force it to use the Qt version of the dialog box by passing in the DontUseNativeDialog option to the options keyword argument, as we've done here:
font, accepted = qtw.QFontDialog.getFont( current,
self,
options=(
qtw.QFontDialog.DontUseNativeDialog | qtw.QFontDialog.MonospacedFonts )
)
We've also passed in an option here to limit the dialog box to mono-spaced fonts. See the Qt documentation on QFontDialog at https://doc.qt.io/qt-5/qfontdialog. html#FontDialogOption-enum for more information about the available options.
Other dialog boxes
Qt contains other dialog box classes for selecting colors, requesting input values, and more. All of these work more or less like the file and font dialog boxes, and they descend from the QDialog class. We can subclass QDialog ourselves to create a custom dialog box.
For example, suppose we want to have a dialog box for entering our settings. We could start building it like this:
class SettingsDialog(qtw.QDialog):
"""Dialog for setting the settings"""
def __init__(self, settings, parent=None): super().__init__(parent, modal=True) self.setLayout(qtw.QFormLayout())
self.settings = settings self.layout().addRow(
qtw.QLabel('
Application Settings
'),
)
self.show_warnings_cb = qtw.QCheckBox( checked=settings.get('show_warnings')
)
self.layout().addRow("Show Warnings", self.show_warnings_cb)
self.accept_btn = qtw.QPushButton('Ok', clicked=self.accept)
self.cancel_btn = qtw.QPushButton('Cancel', clicked=self.reject) self.layout().addRow(self.accept_btn, self.cancel_btn)
This code isn't far removed from pop-up boxes we've made in past chapters using QWidget. However, by using QDialog we get a few things for free, namely these:
- We get accept and reject slots to which we can connect the appropriate buttons. By default, these cause the window to close and emit either an accepted or rejected signal respectively.
- We also get the exec() method that returns a Boolean value indicating whether the dialog box was accepted or rejected.
- We can easily set the dialog box to be modal or modeless, by passing the appropriate values to the super() constructor.
QDialog gives us a lot of flexibility on how to make use of the data entered by the user. We could use a signal to emit the data or override exec() to return the data, for instance.
In this case, since we're passing in a mutable dict object, we'll override accept() to alter that dict object:
def accept(self):
self.settings['show_warnings'] = self.show_warnings_cb.isChecked() super().accept()
Back in the MainWindow class, let's create a property and method to use the new dialog:
class MainWindow(qtw.QMainWindow):
settings = {'show_warnings': True}
def show_settings(self):
settings_dialog = SettingsDialog(self.settings, self) settings_dialog.exec()
Using a QDialog class is as simple as creating an instance of the dialog box class and calling exec(). Since we're editing our settings dict directly, in this case, we don't need to worry about connecting the accepted signal or using the output of exec().
Saving settings with QSettings
Qt는 QtCore.QSettings 클래스를 사용하여이 작업에서 우리를 구출합니다.
QSettings 클래스는 플랫폼에 적합한 방식으로 자동으로 유지되는 간단한 키-값 데이터 저장소입니다. 예를 들어 Windows에서는 설정이 레지스트리 데이터베이스에 저장되고 Linux에서는 ~/.config 아래의 일반 텍스트 구성 파일에 저장됩니다.
텍스트 편집기에서 만든 설정 dict 객체를 QSettings 객체로 바꾸겠습니다.
QSettings 객체를 만들려면 다음과 같이 회사 이름과 응용 프로그램 이름을 전달해야합니다.
class MainWindow(qtw.QMainWindow):
settings = qtc.QSettings('회사명', '작업자')
이러한 문자열은 설정이 저장될 레지스트리 키 또는 파일 경로를 결정합니다.
예를 들어 리눅스에서 이 설정 파일은 ~/.co n fig/회사명/작업자.co nf에 저장됩니다. Windows에서는 HK E Y_CURR E NT_USER\회사명\작업자\의 레지스트리에 저장됩니다.
객체의 value() 메서드를 사용하여 모든 설정의 값을 쿼리할 수 있습니다 . 예를 들어 시작 경고 대화 상자를 s ho w _war n ings 설정을 조건부로 만들 수 있습니다.
if self.settings.value('show_warnings', False, type=bool):
# Warning dialog code follows...
pass
The arguments to value() are the key string, the default value if the key is not found, and the type keyword argument, which tells QSettings how to interpret the saved value. The type argument is crucial; not all platforms can adequately represent all data types in an unambiguous way. Boolean values, for instance, are returned as the strings true and false if the data type is not specified, both of which are True in Python.
Setting the value of a key uses the setValue() method, as shown here in the SettingsDialog.accept() method:
self.settings.setValue( 'show_warnings', self.show_warnings_cb.isChecked())
이러한 값을 디스크에 저장하기 위해 아무 것도 할 필요가 없습니다. Qt 이벤트 루프에 의해 주기적으로 디스크에 자동으로 동기화됩니다. 또한 QSettings 객체가 생성되는 순간 디스크에서 자동으로 읽습니다. 원래 setti n g s dict 를 QSettings 객체로 바꾸기 만하면 파일 I / O 코드를 한 줄도 작성하지 않고도 지속적인 설정을 제공 할 수 있습니다!
Limitations of QSettings
As powerful as they are, QSettings objects can't store just anything. All values in the settings object are stored as QVariant objects, so only objects that can be cast to QVariant can be stored. This encompasses a long list of types, including nearly any Python built-in type and most of the data classes from QtCore. Even function references can be stored (though not the function definitions).
Unfortunately, in the event that you try to store an object that cannot be properly stored, QSettings.setValue() will neither throw an exception or return an error. It will print a warning to the console and store something that will likely not be useful, for example:
app = qtw.QApplication(sys.argv)
s = qtc.QSettings('test')
s.setValue('app', app)
# Prints: QVariant::save: unable to save type 'QObject*' (type id: 39).
일반적으로 데이터를 명확하게 나타내는 개체를 저장하는 경우 문제가 없어야 합니다.
QSettings 객체의 또 다른 주요 한계 는 부울 값에서 보았 듯이 일부 저장된 객체의 데이터 유형을 자동으로 식별 할 수 없다는 것입니다. 이러한 이유로 문자열 값이 아닌 것을 처리할 때 type 인수를 전달하는 것이 중요합니다.
Summary
In this chapter, you learned about PyQt classes that help construct complete applications. You learned about the QMainWindow class, its menus, status bar, toolbars, and dock widgets. You also learned about standard dialog boxes and message boxes derived from QDialog, and how to store application settings with QSettings.
In the next chapter, we'll learn about the model-view classes in Qt, which will help us separate our concerns and create more robust application designs.
Questions
Try these questions to test your knowledge from this chapter:
- You want to use QMainWindow with the calendar_app.py script from Chapter 3, Handling Events with Signals and Slots. How would you go about converting it?
- You're working on an app and have added the submenu names to the menu bar but not populated any of them with items. Your coworker says that none of the menu names are appearing on his desktop when they test it. Your code looks correct; what is probably going on here?
- You're developing a code editor and want to create a sidebar panel for interacting with a debugger. Which QMainWindow feature would be most appropriate for this task?
- The following code isn't working correctly; it proceeds no matter what is clicked. Why doesn't it work, and how do you fix it?
answer = qtw.QMessageBox.question(
None, 'Continue?', 'Run this program?') if not answer:
sys.exit()
- You're building a custom dialog box by subclassing QDialog. You need to get information entered into the dialog box back to the main window object. Which of these approaches will not work?
- Pass in a mutable object and use the dialog's accept() method to alter its values.
- Override the objects accept() method and have it return a dict of
the entered values.
- Override the dialog's accepted signal with one that passes along a dict of the entered values. Connect this signal to a callback in your main window class.
- You're writing a photo editor called SuperPhoto on Linux. You've written the code and saved the user settings, but looking in ~/.config/ you can't find SuperPhoto.conf. Look at the code and determine what went wrong:
settings = qtc.QSettings()
settings.setValue('config_file', 'SuperPhoto.conf') settings.setValue('default_color', QColor('black')) settings.sync()
- You're saving preferences from a settings dialog, but for some reason, the settings being saved are coming back very strangely. What is wrong here?
settings = qtc.QSettings('My Company', 'SuperPhoto') settings.setValue('Default Name', dialog.default_name_edit.text) settings.setValue('Use GPS', dialog.gps_checkbox.isChecked) settings.setValue('Default Color', dialog.color_picker.color)
Further reading
For further information, please refer to the following:
- Qt's QMainWindow documentation can be found at https://doc.qt.io/qt-5/ qmainwindow.html.
- Examples of using QMainWindow can be found at https://github.com/pyqt/ examples/tree/master/mainwindows.
- Apple's Human Interface Guidelines for macOS include guidance on how to structure the application menus. These can be found at https://developer. apple.com/design/human-interface-guidelines/macos/menus/menu-anatomy/.
- Microsoft offers guidance for designing menus for Windows applications at https://docs.microsoft.com/en-us/windows/desktop/uxguide/cmd-menus.
- PyQt offers some examples of dialog box usage at https://github.com/pyqt/ examples/tree/master/dialogs.
- QMainWindow can also be used to create Multiple Document Interfaces (MDIs). For more information on how to build an MDI application, see https://www. pythonstudio.us/pyqt-programming/multiple-document-interface-mdi.html
and the example code at https://doc.qt.io/qt-5/qtwidgets-mainwindows- mdi-example.html.
[ 107 ]  )
)
'Mastering-GUI-Programming' 카테고리의 다른 글
| Styling Qt Applications (0) | 2023.03.08 |
|---|---|
| Handling Events with Signals and Slots (0) | 2023.03.08 |
| Building Forms with QtWidgets (0) | 2023.03.08 |
| Deep Dive into PyQt (0) | 2023.03.08 |


댓글